An Overview of the Freeze Panes Feature in Excel
Working with large datasets in Excel can be challenging, especially when it comes to analyzing and navigating through rows and columns of information. Fortunately, Excel provides a powerful feature called Freeze Panes that allows you to lock certain rows or columns in place while scrolling, ensuring important information remains visible at all times. In this article, I will show you how to use the Freeze Panes feature in Excel and how it can enhance your data analysis and navigation experience.
What is Freeze Panes in Excel?
The Freeze Panes feature in Excel enables you to keep specific rows or columns visible while scrolling through large datasets. By freezing certain areas of your worksheet, you can ensure that important headings or data remain in view, regardless of how far you scroll.
How to Freeze Rows or Columns in Excel
To freeze rows or columns, follow these steps:
- Select the row below the row(s) you want to freeze or the column to the right of the column(s) you want to freeze.
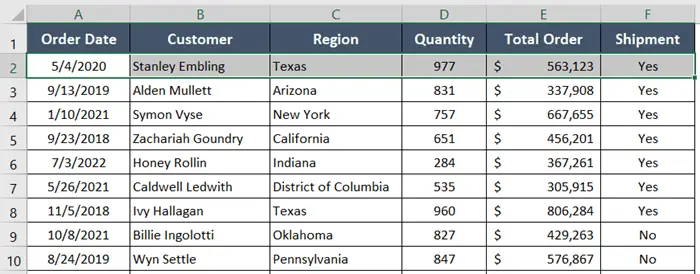
Here, I want to freeze row 1 to freeze the headings. So I selected row 2.
- Navigate to the View tab in the Excel ribbon.
- Click on the Freeze Panes dropdown menu.
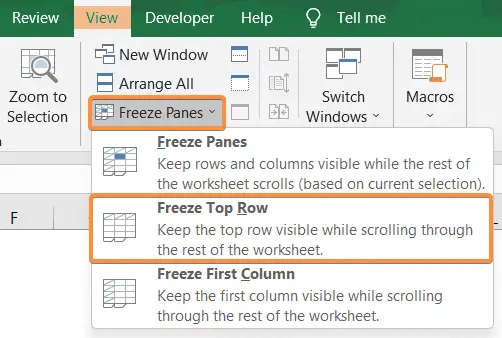
- Choose either Freeze Panes to freeze both rows and columns, Freeze Top Row to freeze the top row, or Freeze First Column to freeze the leftmost column.
I selected Freeze Top Row.
- The selected rows or columns will be frozen, and you can now scroll through the rest of the worksheet while the frozen area remains fixed.
Shortcut Keys to Freeze Rows or Columns in Excel
- Press ALT + W + F + R to freeze the top row.
- Press ALT + W + F + C to freeze the top column.
- Press ALT + W + F + F to freeze the top row and top column.
- Press ALT + W + F + S to freeze both rows and columns at the same time.
Select a cell that is in the row just below the row you want to freeze and the column just to the right of the column you want to freeze.
How to Unfreeze Panes in Excel
To remove frozen rows or columns, follow these steps:
- Navigate to the View tab in the Excel ribbon.
- Click on the Freeze Panes dropdown menu.
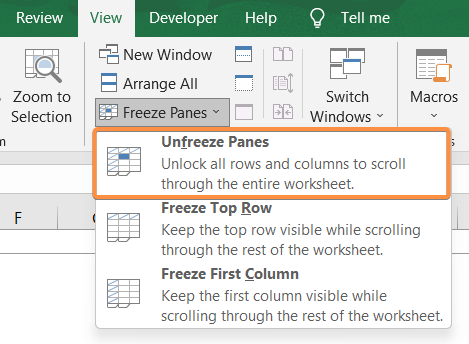
- Select Unfreeze Panes.

The frozen rows or columns will be unfrozen, and you can scroll freely through the entire worksheet.
Benefits of Using Freeze Panes
The Freeze Panes feature offers several advantages in data analysis and navigation. Let’s have a look:
- Easy Data Comparison: By freezing column headings, you can compare data in different parts of your worksheet without losing context.
- Enhanced Focus: Freezing rows or columns allows you to concentrate on specific data while scrolling through large datasets, reducing distractions.
- Improved Navigation: With Freeze Panes, you can easily navigate through extensive worksheets without losing track of essential information.
- Efficient Data Entry: When entering data in lengthy tables, freezing column headings ensures you can reference the appropriate column labels while inputting data.
- Better Printouts: Freeze Panes can also be useful for creating printouts with column or row headings fixed in place, ensuring clarity and readability.
Splitting Panes into Multiple Panes in Excel
In addition to freezing rows or columns, Excel offers a Split option that allows you to divide the worksheet into multiple panes, each with its own scrollable area. Splitting panes can be useful when comparing different parts of the worksheet simultaneously or when viewing distant areas of the data side by side.
Customizing Freeze Panes in Excel
Excel provides flexibility in customizing Freeze Panes to suit your specific needs:
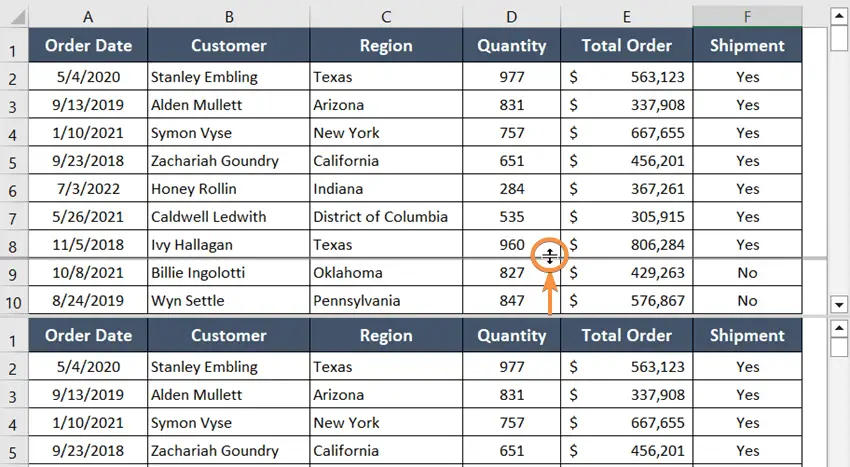
- Splitting Panes: You can split panes vertically or horizontally by dragging the split bars at the top or left side of the worksheet.
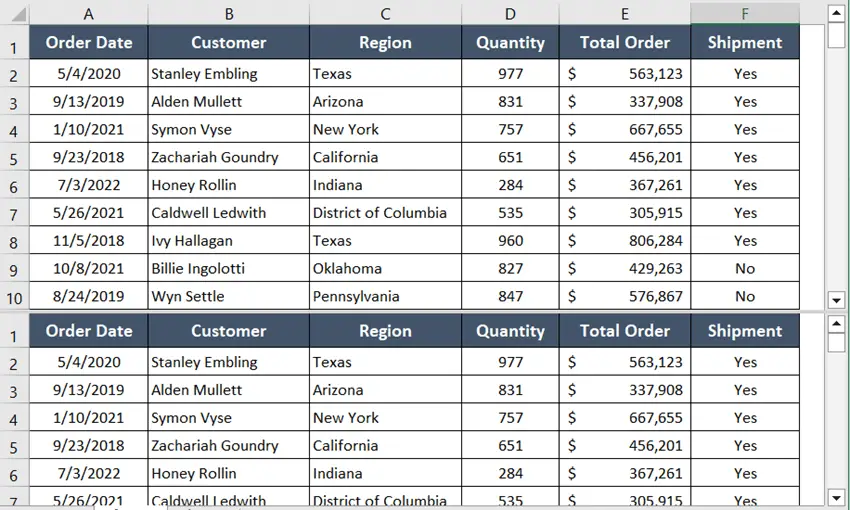
 As I applied the Split Pane option, my dataset was divided into two portions. Notice in the image below that each portion has its own scroll bar.
- Adjusting Panes: If you need to change the location of the Split Panes, simply click and drag the dividing line to a new position.
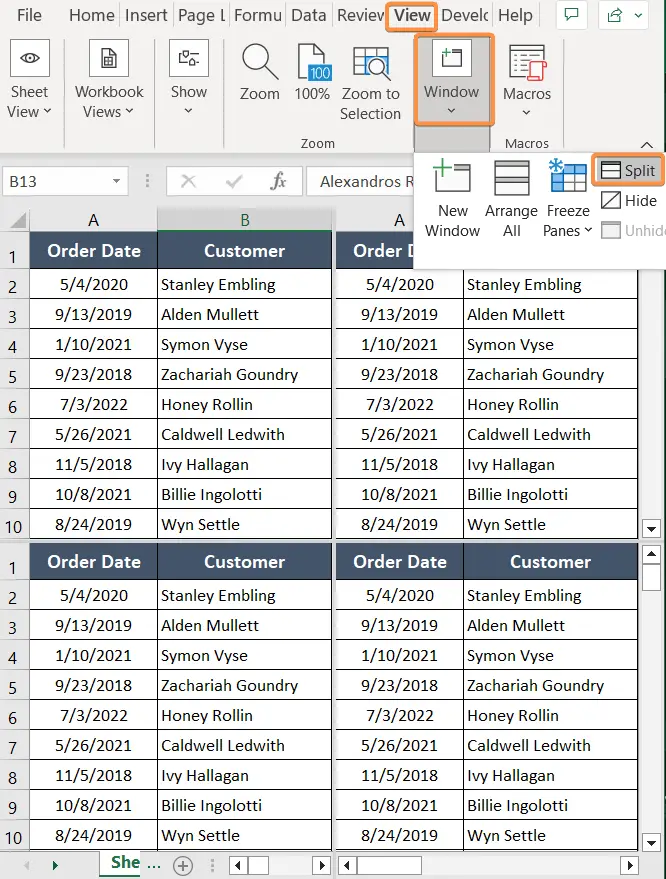
- Split into Quadrants: To split the Excel sheet into four panes, go to View > Window > Split.
The following image shows that my dataset is split into four separate parts.
Conclusion
Excel’s Freeze Panes feature is a valuable tool for analyzing and navigating large datasets with ease. By selectively freezing rows or columns, you can keep essential information visible while scrolling through extensive worksheets. This improves data analysis, enhances focus, and simplifies navigation, leading to increased efficiency and productivity. Incorporate Freeze Panes into your Excel workflows, and unlock the full potential of your data analysis capabilities.
Excel Glossary | Autosum | Fill Handle | Conditional Formatting | Merge & Center | Wrap Text | Flash Fill | Find & Replace | Format Painter | Format Cells | Sort & Filter | Advanced Filter | Text to Columns | Go To Special | Calculation Options | Name Manager | Excel Table | Slicer | Power Query | Add-ins
