Mastering the Fill Handle: Excel’s Secret Weapon
What is the Fill Handle in Excel?
The Fill Handle is a small square located in the bottom right corner of a selected cell in Excel. It is used to quickly fill a series of cells with data or formulas. This can be a huge time-saver when working with large amounts of data or when creating repetitive formulas.
What Does the Fill Handle Look Like?
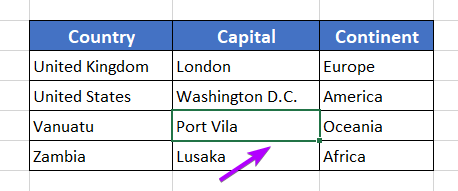
This is what the Fill Handle looks like when you select a single cell.
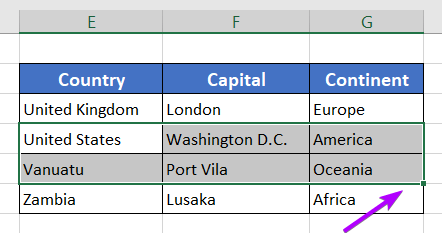
When you select a range of cells, it looks like this:
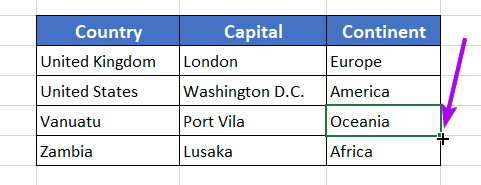
If you hover the cursor on the bottom-right corner of the Fill Handle, the cursor changes to a black plus-like icon.
Characteristics of the Fill Handle Tool in Excel
After selecting a single cell or a cell range, you will either double-click on the Fill Handle or simply drag it down. Based on types of the data, the Fill Handle changes its role.
1. Fill Handle Fills Down Formulas with Changing Cell References
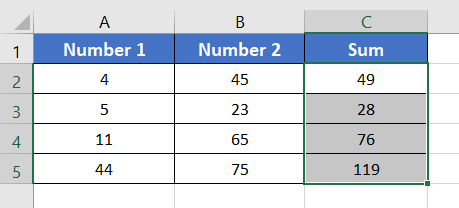
Suppose you have a formula in a cell and you drag down the Fill Handle.
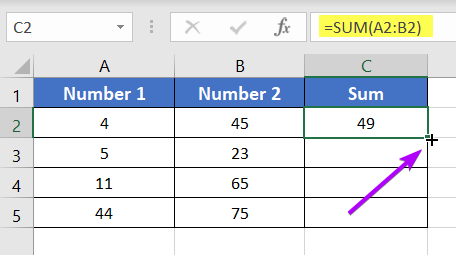
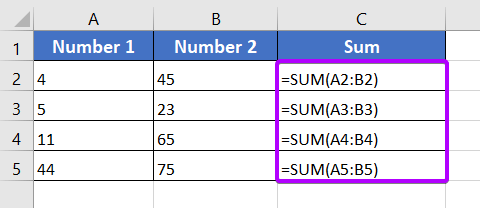
In such a case, the Fill Handle will copy down the formula with changing cell reference. If you don’t want the Fill Handle to change the cell reference, you must use an Absolute Cell Reference.
To see the formulas, select the Formulas menu > Formula Auditing group > Show Formulas command.
2. Fill Handle Auto-Fills Pattern
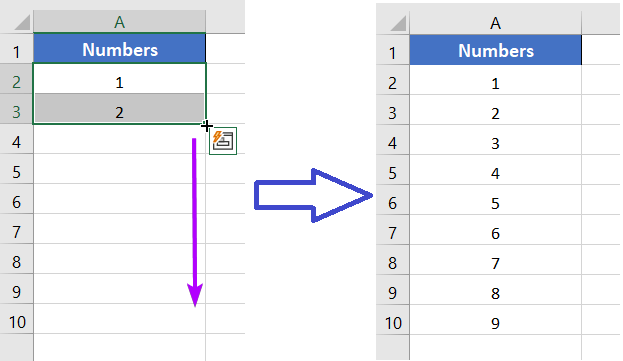
The Fill Handle can understand the patterns in a range of cells. However, if you use the Fill Handle to fill down the rest of the cells, it will autofill the cells as per the pattern.
In the following scenario, the Fill Handle auto-fills the range A4:A10 by numbers with an increment of 1.
You can follow the same way to auto-fill dates, times, years, etc.
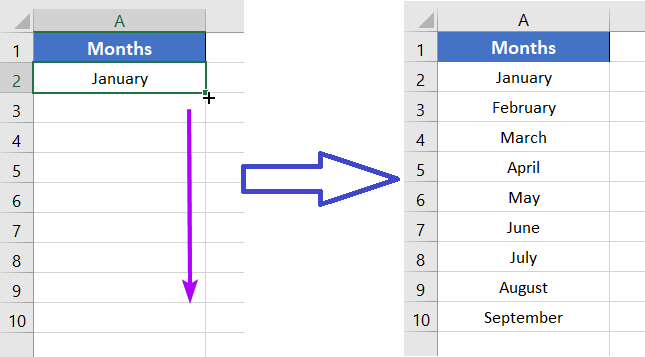
In the case of months or weekdays, you don’t need to insert a pattern to autofill. Just insert a month or day in a cell. Then use the Fill Handle to complete the list.
3. Fill Handle Copies Non-Recognizable Patterns
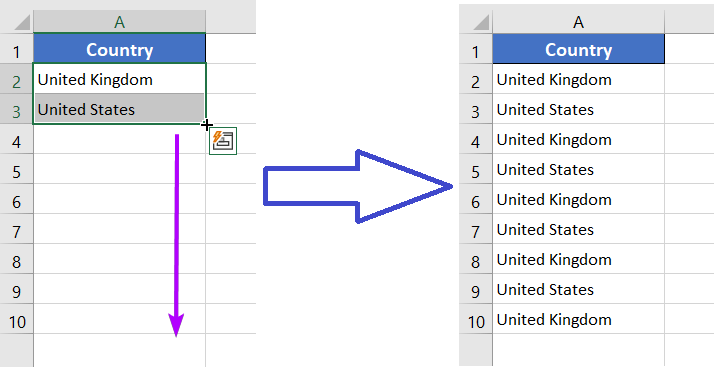
When the Fill Handle doesn’t get any pattern, it simply copies the contents of the selected cells.
Basic Usage of the Fill Handle Tool in Excel
A. Filling Numbers or Dates
You can use the Fill Handle to quickly generate a sequence of numbers or dates. Here’s how:
- Enter the starting number or date in a cell.
- Click and drag the Fill Handle down or to the right to create a series of numbers or dates.
B. Filling Text or Custom Lists
Excel allows you to create custom lists and autofill them using the Fill Handle:
- Enter the first item of your list in a cell.
- Select that cell and drag the Fill Handle in the direction you want to fill the list.
C. Autofilling Formulas
One of the most powerful applications of the Fill Handle is auto-filling formulas. Here’s how to use it:
- Enter a formula in a cell.
- Select the cell, click on the Fill Handle, and drag it to autofill the formula into adjacent cells.
Advanced Usage of the Fill Handle Tool in Excel
A. Filling with Incremental Patterns
You can create patterns with increments using the Fill Handle. For example, if you have a sequence like 2, 4, 6, 8, and you want to continue it:
- Enter the first two values in adjacent cells.
- Select both cells and drag the Fill Handle to extend the pattern.
B. Filling with Days of the Week
You can use the Fill Handle to generate a series of days of the week:
- Enter the first day (e.g., “Monday”) in a cell.
- Drag the Fill Handle in the direction you want to fill the days of the week.
C. Filling Dates with Custom Intervals
If you need to fill dates with custom intervals, such as every three days:
- Enter the first date in a cell.
- Create a custom pattern by entering the first two dates in adjacent cells.
- Select both cells and drag the Fill Handle to autofill the custom pattern.
Time-Saving Tips for Using the Fill Handle in Excel
- Custom Lists: You can create custom lists in Excel by going to File > Options > Advanced > Edit Custom Lists. This allows you to use the Fill Handle for frequently used sequences or lists.
- Using the Right Mouse Button: When dragging the Fill Handle, you can use the right mouse button instead of the left. This brings up options for how you want to fill the data.
- AutoFill Options: After using the Fill Handle, Excel provides AutoFill options like “Fill Series,” “Fill Formatting Only,” and more, which can be very handy.
- Excel Tables: When working with Excel tables, the Fill Handle adjusts automatically as you add or remove data, saving you from manual adjustments.
Conclusion
The Fill Handle is a powerful tool for Excel users that can save you time and effort when working with data and formulas. By understanding how to use it to copy formulas and data, as well as its other functions, you can become a more efficient and effective Excel user. So next time you’re working on a spreadsheet, remember to give the Fill Handle a try and see how it can make your work easier.
Frequently Asked Questions
Where is the Fill Handle in Excel?
The Fill Handle in Excel is located in the bottom-right corner of a selected cell. You can click and drag it to fill adjacent cells with data, numbers, dates, or formulas. It’s a time-saving feature for extending series or auto-filling in Excel.
Does Fill Handle copy formatting?
No. By default, the Fill Handle in Excel does not copy formatting. It is primarily used to copy data, numbers, dates, or formulas, and does not replicate the formatting of the source cell. When you drag the Fill Handle to autofill or copy a sequence of values or formulas to adjacent cells, it will only populate the content or the formula itself, not the formatting attributes like font style, color, borders, or cell shading.
How to enable Fill Handle in Excel?
To enable the Fill Handle in Excel:
- Open Excel.
- Click “File” (or the Office button in older versions).
- Choose “Options.”
- Access “Advanced” in the Excel Options dialog.
- In the “Editing Options” section, ensure “Enable fill handle and cell drag-and-drop” is checked.
- Click “OK” to save your changes.
The Fill Handle is now enabled for auto-filling data, formulas, or sequences in Excel.
What is Autofill and Fill Handle?
Autofill and Fill Handle are two features in Microsoft Excel that can help you save time and effort when you’re working with spreadsheets. Autofill is a tool that automatically fills cells with data, like sequences or formulas, based on patterns or existing data. Fill Handle is a special tool inside Excel that lets you drag and drop data or patterns like numbers, dates, and formulas into adjacent cells. You can use it to extend a series, fill days of the week or months with formulas, or copy formulas.
Why is the Excel Fill Handle not working?
If the Excel Fill Handle is not working:
- Check for locked cells and unlock them.
- Verify and select the desired AutoFill option after dragging the Fill Handle.
- Ensure consistent data formats in the cells you’re auto-filling.
- Set Excel’s calculation settings to Automatic for formula autofill.
- Ensure the worksheet is not protected or unprotect it.
- Consider using a newer Excel version if you face compatibility issues.
- Restart Excel or your computer for software or system-related issues.
- Check for corrupted workbooks; try opening another Excel file.
- Disable any problematic add-ins or extensions.
- Verify that your mouse or trackpad is functioning correctly.
- Keep Excel updated to access bug fixes and improvements.
- For large and complex files, consider optimizing or splitting the workbook.
If the issue persists, seek technical support or expert advice for a more specific resolution.
Excel Glossary | Autosum | Conditional Formatting | Merge & Center | Wrap Text | Flash Fill | Find & Replace | Freeze Panes | Format Painter | Format Cells | Sort & Filter | Advanced Filter | Text to Columns | Go To Special | Calculation Options | Name Manager | Excel Table | Slicer | Power Query | Add-ins