6 Ways to Remove Single Quotes in Excel
People may add single quotation marks or apostrophes (‘) to Excel cells for various reasons. One common reason is to treat the value in the cell as text instead of a number or a date. But after adding the single quotation marks (‘), it can be harder to work with the data. Thankfully, there are ways to remove single quotes from Excel cells to ensure smooth data handling. In this article, I will discuss 6 easy ways to remove single quotes in Excel and make sure your data is ready for analysis.
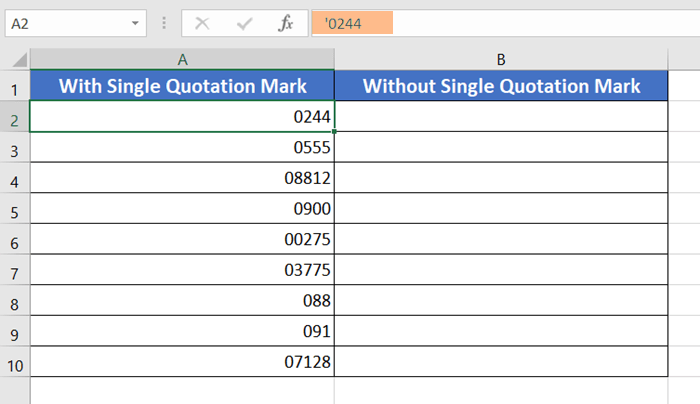
In the following dataset, I have 2 columns (With Single Quotation Mark and Without Single Quotation Mark). It is important to note that, the single quotation mark (‘) is present in all cells of the column With Single Quotation Mark, but they are apparently invisible. But, when I select any of these cells and check at the Formula Bar, it is visible there.
Now, I will show how you can remove single quotes (‘) from the cells in Excel.
Remove Single Quotes in Excel by Using Text to Columns Feature
The fastest way to remove the single quotes (‘) is by using the Text to Columns feature. You can do it within 5 effortless steps.
To remove the single quotes in Excel using the Text to Column feature, follow these steps:
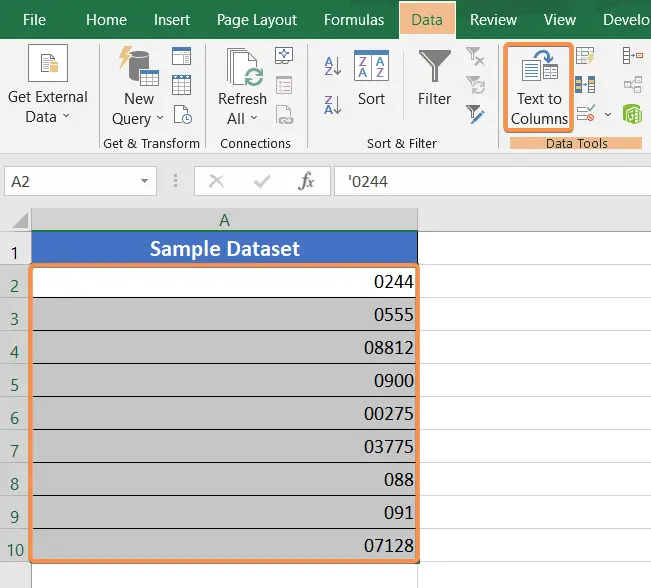
- Select your target cell range, cell A2:A10.
- Go to the Data tab.
- From the Data Tools group, click on the Text to Columns option.

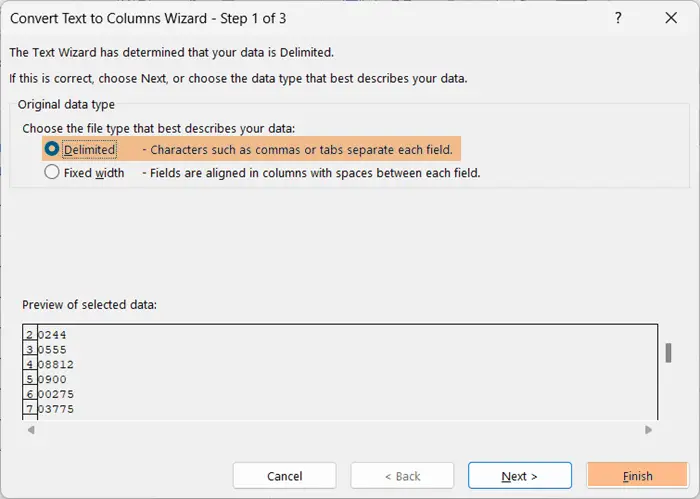
- Select Delimited as the file type on the Convert Text to Columns Wizard.
- Lastly, hit the Finish button.

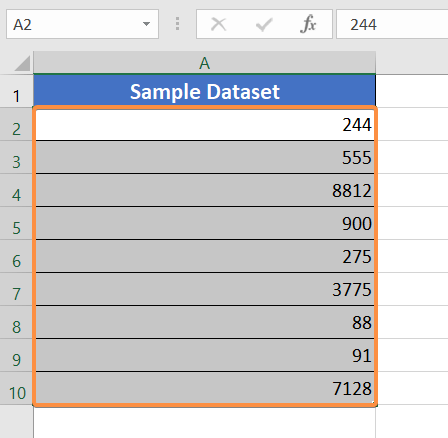
Now, the leading zero of the number trail and the single quotes (‘) have gone.
Remove Single Quotes in Excel Using the SUBSTITUTE Function
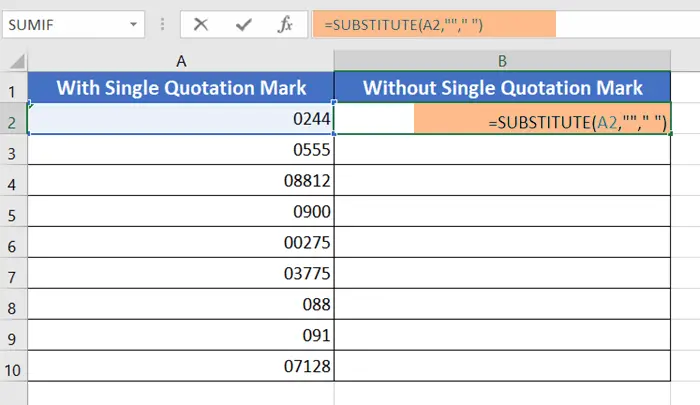
Another fastest way to remove the single quotes (‘) is by using the SUBSTITUTE function. What I am going to do is, as an alternative to the apostrophes, use a blank space.
Syntax
=SUBSTITUTE(text, old_text, new_text, [instance_num])Formula
=SUBSTITUTE(A2,” ’ ”, “ “)Formula Explanation
- A2 is the text. It is the cell reference that you want to change or modify.
- “ ‘ ” is the old_text. It is the cell reference that you want to change or modify.
- “ “ is the new_text. It is the mention of the new characters that you want to replace the old_text with.
- [instance_num] is an optional argument. It defines the occurrence of the old_text that you want to replace. If you omit this argument, all instances of old_text will be replaced.
To remove the single quotation mark in Excel with SUBSTITUTE function, follow these steps:
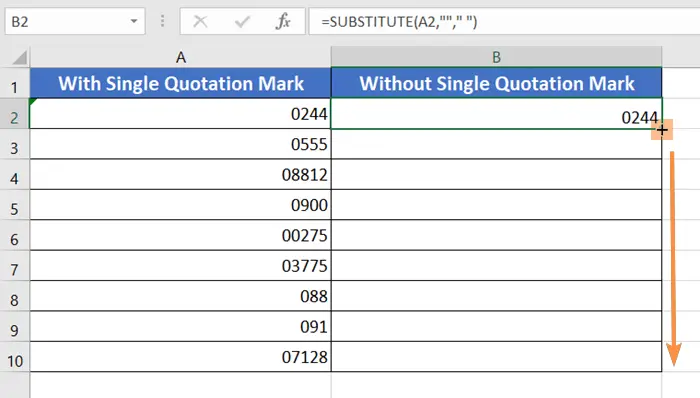
- At first, place an empty cell (B2) beside the original column.
- Type this formula in cell B2: =SUBSTITUTE(A2,” ’ ”, “ “)
- Press ENTER.

- Now, copy down the formula using the Fill Handle icon in the cell range B2:B10.

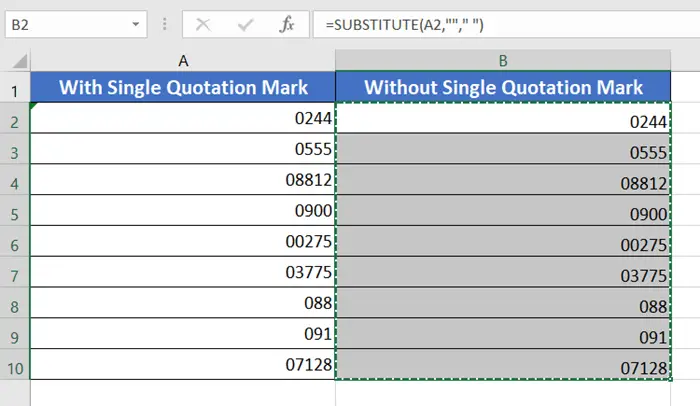
- Next, select the cell range B2:B10.
- Press CTRL+C to copy the cell range B2:B10.

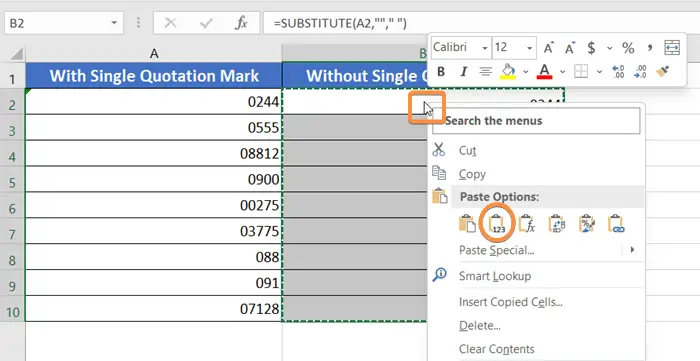
- Then, right-click on the top cell B2.
- Lastly, from the context menu, select the Paste (Values) option.

If you want to display the leading zeroes of your inputs, you can use this method. This way, the leading zeroes do not vanish from the results.
- 3 Ways to Remove Specific Characters in Excel
- 5 Ways to Remove Blank Characters in Excel
- 5 Ways to Remove Numeric Characters from Cells in Excel
Remove Single Quotes in Excel by Multiplying the Cells with 1
Another amazing technique to remove the single quotes (‘) is multiplying your target cell range with 1 and after that, returning them as values in the cell addresses.
To remove the single quotation mark in Excel by multiplying the cells with 1, follow this step-by-step guide:
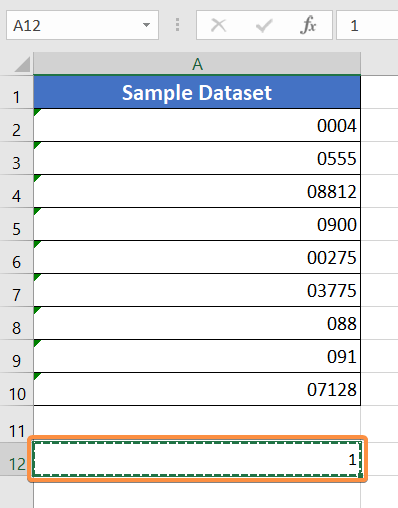
- Type 1 in a separate cell (A12) beside the dataset.
- Copy cell A12.

- Select your target cell range A2:A10.
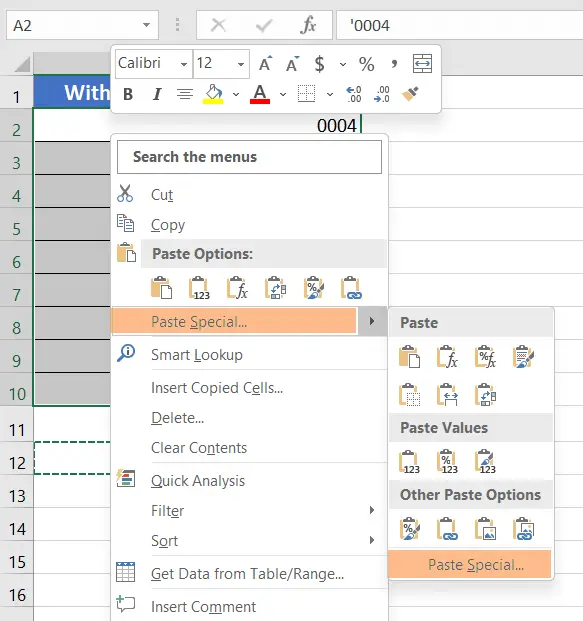
- Right-click on the top cell A2.
- Select the Paste Special option from context menu.

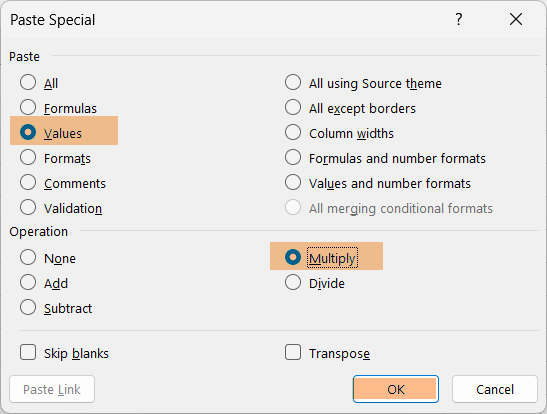
- Now, select Values as the Paste option and select Multiply as the Operation option.
- Lastly, Click OK.

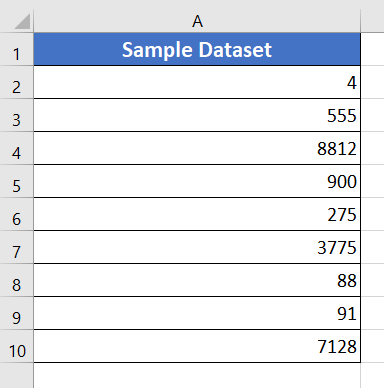
You will see the apostrophes are no longer present in the dataset.
Use Text Format Feature to Remove Single Quotes in Excel
You can also format the cells in the Text Format in Excel to remove single quotes.
Follow these steps to use the Text Format to Remove Single Quotes in Excel:
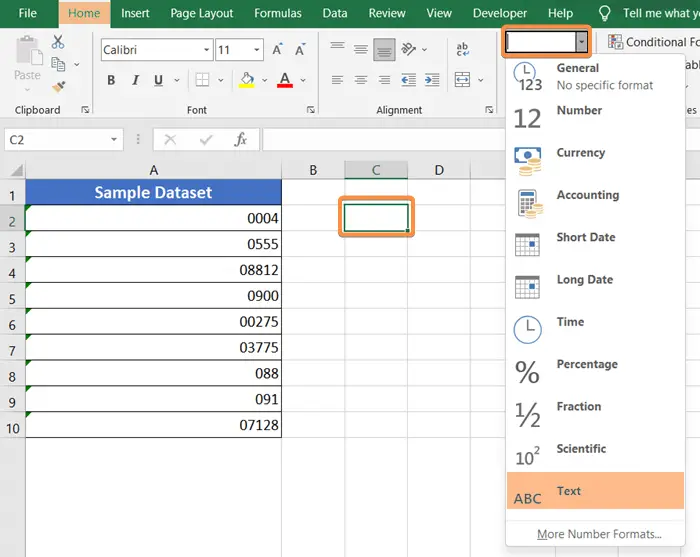
- Take a spare cell (C2) beside your dataset.
- Go to the Home tab.
- Now, from the Number group, click on the Number Format drop-down menu.
- From the list, select Text.

- Now copy cell C2 by pressing the CTRL+C key.
- After that, select the cell range A2:A10.
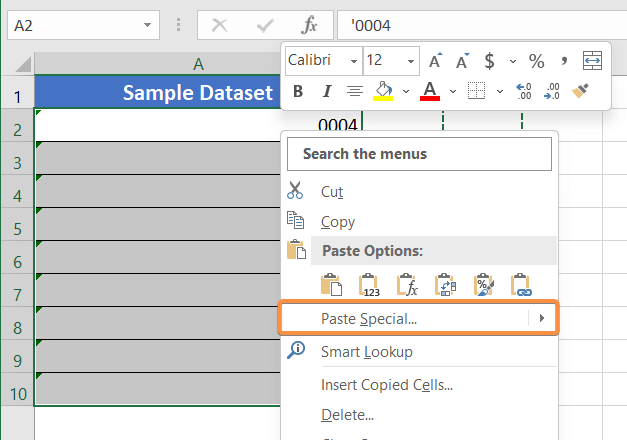
- Then, on the top cell A2, right-click to open the context menu.
- Go to Paste Special from the context menu.
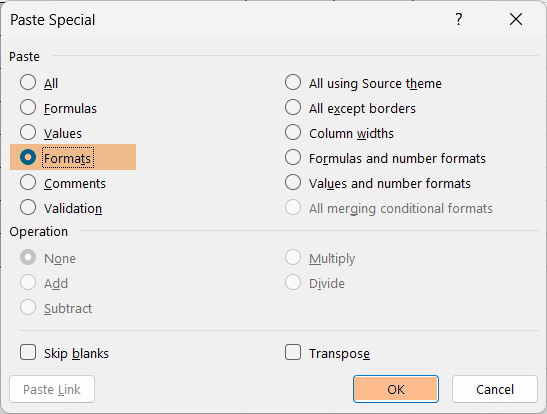
 The Paste Special window will appear instantly.
 - Now select Formats as the Paste option.
- Lastly, click OK to apply it.
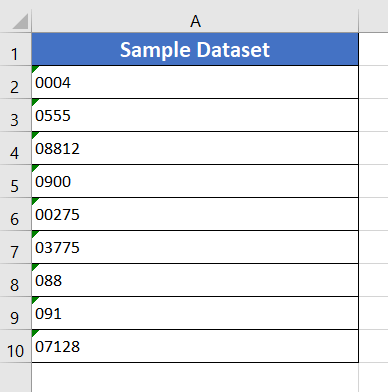
 The cells are now in text format and do not have single quotes anymore.
However, if you are worried about the green little triangle signs, these are alert signs.
Green Error Signs
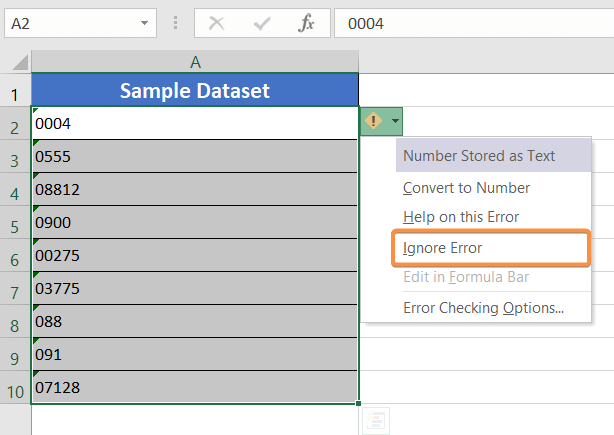
Green error signs appear to alert you to certain actions. But they don’t interfere with any functionality on the spreadsheet. When numbers are saved as text in a cell, Excel often detects this and displays an alert next to the cell. When you see a green error sign in a cell, you can click on the cell to see a drop-down menu that provides information about the error and suggests potential solutions.
You can remove the error signs by following these two steps:
- Click on the yellow alert button located in the top-left corner of the top cell.
- Then select Ignore Error from the drop-down menu.
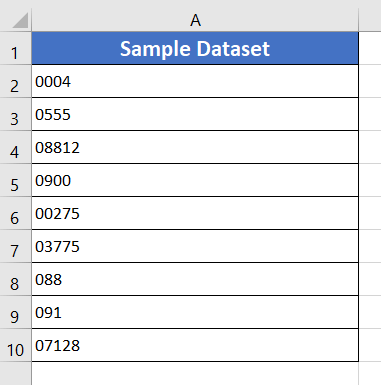
By turning the cells into text format, the numbers have shifted on the left side of the cells. If you wish you can move them to the right side again.
- 7+ Methods to Remove Characters from Left in Excel
- 5 Approaches to Remove Characters from the Right in Excel
- 3+ Ways to Remove Dashes in Excel
Use VBA Codes to Remove Single Quotes in Excel
If you want to use VBA codes to remove the single quotes (‘) from your dataset in Excel, you can use this specific code. Just Copy the code from here and insert the code inside a new Module in your Visual Basic Editor. Finally, Run it. Done!
Sub RemoveSingleQuotes()

    Dim cell As Range
    For Each cell In Selection.Cells
        cell.Value = Replace(cell.Value, "'", "")
    Next cell

End Sub
To remove single quote from the cells of Excel using VBA code, you can follow these steps:
- Press ALT + F11 to open the Visual Basic Editor.
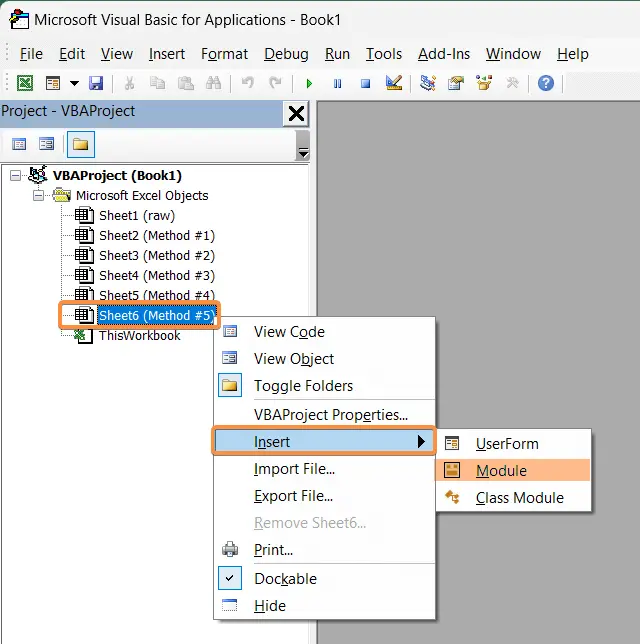
- Now right-click on the sheet name.
- Now, choose Insert > Module.
 This will create a new Module.
 - Copy the VBA code mentioned above in this article.
- Now paste it into the Module.
- Go back to your sheet.
- Select the cells containing the single quotes you want to remove.
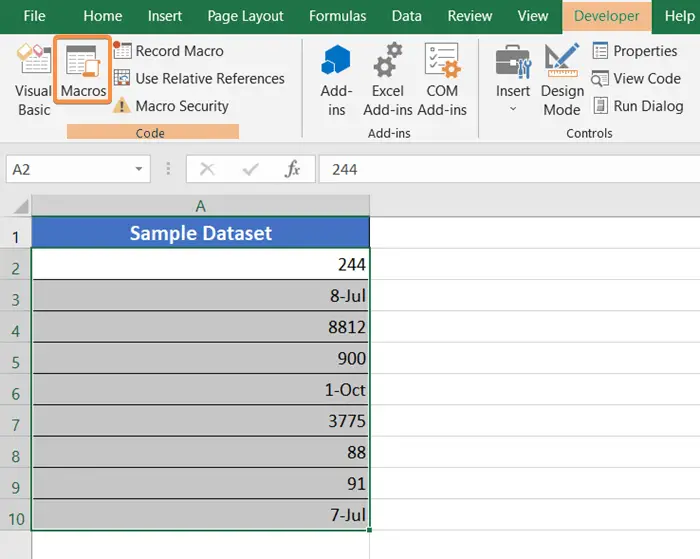
- Then, click the Macros button on the Developer tab.
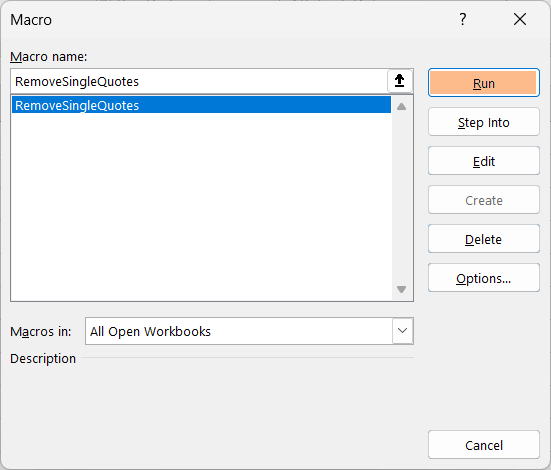
 The Macro window will pop up immediately.
 - Now, select the RemoveSingleQuotes macro.
- Finally, click Run.

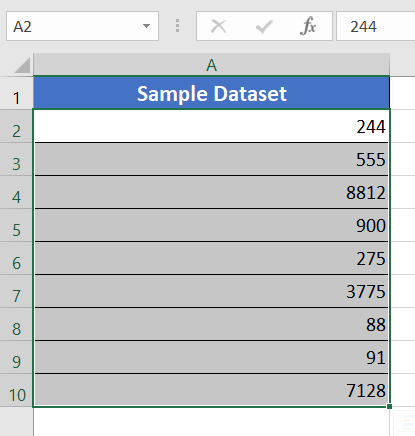
The VBA has perfectly done the job of removing single quotes from the cells in Excel.
Use Flash Fill Feature to Remove Single Quotes in Excel
The technique I am going to show you is using the Flash Fill feature to remove the apostrophes (‘) from the Excel sheets. Flash Fill helps to automatically fill values based on patterns it recognizes in the data. For that reason, you have to manually input the first cell.
Follow these steps to use the Flash Fill feature to remove single quotation mark in Excel:
- On cell B2, type the raw content of cell A2 without the single quotation mark (‘).

- Go to the Data tab.
- Lastly, from the Data Tools group, hit the Flash Fill icon.

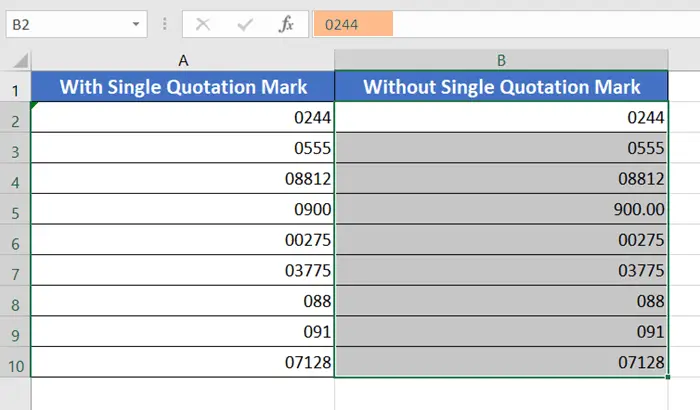
Note: Sometimes you may not see the single quotes visible before raw data of cell inputs, but they are actually present. You can assure about the presence of the single quotation mark just by looking at the formula bar. In cell B2, I wrote the same input as cell A2, just without a single quote.
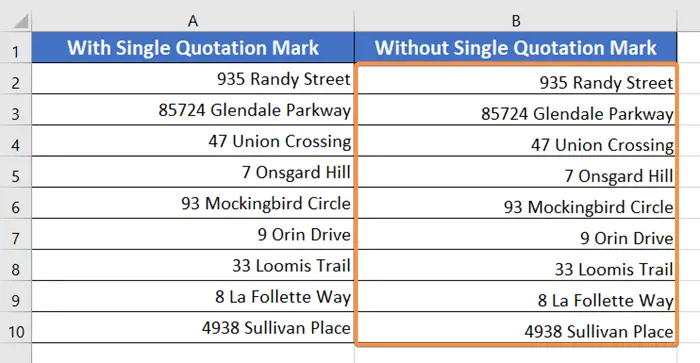
The Flash Fill correctly recognized the output pattern and returned all the cell values without the single quotes in the column Without Single Quotation Mark.
Conclusion
In conclusion, there are several ways to remove single quotes in Excel. Whether you prefer to use built-in functions or VBA code or Flash Fill feature, Excel provides a variety of options for manipulating your data. By following the methods outlined in this article, you can easily remove single quotes from your cells in Excel. I hope you find this article helpful. To read more about removing specific characters in Excel, click here. And also, feel free to comment in the comment section if you find anything confusing. Thanks for reading!
Frequently Asked Questions
How do I remove quotes from Excel?
To remove quotes from text in Excel, use the SUBSTITUTE function. Here’s a simple formula: =SUBSTITUTE(cell_reference, “”””, “”)
Replace “cell_reference” with the reference to the cell containing the text with quotes. The SUBSTITUTE function removes double quotes by replacing them with an empty string. This is a quick and efficient way to eliminate quotation marks from your Excel data.
How do you remove single quotes from a string?
To remove single quotes from a string in Excel, use the SUBSTITUTE function. Here’s a formula you can use: =SUBSTITUTE(cell_reference, “‘”, “”)
Replace “cell_reference” with the reference to the cell containing the text with single quotes. The SUBSTITUTE function replaces single quotes with an empty string, effectively removing them from the Excel string. This method provides a straightforward way to clean up text data by eliminating unwanted single quotes.
What is the shortcut to remove quotes from a string?
In Excel, the shortcut to remove quotes from a string is by using the SUBSTITUTE function. A quick formula can be applied: =SUBSTITUTE(cell_reference, “”””, “”)
Replace “cell_reference” with the reference to the cell containing the text with quotes. This SUBSTITUTE function effectively removes double quotes by substituting them with an empty string. It’s a convenient and efficient way to handle quote removal in Excel.
Related Articles
 The Paste Special window will appear instantly.
 The cells are now in text format and do not have single quotes anymore.
 This will create a new Module.
 The Macro window will pop up immediately.