30 Basic Excel Formulas for Beginners
Excel formulas are the essential starting point for anyone looking to harness the power of Microsoft Excel. In this guide, I will introduce you to 30 basic Excel formulas that will empower you to perform calculations, analyze data, and make informed decisions within your spreadsheets.
What is an Excel Formula?
An Excel Formula is a fundamental element in Microsoft Excel, serving as a powerful tool for performing mathematical, logical, and data manipulation operations within spreadsheets. It comprises a combination of operators, functions, cell references, and constants that, when entered into a cell, enables automated calculations and decision-making based on data.
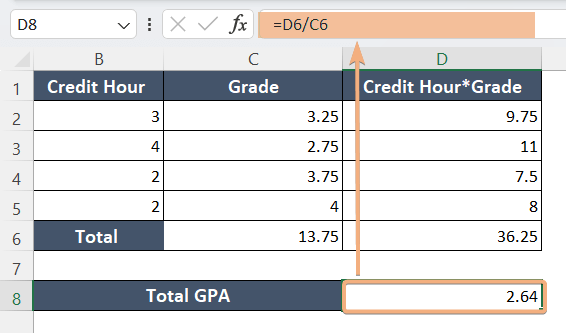
Excel formulas are vital for everything from basic calculations to advanced data analysis and modeling, building the foundation for effective spreadsheet usage. Here, in cell D7 I used the SUM function and division operator (/) to create an Excel formula that calculates GPA.
Here’s the formula,
=SUM(D2:D5)/SUM(C2:C5)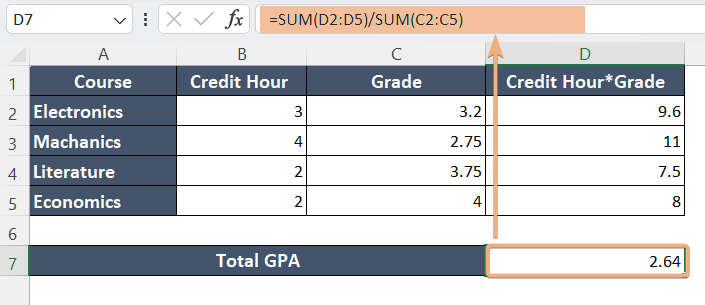
Working with Excel Formulas
The Excel formulas are the secret sauce that transforms spreadsheets from static data repositories into dynamic tools for calculations, data analysis, and decision-making.
In this guide, I’ll break down the basics of using formulas in Excel so you can perform calculations and manage data effortlessly.
Let’s assume, we have to calculate GPA in Excel.
Formula
GPA=∑(Credit Hour*Grade)/Total Credit HourHere are the steps to use formulas in Excel:
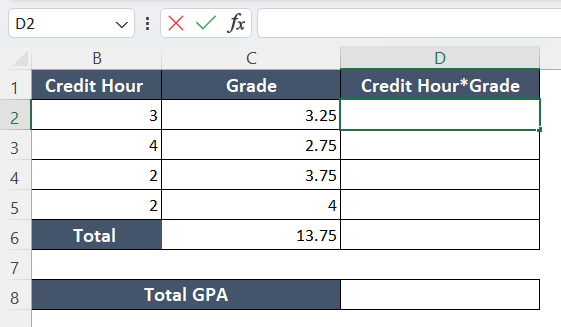
1. Select a Cell: Start by selecting the cell where you want the formula result to appear. Click on the cell to activate it.
2. Begin with an Equal Sign: In Excel, all formulas must start with an equal sign (=). This tells Excel that you’re entering a formula.
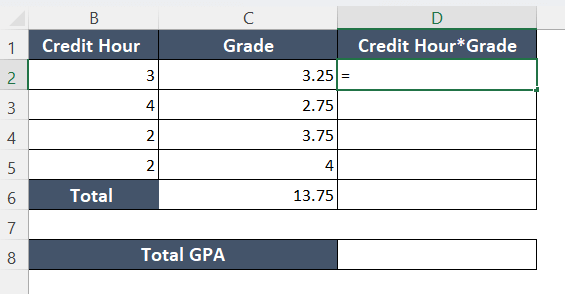
3. Enter the Formula: After the equal sign, enter the formula expression. You can use numbers, cell references, mathematical operators (+, -, *, /, ^), and functions in your formula.
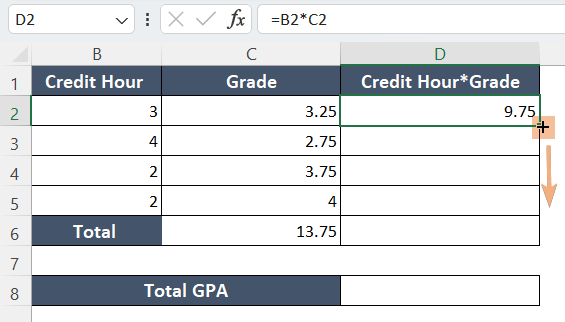
4. Use Cell References: Excel formulas often involve cell references (e.g., A1, B2) to perform calculations using the values in those cells. You can either click on the cell or manually type its reference in the formula. For instance, =B2*C2 multiplies the values in cells B2 and C2.
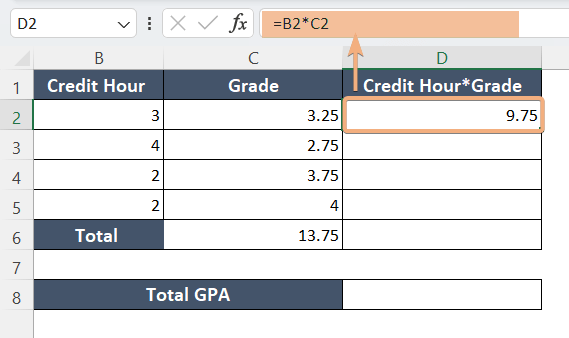
5. Use Functions: Excel offers a wide range of built-in functions (e.g., SUM, AVERAGE, IF) that you can use to perform specific tasks. Functions are followed by parentheses containing their arguments.
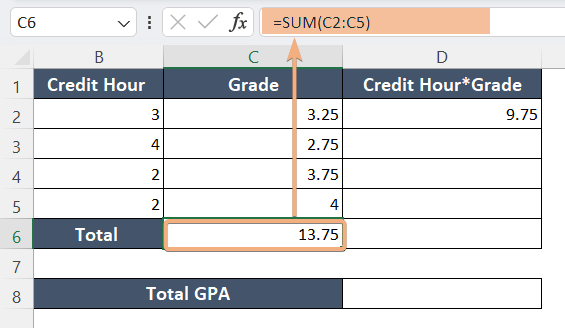
6. Complete the Formula: After entering the formula, press the ENTER key to calculate the result. The result will appear in the selected cell.
7. AutoFill: To apply the same formula to adjacent cells, you can use Excel’s AutoFill feature. Click and drag the Fill Handle (a small square at the bottom-right corner of the selected cell) to populate neighboring cells with the formula. Excel will adjust cell references automatically.
8. Mathematical Operators: You can use mathematical operators within formulas to perform arithmetic operations. Here, I have divided the values of cell D2 by cell C2.
List of 30 Basic Formulas in Excel for Beginners
Now, here I’ve discussed 30 basic Excel formulas for anyone who wants to start learning Microsoft Excel. So, let’s get started.
1. SUM
The SUM formula is versatile in Excel. We can use it to calculate total values within a selected range of cells, even with the numbers. By using the SUM function, Excel users can easily perform calculations to find the sum of numbers, making it an essential tool for various tasks, including financial analysis, budgeting, and data manipulation.
Syntax
=SUM(range)Formula
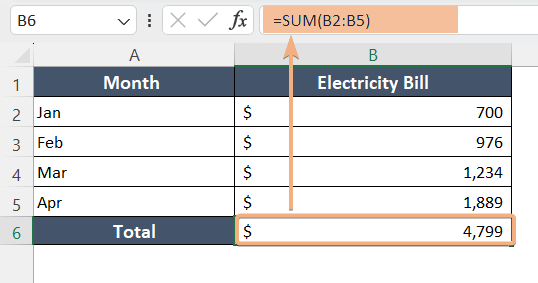
=SUM(B2:B5)In the dataset, I have records of electricity bills for four months. Our target is to calculate the total cost of electricity bills throughout these months.
Formula Breakdown
In this formula, you can select a range of numbers in a column or row. As we set B2 to B5, it will add the value of cells B2, B3, B4, and B5. It will store the result in cell B6.
2. SUMIF
The SUMIF formula in Excel is used to sum values based on specific criteria or conditions. It allows you to add up numbers in a range that meets a specific condition.
Syntax
=SUMIF(range, criteria, [sum_range])Formula
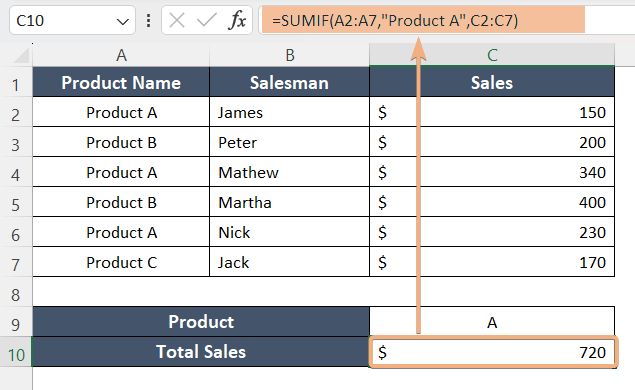
=SUMIF(A1:A7, "Product A", C1:C7)This formula calculates the sum of total sales of product A. Here,
Formula Breakdown
- A1:A7: This is the range of cells that contains the products (the range to evaluate).
- Product A: This is the criteria to apply to the cells in the range A1:A7. In this case, I want to find instances where the product is Product A.
- C1:C7: This is the range of cells that contains the sales values (the range to sum).
3. SUMPRODUCT
The SUMPRODUCT formula in Excel is a handy tool for doing math with lists of numbers. SUMPRODUCT allows you to multiply corresponding values from different arrays and then sum up the results, providing a versatile way to analyze and manipulate data in Excel.
Syntax
=SUMPRODUCT(array1, [array2], [array3], ...)Formula
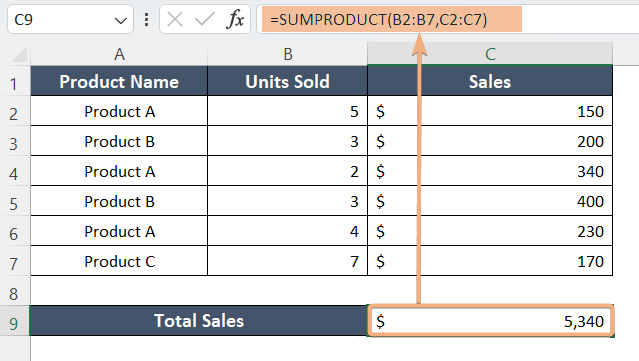
=SUMPRODUCT(B2:B7, C2:C7)The formula calculates total sales for all products.
Formula Breakdown
- B2:B7: It represents the first range of values. In this case, it’s a range of values from cell B2 to B7. Here these values represent units of products.
- C2:C7: It represents the second range of values. It’s another range of values from cell C2 to C7, and in this context, these values represent the prices per unit of the items corresponding to the quantities in the first range.
- SUMPRODUCT: The SUMPRODUCT function adds up these individual products. This formula multiplies the units sold (column B) by the Sales (column C) for each row and then adds up these products for all rows.
4. AVERAGE
You can easily calculate the mean of a range of numbers using the AVERAGE formula. The AVERAGE formula sums up all the numbers in a specified range and then divides the sum by the count of those numbers to provide the average value.
Syntax
=AVERAGE(Range)Formula
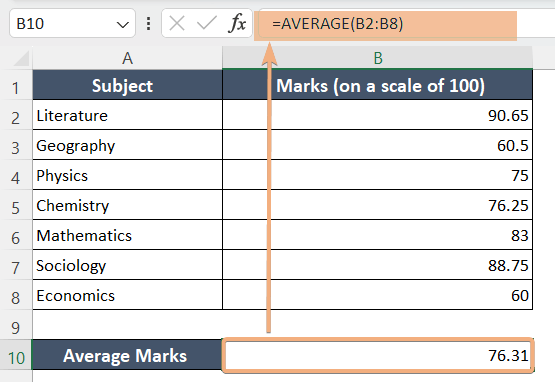
=AVERAGE(B2:B8)This function helps to find out the mean value of a range of numbers.
Formula Breakdown
- B2:B8: This is the range of cells containing the numerical values for the subjects. In this case, it includes the marks obtained in Literature, Geography, Physics, Chemistry, Mathematics, Sociology, and Economics.
- AVERAGE(B2:B8): This part of the formula instructs Excel to calculate the average of the values in the specified range (B2 to B8).
5. COUNT
The COUNT formula is a useful tool in Excel for counting numeric values within a defined range, making it valuable for different data analysis and reporting purposes. It doesn’t count the cells that contain text values.
Syntax
=COUNT(range)Formula
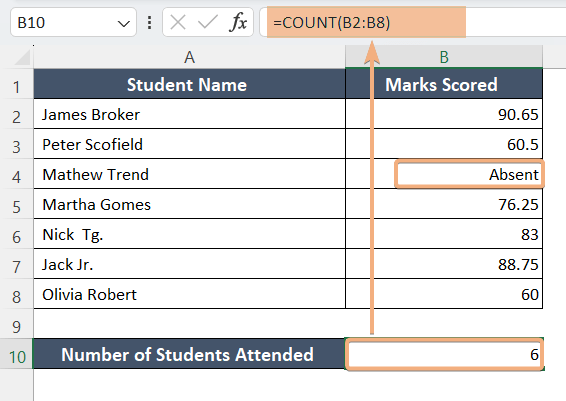
=COUNT(B2:B8)The COUNT formula counts the numeric values within cells B2 to B8.
Formula Breakdown
- B2:B8: This is the range of cells for counting.
- COUNT: It calculates the total number of cells that have numeric values only in the specific range. Within cells B2 to B8, cell B4 doesn’t have a numeric value, so it counts except for cell B4.
6. COUNTIF
COUNTIF is a formula in Excel that allows you to count the number of cells within a specified range that meets a specified condition or criteria.
Syntax
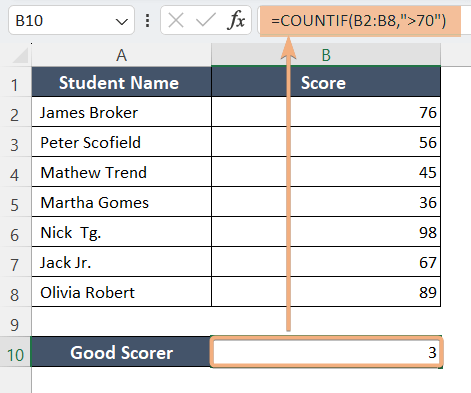
=COUNTIF(range, criteria)Formula
=COUNTIF(B2:B8,">70")The COUNTIF function counts the number of cells within a designated range that satisfies specific conditions.
Formula Breakdown
- B2:B8: This is the range of cells (from cell B2 to B8) that contains the scores of the students. It’s the range I want to evaluate.
- >70: This is the condition or criteria we are applying to the cells within the specified range. In this case, we are checking if the score in each cell is greater than 70.
- COUNTIF: This counts cells in a given range based on a specified condition. Here it gives a result of 3, the students who scored more than 70.
7. IF
The IF formula in Excel is used to perform conditional calculations by evaluating a specified condition and returning one value if the condition is true and another value if it’s false.
Syntax
=IF(logical_test, value_if_true, [value_if_false])Formula
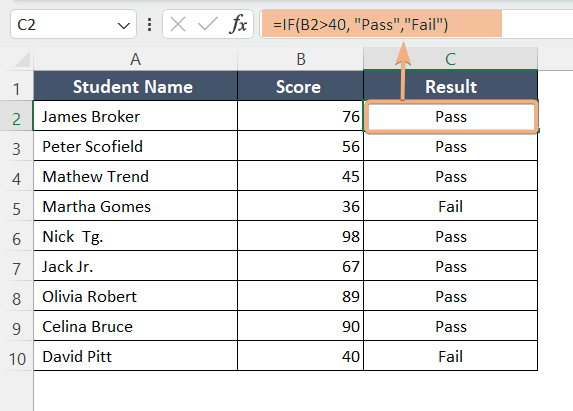
=IF(B2>40, "Pass", "Fail")The IF function acts as a logical operator, providing different outcomes depending on whether a specified condition is satisfied or not.
Formula Breakdown
- B2 > 40: It is the logical test, which evaluates whether the value in cell B2 is greater than 40. This logical test can result in either TRUE (if B2 is greater than 40) or FALSE (if B2 is not greater than 40).
- “Pass”: If the logical test B2 > 40 is TRUE (meaning that the value in cell B2 is indeed greater than 40), then the formula will return the text “Pass.” This is the value to display if the condition is met.
- “Fail”: If the logical test B2 > 40 is FALSE (meaning that the value in cell B2 is not greater than 40), then the formula will return the text “Fail.” This is the value to display if the condition is not met.
- IF: This function works as a logic: If a given condition is met (evaluates to TRUE), it returns one value; otherwise (if the condition is FALSE), it returns another value.
8. IFS
The IFS is a versatile formula that allows you to test multiple conditions and specify different results for each condition.
Syntax
=IFS(Something is True1, Value if True1, Something is True2, Value if True2, Something is True3, Value if True3)Formula
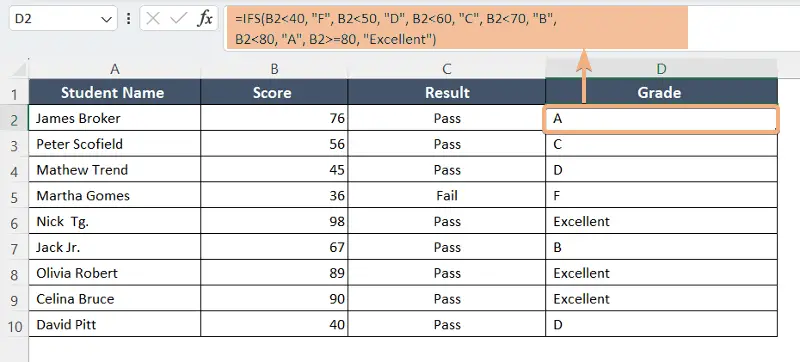
=IFS(B2<40, "F", B2<50, "D", B2<60, "C", B2<70, "B", B2<80, "A", B2>=80, "Excellent")The formula is useful in multiple conditions to evaluate, simplifying your formulas and improving readability. Here,
Formula Breakdown
- B2: This refers to the value in cell B2, which represents a student’s score or numeric result.
- B2<40: This is the first condition. It checks if the score in cell B2 is less than 40. If this condition is true, it assigns the grade “F”.
- B2<50: This is the second condition. It checks if the score in cell B2 is less than 50. If this condition is true (meaning the score is between 40 and 49), it assigns the grade “D.”
- B2<60: This is the third condition. It checks if the score in cell B2 is less than 60. If this condition is true (meaning the score is between 50 and 59), it assigns the grade “C.”
- B2<70: This is the fourth condition. It checks if the score in cell B2 is less than 70. If this condition is true (meaning the score is between 60 and 69), it assigns the grade “B.”
- B2<80: This is the fifth condition. It checks if the score in cell B2 is less than 80. If this condition is true (meaning the score is between 70 and 79), it assigns the grade “A.”
- B2>=80: This is the last condition. It checks if the score in cell B2 is 80 or greater. If this condition is true, it assigns “Excellent.”
- IFS: The formula evaluates the conditions one by one, from top to bottom, and as soon as it finds a condition that is true, it returns the corresponding value. If none of the conditions are true, the formula won’t return anything, which is acceptable because the grades are only assigned when specific score ranges are met.
9. ROUND
The ROUND formula in Excel is a powerful tool used for adjusting the precision of numeric values within your spreadsheets. Its primary purpose is to round a number to a specified number of decimal places or to the nearest whole number.
Syntax
=ROUND(number, num_digits)Formula
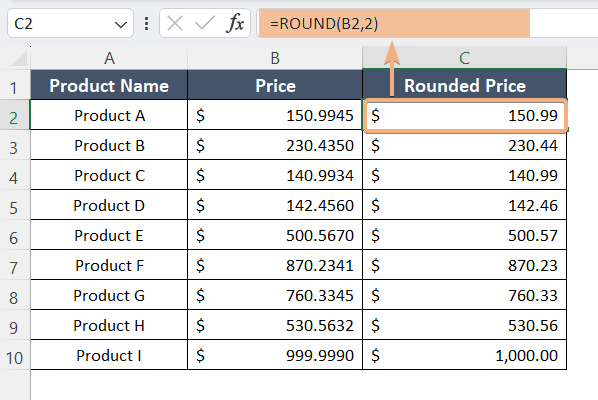
=ROUND(B2,2)The ROUND formula operates on the numeric value in cells, rounding it to two decimal places.
Formula Breakdown
- B2: This part of the formula refers to a specific cell in Excel, namely cell B2. This cell is where you have the numeric value that you want to round.
- 2: This indicates the number of decimal places to which you want to round the value in cell B2. In this case, it’s set to 2, which means you want to round to two decimal places.
- ROUND: The function takes the numeric value in cell B2, which might be something like 15.349, and rounds it to the specified number of decimal places.
10. RANDBETWEEN
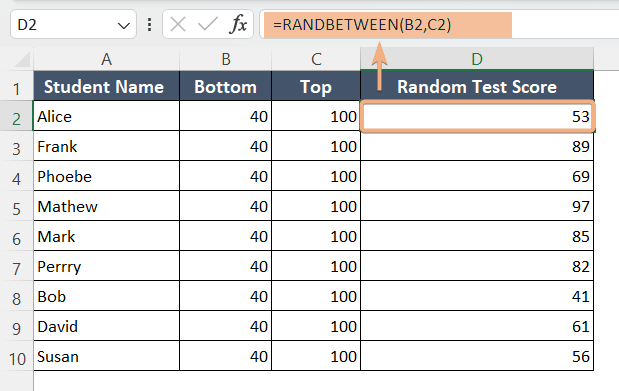
The RANDBETWEEN formula generates a random integer number between two specified values. It’s a useful function for scenarios where you need to generate random data for simulations, testing, or other purposes.
Syntax
=RANDBETWEEN(bottom,top)Formula
=RANDBETWEEN(B2, C2)This formula produces a random number between the values specified in cells.
Formula Breakdown
- B2: This cell contains the minimum value of the range of random numbers to generate.
- C2: This cell contains the maximum value of the range of random numbers to generate.
- RANDBETWEEN: This random number falls within the specified range, as defined by the values in cells B2 and C2. Here, it chooses a random test score for each student.
11. MAX & MIN
The MAX and MIN functions in Excel are used to find the maximum (largest) and minimum (smallest) values within a range of numbers or a list of values. These functions are essential for analyzing data and identifying extremes or boundaries in your dataset.
Syntax
=MAX(range)=MIN(range)Formula
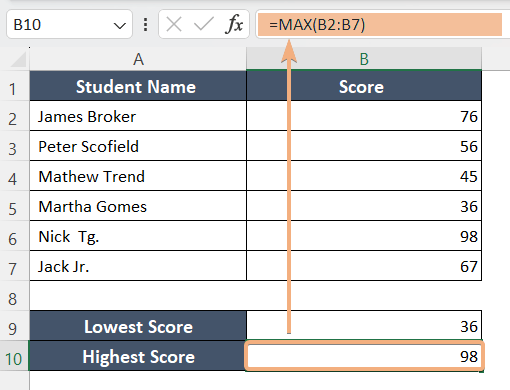
=MAX(B2:B7)This formula evaluates the range of values from cell B2 to B7 and returns the maximum value from that range.
Formula Breakdown
- B2:B7: This part of the formula represents a range of cells. In this example, it covers cells B2 through B7, which contain a list of numeric values.
- MAX: The MAX function is used to find the maximum value within the specified range.
Formula
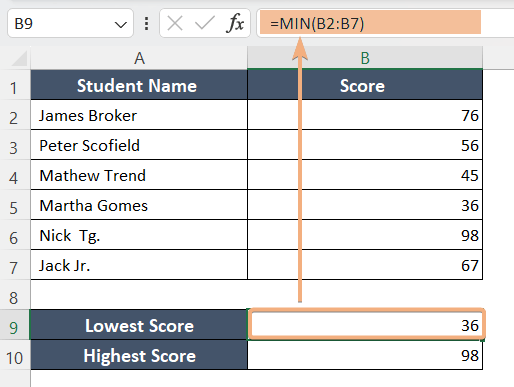
=MIN(B2:B7)This formula evaluates the range of values from cell B2 to B7 and returns the minimum value from that range.
Formula Breakdown
- B2:B7: This part of the formula represents a range of cells. In this example, it covers cells B2 through B7, which contain a list of numeric values.
- MIN: The MIN function is used to find the minimum value within the specified range.
12. LEFT, RIGHT & MID
The LEFT, RIGHT, and MID formulas in Excel are used for text manipulation and extraction. The LEFT function extracts characters from the beginning (left side) of a text string, the RIGHT function extracts characters from the end (right side), and the MID function extracts characters from anywhere within the string based on the starting position and length you specify.
Syntax
=LEFT(text,num_chars)=RIGHT(text,[num_chars])=MID(text, start_num, num_chars)Formula
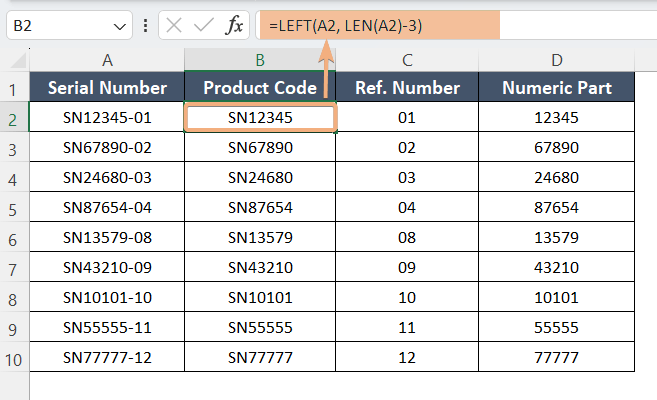
=LEFT(A2, LEN(A2)-3)This formula removes a specific number of characters from the end of a text string.
Formula Breakdown
- A2: This part of the formula refers to cell A2, which contains the original text string you want to manipulate.
- LEN(A2): The LEN function calculates the length (the number of characters) of the text string in cell A2.
- LEN(A2)-3: This part subtracts 3 characters from the length of the text string. In this case, it means removing the last 3 characters from the text.
- LEFT: The LEFT function is then used to extract the leftmost characters from the text string in cell A2. It extracts the characters starting from the left and continues up to the length calculated.
Formula
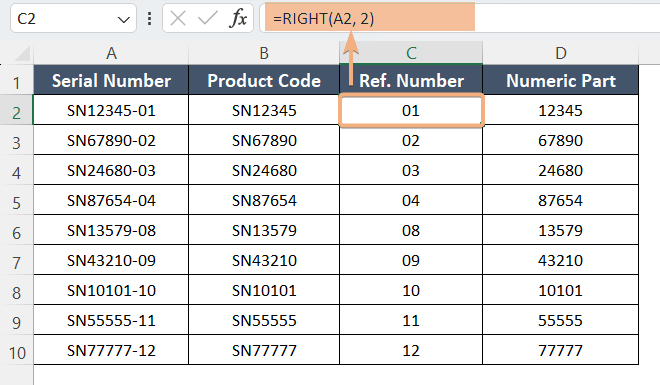
=RIGHT(A2, 2)The RIGHT formula extracts the rightmost (last) 2 characters from a text string located in cell A2.
Formula Breakdown
- A2: This part of the formula refers to cell A2, which contains the original text string you want to extract characters from.
- RIGHT: The RIGHT function is used to extract characters from the right side of the text string. In this case, it extracts the last 2 characters.
Formula
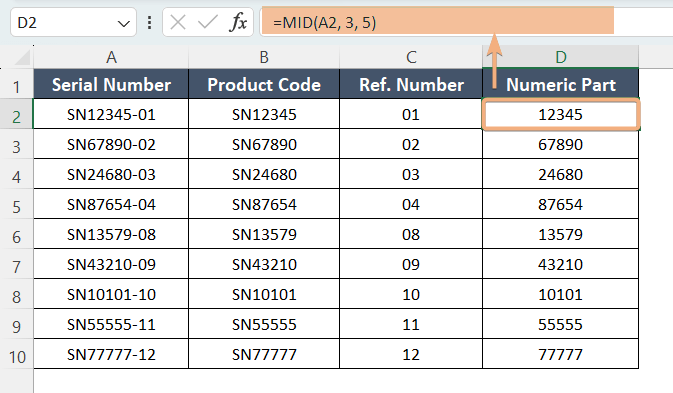
=MID(A2, 3, 5)The MID formula removes a substring from a text string located in cells.
Formula Breakdown
- A2: This part of the formula refers to cell A2, which contains the original text string you want to extract characters from.
- MID: The MID function is used to extract a portion of the text string, starting from a specific position and including a specified number of characters.
13. UPPER, LOWER & PROPER
The UPPER, LOWER & PROPER formulas allow you to effortlessly change the case of text within cells, making your data consistent and visually appealing. Whether you need to convert text to uppercase, lowercase, or proper case with the first letter of each word capitalized, these functions have you covered.
Syntax
=UPPER(text)=LOWER(text)=PROPER(text)Formula
=UPPER(A2)The UPPER function converts all the letters in the specified text to uppercase (capital letters).

Formula Breakdown
- A2: This part of the formula refers to cell A2, which contains the original text you want to convert to uppercase.
- UPPER: The function converts the text of any cell to capital letters.
Formula
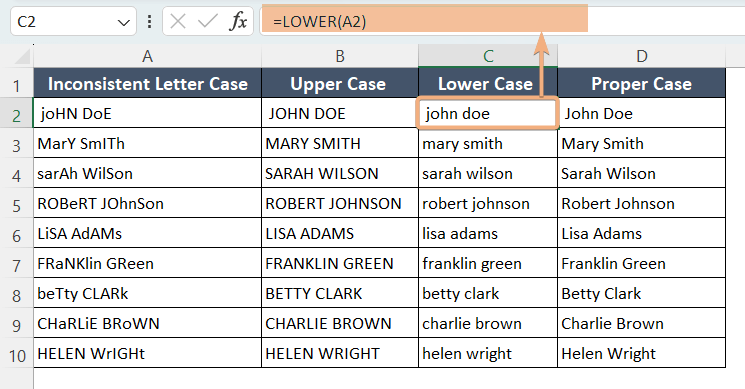
=LOWER(A2)The LOWER function converts all the letters in the specified text to lowercase, which means it changes all the characters in the text to small letters.
Formula Breakdown
- A2: This part of the formula refers to cell A2, which contains the original text you want to convert to lowercase.
- LOWER: The function converts the text of any cell to small letters.
Formula
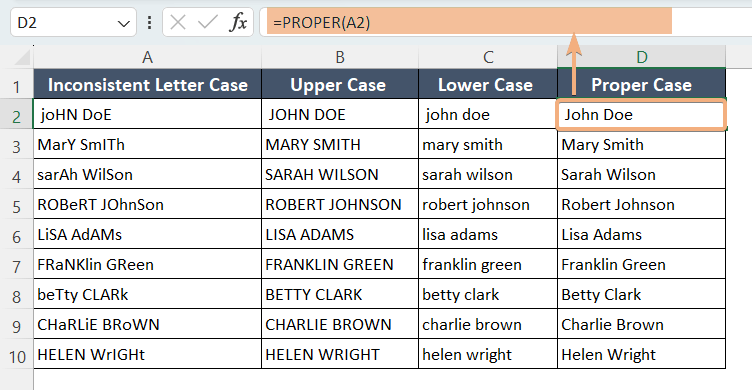
=PROPER(A2)The PROPER function capitalizes the first letter of each word in the specified text while making all other letters lowercase. It essentially converts the text to “Proper Case.”
Formula Breakdown
- A2: This part of the formula refers to cell A2, which contains the original text you want to convert to the proper case.
- PROPER: The function capitalizes the first letter of each word while converting the rest of the letters to lowercase.
14. LEN
The LEN formula counts the number of characters in a text string. It’s a simple yet powerful function that helps you determine the length of a text value, including spaces and special characters.
Syntax
=LEN(text)Formula
=LEN(A2)+LEN(B2)This formula calculates the total number of characters in two different text values located in cells.
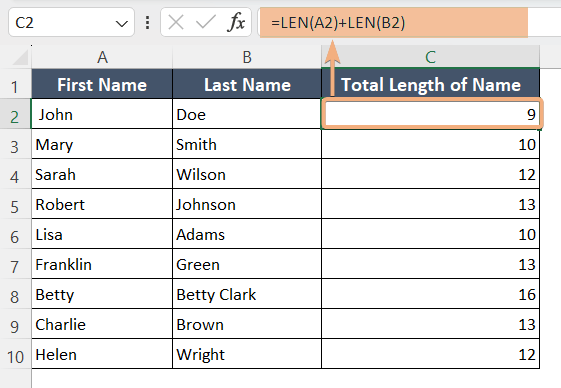
Formula Breakdown
- LEN(A2): It calculates the number of characters in the text value in cell A2.
- LEN(B2): It calculates the number of characters in the text value in cell B2.
15. REPLACE and SUBSTITUTE
The REPLACE and SUBSTITUTE functions are valuable for text manipulation tasks in Excel, such as cleaning data, making specific replacements, or formatting text as needed.
REPLACE is used for one-time replacements at a specific position within the text. It performs a one-time replacement at the specified position. You need to specify the original text, the starting position where the replacement should begin, the number of characters to replace, and the replacement text.
SUBSTITUTE is used to replace all occurrences of a specified substring throughout the text. It requires you to specify the original text, the text you want to replace within the original text, and the replacement text.
Syntax
=REPLACE(old_text, start_num, num_chars, new_text)=SUBSTITUTE(text, old_text, new_text, [instance_num])Formula
=REPLACE(A2, 1, 2, "OM")This REPLACE formula replaces a portion of text in cell A2 with the text “OM.”
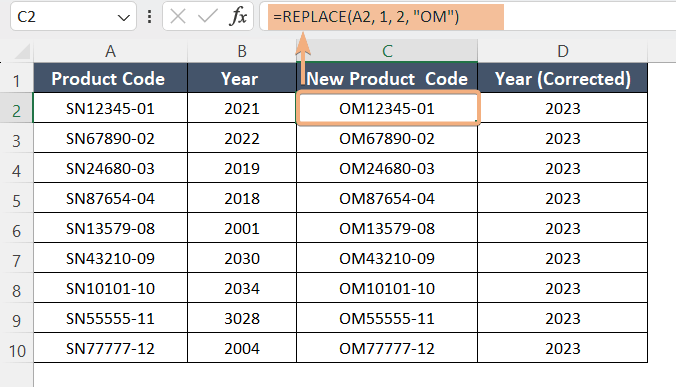
Formula Breakdown
- A2: This part of the formula refers to cell A2, which contains the original text you want to modify.
- 1: This is the starting position within the text where the replacement will begin. In this case, it starts with the first character of the text.
- 2: This indicates the number of characters to replace, starting from the specified position. In this case, it replaces the first two characters.
- “OM”: This is the new text that will replace the specified portion of the original text. In this case, it replaces the first two characters with “OM.”
Formula
=SUBSTITUTE(B2, B2, "2023")The SUBSTITUTE formula replaces all occurrences of the content in cell B2 with the text “2023” within the same cell.
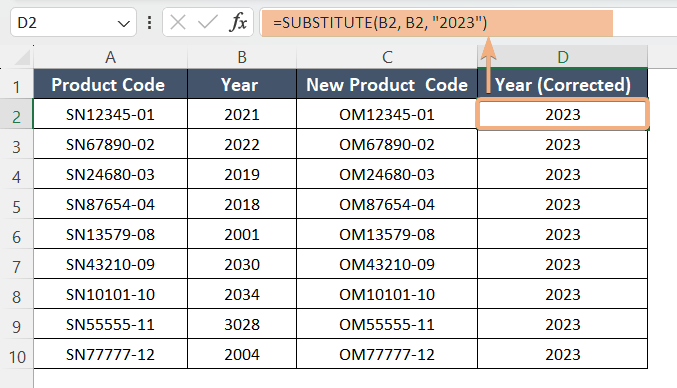
Formula Breakdown
- B2: This part of the formula refers to cell B2, which is the text you want to replace.
- B2: The second occurrence of B2 refers to the text you want to replace within cell B2 itself.
- “2023”: This is the new text that will replace the existing content of cell B2. In this case, it will replace the entire content of cell B2 with “2023.”
16. CONCAT
The CONCAT formula in Excel is used to combine or concatenate multiple text strings into a single text string. It’s especially useful when you need to join the contents of several cells or text strings together.
Syntax
=CONCAT(text1, [text2],…)Formula
=CONCAT(A2, B2)This formula concatenates two text strings located in cells A2 and B2 into a single text string.
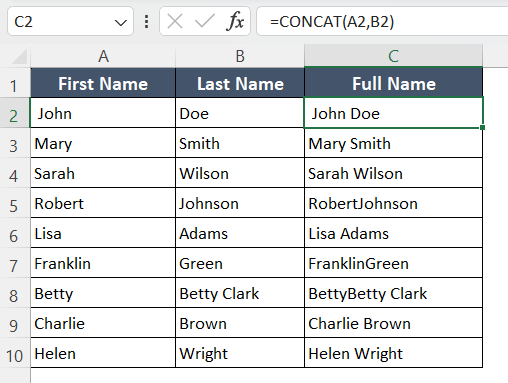
Formula Breakdown
- A2: This part of the formula refers to cell A2, which is the first text string you want to concatenate.
- B2: This part of the formula refers to cell B2, which is the second text string you want to concatenate.
17. DATE
The DATE formula in Excel is used to create a date based on the year, month, and day values provided as arguments.
Syntax
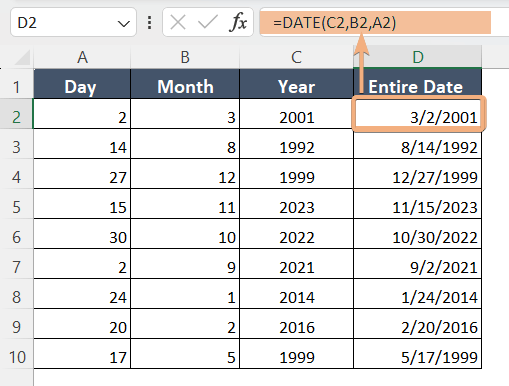
=DATE(year, month, day)Formula
=DATE(C2, B2, A2)The DATE formula creates a date value based on the values in cells A2, B2, and C2.
Formula Breakdown
- C2: This cell contains the year value.
- B2: This cell contains the month value (1 to 12).
- A2: This cell contains the day value (1 to 31).
- DATE: The DATE function takes these values and combines them to generate a date. The result will be a date in Excel’s date format, such as “mm/dd/yyyy.”
18. DAY, MONTH
In Excel, the DAY and MONTH functions are used to extract specific components from a date, such as a day or month.
Syntax
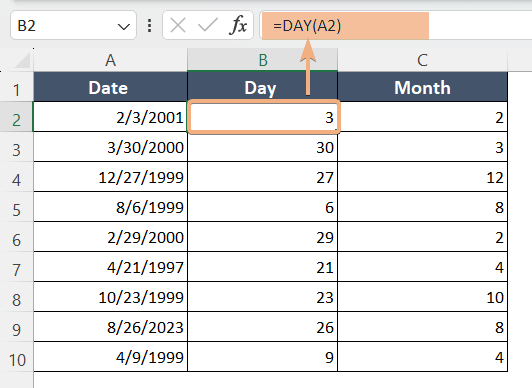
=DAY(serial_number)=MONTH(serial_number)Formula
=DAY(A1)The DAY formula extracts the day (a number between 1 and 31) from a date.
Formula Breakdown
- A1: This part of the formula refers to cell A1, which contains the date from which you want to extract the day.
- DAY: This is the Excel function used to extract the day component from a date.
Formula
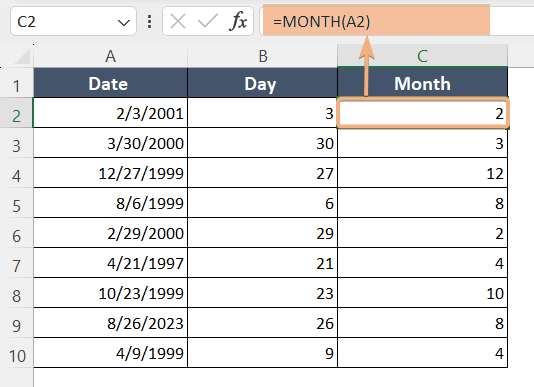
=MONTH(A1)The MONTH formula extracts the month (a number between 1 and 12) from a date.
Formula Breakdown
- A1: This part of the formula refers to cell A1, which contains the date from which you want to extract the month.
- MONTH: This is the Excel function used to extract the month component from a date.
19. TIME
The TIME formula in Excel is used to create a time value based on the specified hour, minute, and second values. It’s useful for working with time-related calculations and data.
Syntax
=TIME(hour, minute, second)Formula
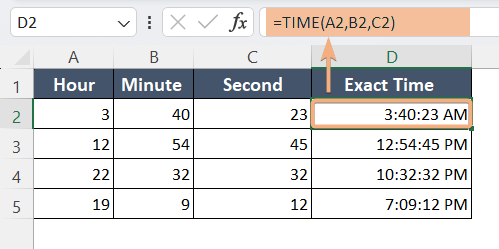
=TIME(A2, B2, C2)We can use this formula to construct a time value by specifying the hour, minute, and second as separate components.
Formula Breakdown
- A2: This cell contains the hour value (0 to 23).
- B2: This cell contains the minute value (0 to 59).
- C2: This cell contains the second value (0 to 59).
- TIME: This function takes these values and combines them to generate a time value. The result will be a time value in Excel’s default time format, typically displayed as “hh:mm: ss AM/PM.”
20. HOUR, MINUTE, SECOND
In Excel, the HOUR, MINUTE, and SECOND formulas are used to extract specific components (hour, minute, and second) from a time value or a date and time value.
Syntax
=HOUR(serial_number)= MINUTE(serial_number)=SECOND(serial_number)Formula
=HOUR(A2)The HOUR formula allows you to isolate and work with the hour portion of a time or date and time value in Excel.
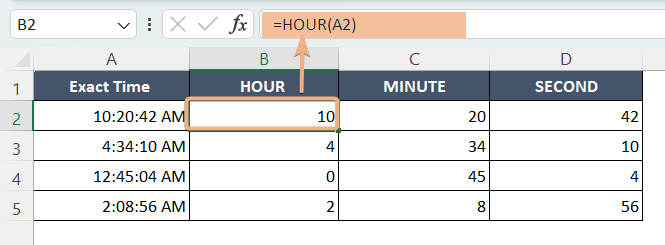
Formula Breakdown
- A2: This part of the formula refers to cell A2, which contains the time or date and time value from which you want to extract the hour.
- HOUR: This formula extracts the hour component from a time value or date and time value.
Formula
=MINUTE(A2)The MINUTE formula allows you to isolate and work with the minute portion of a time or date and time value in Excel.
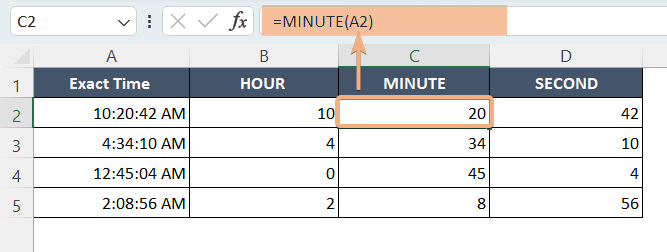
Formula Breakdown
- A2: This part of the formula refers to cell A2, which contains the time or date and time value from which you want to extract the minute.
- MINUTE: The formula extracts the minute component from a time value or date and time value.
Formula
=SECOND(A2)The SECOND formula allows you to isolate and work with the second portion of a time or date and time value in Excel.
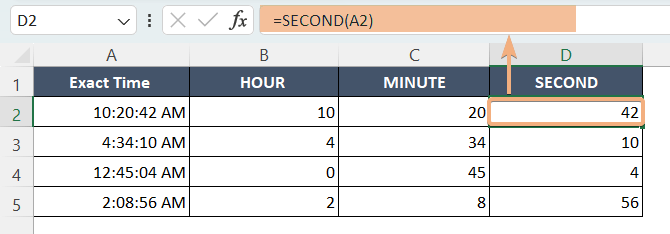
Formula Breakdown
- A2: This part of the formula refers to cell A2, which contains the time or date and time value from which you want to extract the second.
- SECOND: The formula extracts the second component from a time value or date and time value.
21. ROW
The ROW formula returns the row number of a cell or a range of cells. It is helpful in various scenarios, such as when you need to perform calculations or create dynamic formulas based on the position of data within a worksheet.
Syntax
=ROW([reference])Formula
=ROW(B2:B5)The ROW formula returns an array of row numbers corresponding to the cells in the specified range, which is B2:B5 in this case.
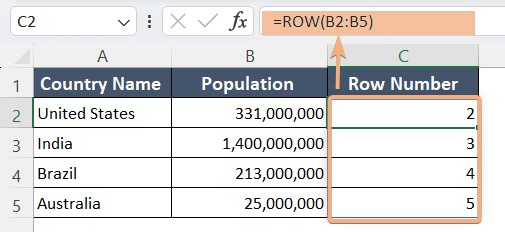
Formula Breakdown
- ROW: It’s the ROW function, which returns the row number of a specified cell or range.
- B2:B5: It specifies the range of cells (B2 to B5) from which you want to retrieve the row numbers.
22. COLUMN
The COLUMN formula returns the column number of a specified cell or range of cells. It is really useful for various tasks, such as referencing specific columns in formulas, data analysis, or formatting.
Syntax
=COLUMN([reference])Formula
=COLUMN(A3:D3)The above formula provides the column numbers for each cell within that range.
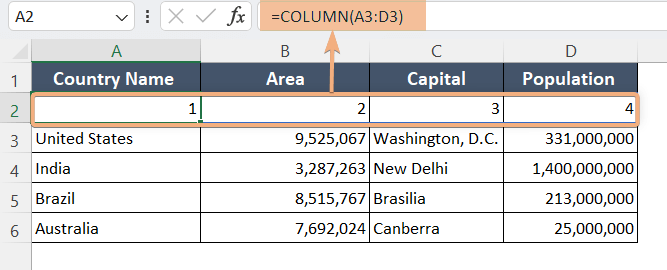
Formula Breakdown
- COLUMN: It’s the COLUMN function, which returns the column number of a specified cell or range.
- A3:D3: It specifies the range of cells (A3 to D3) from which you want to retrieve the column numbers.
23. SORT
The SORT formula helps to sort a range of data and return the sorted values in a new array, without altering the original data.
Syntax
=SORT(array, [sort_index], [sort_order], [by_col])Formula
=SORT(A2:C10, 3, 1)This formula sorts a table of data based on a specific range based on one or more columns.
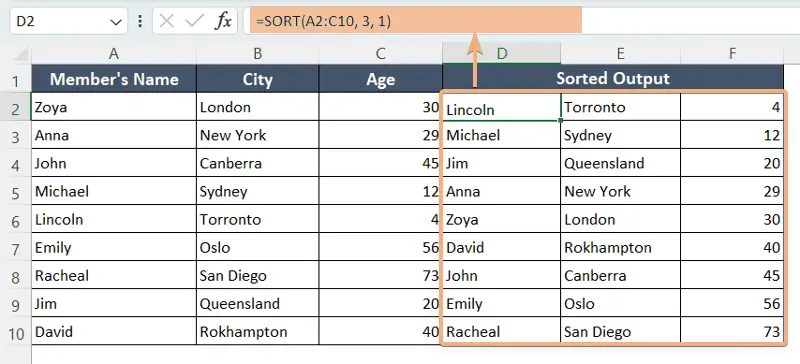
Formula Breakdown
- A2:C10: This specifies the range of cells that contains the dataset you want to sort.
- 3: This is the “sort_index” argument, indicating that you want to sort the data based on the values in the third column (Age column). In Excel, columns are indexed starting from 1, so column A is 1, column B is 2, and column C is 3.
- 1: This is the “sort_order” argument, specifying that you want to sort the values in ascending order. The value 1 represents ascending order.
- SORT: The formula rearranges the values in cells in order and replaces the original unsorted data with the sorted values.
24. IFERROR
The IFERROR formula handles errors that may occur in a formula or expression. It allows you to specify a value or action to be taken if an error occurs, providing a way to handle errors gracefully in your Excel worksheets.
Syntax
=IFERROR(value, value_if_error)Formula
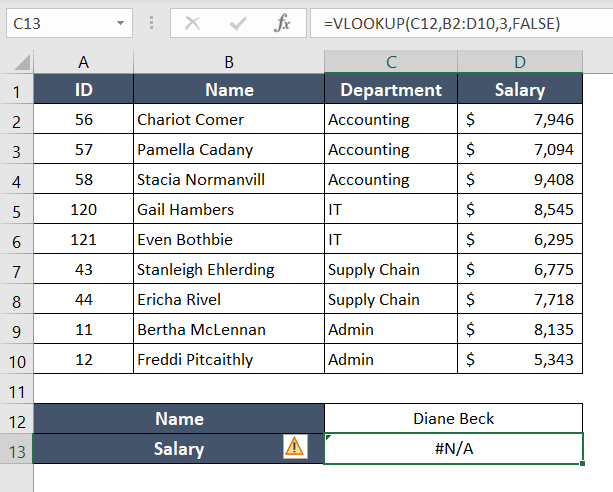
=IFERROR(VLOOKUP(C12, B2:D10, 3, FALSE), "Not Found")This formula handles errors in a formula by specifying a value to display if an error occurs.
Without Using IFERROR Function_
After Using IFERROR Function_
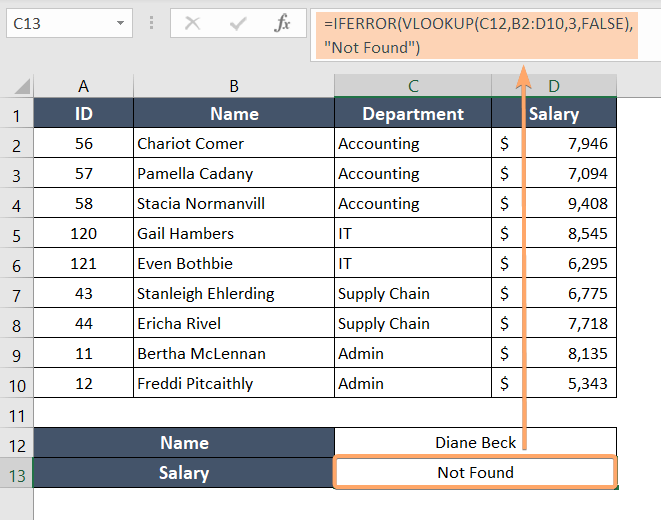
Formula Breakdown
- C12: This is the value you want to look up in the first column of the range B2:D10.
- B2:D10: This is the table or range of data in which you want to perform the VLOOKUP It consists of three columns: the first column is where the lookup value (C12) is searched, and the third column (the one specified as the result column) is where the function retrieves data if a match is found.
- 3: This argument specifies that you want to retrieve data from the third column of the range B2:D10 (column D) when a match is found.
- FALSE: The fourth argument indicates that you want an exact match. If you don’t find an exact match, it will return an error.
- “Not Found”: This is the value that the formula will display if the VLOOKUP operation results in an error, such as when the lookup value (C12) is not found in the first column of the range.
- IFERROR: This function is for error handling to specify a value or action to take when a formula or expression produces an error.
25. INDEX, MATCH
The combination of the INDEX and MATCH functions in Excel is a powerful way to look up and retrieve data from a dataset. This formula performs a lookup operation based on a specified search value in a given range and retrieves a corresponding value from another range.
Syntax
=INDEX(range, row_num, [column_num])=MATCH(lookup_value, lookup_array, [match_type])Formula
=INDEX(C2:C7, MATCH(B4, B2:B7, 0))This formula returns a value from a specified range (in this case, the range C2:C7).
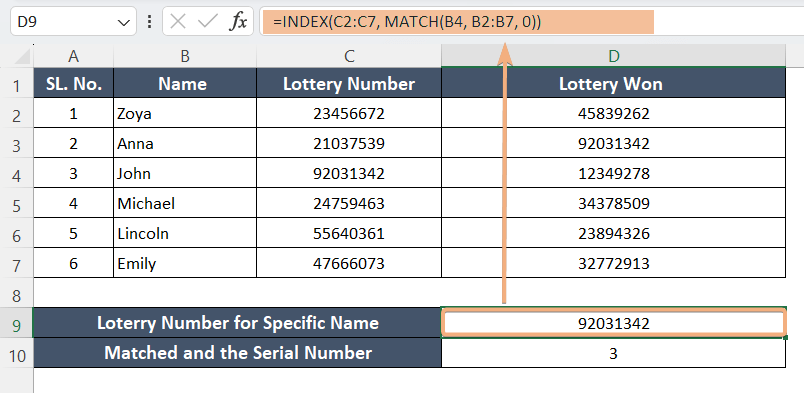
Formula Breakdown
- C2:C7: This is the lookup range in which you have to search.
- MATCH(B4, B2:B7, 0): The MATCH function is used to search for a value (B4) within a specified range (B2:B7) and determine its position or relative row number within that range. The “0” as the third argument indicates that an exact match is required.
- B4: It is the value you want to find in the range.
- B2:B7: The range in which you’re searching for the value.
Formula
=MATCH(C4, C2:C7,0 )This formula searches for a specified value (in this case, the value in cell C4) within a given range (C2:C7) and determines its relative position or row number within that range.
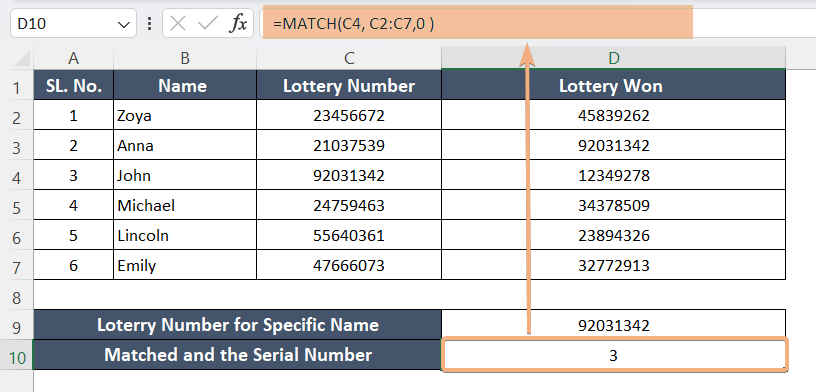
Formula Breakdown
- C4: This is the value you want to find within the specified range.
- C2:C7: This is the range in which you are searching for the value.
- 0 (third argument): This argument specifies that you are looking for an exact match. In other words, it will only return a result if it finds the value in cell C4 exactly matching one of the values in the range C2:C7.
26. VLOOKUP
VLOOKUP is a formula in Excel that searches for a value in a dataset retrieves related information from a specified column, and displays the result.
Syntax
=VLOOKUP (lookup_value, table_array, col_index_num, [range_lookup])Formula
=VLOOKUP("Product D", A2:C7, 2, FALSE)This formula searches for “Product D” in column A of the range A2:C7 and returns the corresponding value from column B if an exact match is found.
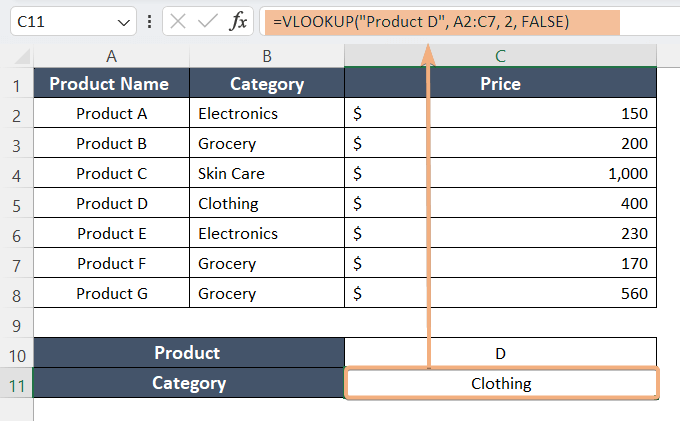
Formula Breakdown
- “Product D”: It is the value you want to search for within the dataset.
- A2:C7: The range where Excel should search for the value and retrieve the related information.
- 2: It specifies the column number from which you want to retrieve the result (in this case, the “Category” column is the second column in the range A2:C7).
- FALSE: It specifies an exact match. This ensures that Excel looks for an exact match for “Product D.
- VLOOKUP: The formula searches for “Product D” in the “Product” column (A2:A7) and returns the corresponding category from the “Category” column (C2:C7).
27. HLOOKUP
The HLOOKUP formula in Excel is similar to the VLOOKUP formula but performs a horizontal lookup. It searches for a value in the first row of a specified range and then returns a value from the same column in a specified row.
Syntax
=HLOOKUP(lookup_value, table_array, row_index_num, [range_lookup])Formula
=HLOOKUP("Product C", B1:E3, 3, FALSE)The formula scans for the value “Product C” in the first row (row 1) of the specified range B1:E3.
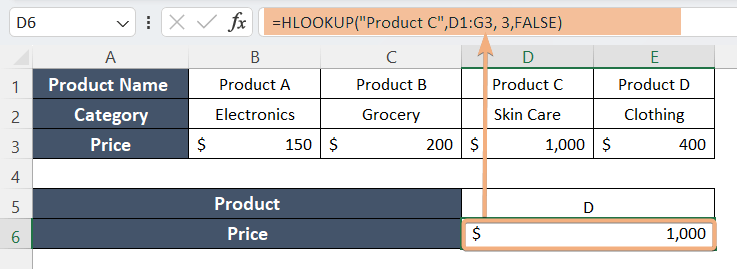
Formula Breakdown
- “Product C”: This is the value you want to find within the first row (headers) of the specified range.
- B1:E3: This is the range in which Excel should search for the value and retrieve related information. In this case, it includes three rows and four columns of data.
- 3: This number represents the row number from which you want to retrieve the result. Since you’re looking for “Product C” within the headers in the first row and want to retrieve information from the third row, you specify “3.”
- FALSE: This argument specifies an exact match. With FALSE, Excel looks for an exact match of “Product C” within the headers. If an exact match is not found, it returns an error.
- HLOOKUP: The formula searches for a specific value (“Product C”) within a horizontal range (B1:E3) and retrieves a corresponding value from the third row of that range.
28. XLOOKUP
The XLOOKUP formula is highly versatile and can handle a wide range of lookup scenarios, including approximate matches, exact matches, and more. It’s a valuable tool for data analysis and retrieval in Excel.
Syntax
=XLOOKUP(lookup_value, lookup_array, return_array, [if_not_found], [match_mode], [search_mode])Formula
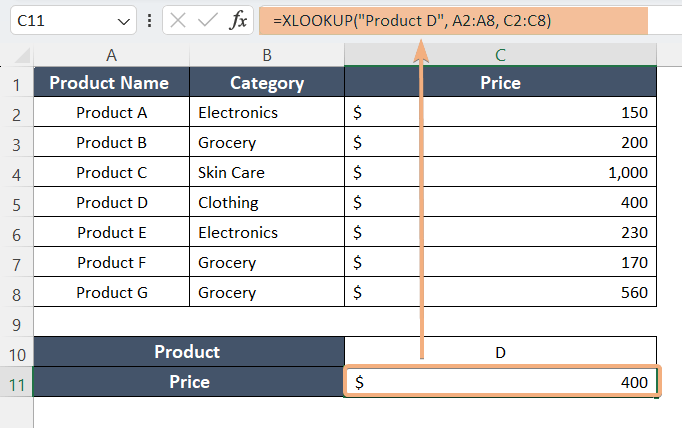
=XLOOKUP("Product D", A2:A8, C2:C8)The formula searches for the given lookup value in the specified range.
Formula Breakdown
- “Product D”: It is the value you want to search for within the “Product” column (column A).
- A2:A7: The range where Excel searches for the value (the “Product” column).
- C2:C7: The range from which Excel retrieves the corresponding value (the “Price” column).
- XLOOKUP: It searches for “Product D” in the “Product” column (A2:A7) and returns the corresponding price of “$400.”
29. FILTER
The FILTER formula is used to extract data from a range or table based on specified criteria. It’s particularly useful for creating filtered lists or tables from a larger dataset.
Syntax
=FILTER(array, include,[if_empty])Formula
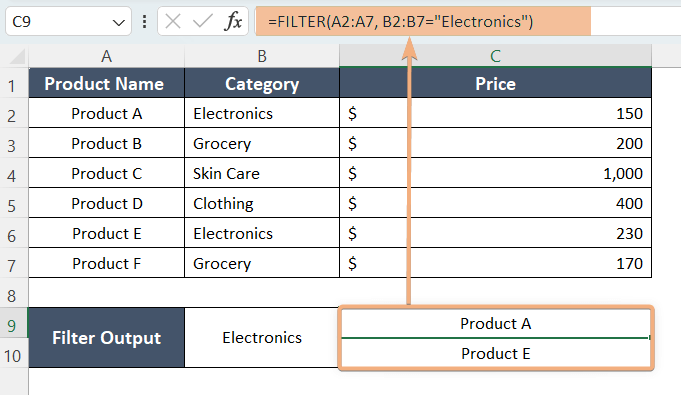
=FILTER(A2:A7, B2:B7="Electronics")The formula filters values from the given range A2:A7 based on a condition.
Formula Breakdown
- A2:A7: This is the range of values you want to filter, which consists of product names in column A.
- B2:B7=”Electronics”: This is the condition you want to apply. It checks if the corresponding category in column B is “Electronics.”
- FILTER: The formula evaluates each row in column B (B2 to B7) to see if it matches the condition “Electronics.” If the condition is met, it includes the corresponding product name from column A in the filtered list.
30. UNIQUE
The UNIQUE function in Excel is used to extract unique values from a dataset, which means it returns a list of values without any duplicates.
Syntax
=UNIQUE(array, [by_col], [exactly_once])Formula
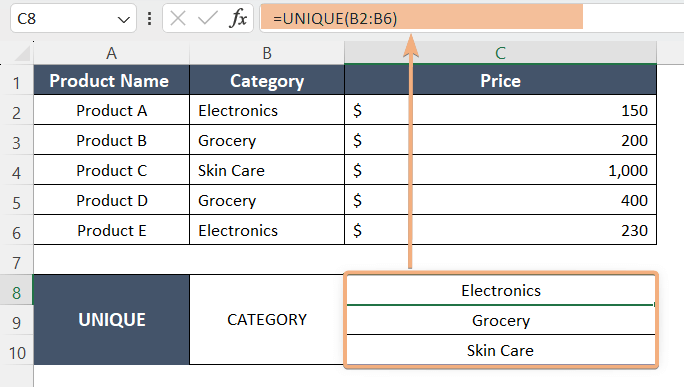
=UNIQUE(B2:B6)The formula returns a list of unique values from the range B2:B6, meaning it will remove any duplicate values and display each unique value once.
Formula Breakdown
- B2:B6: This is the range of values you want to find unique values from. In this case, it represents a column of data containing several entries, and you want to identify the unique values within this column.
- UNIQUE: It eliminates duplicate entries and provides you with a clean list of unique values from the specified range.
Conclusion
Excel formulas form a versatile toolkit for managing, analyzing, and presenting data efficiently. These 30 basic formulas will allow you to perform essential calculations, such as adding, averaging, and counting values, as well as making decisions based on conditions. These basic Excel formulas serve as the foundation upon which more advanced Excel skills are built, making them a crucial tool for anyone working with data management and analysis in Excel.
Excel Glossary | Active Cell | Cell Address | Range | Function | Argument | Wildcard | Worksheet | Workbook