How to Sort in Excel by Date (3 Ways)
Microsoft Excel is full of amazing built-in tools to help you organize your worksheets. One of the powerful functions of Excel is to quickly sort the dates chronologically. When a data sheet is lengthy, you may need to sort the dates which will be very time-saving. This article will show you how you will sort the data in Excel by dates in 3 simple ways and every other thing you need to know about date insertion in Microsoft Excel sheets.
Sort in Excel by Date Using the Sort Command
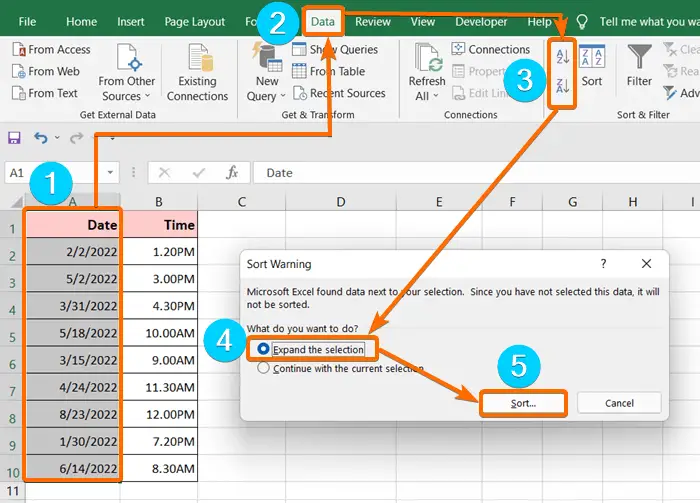
To sort in Excel by date with Sort command, go through the steps below:
- Select the column that contains the dates.
- Go to the Data.
- Select A-Z or Z-A.
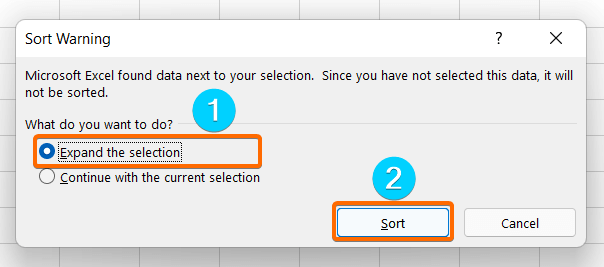
- Click on Expand the Selection from the Sort Warning dialog box.
- Then, hit Sort.
Sort in Excel by Date Using A-Z or Z-A Button
To sort by date in Excel with A-Z or Z-A button, here are the steps below:
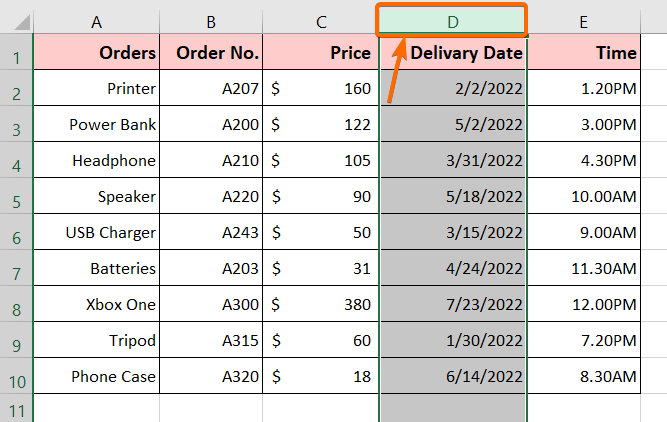
- Select the column that carries the dates by clicking on it. I have selected column D.

- Go to the Data tab.
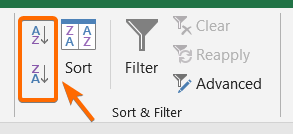
- Now click on the A-Z or Z-A command from the Sort & Filter group.
 A Sort Warning dialog box will show up to ask your permission.
 - Choose the Expand the Selection option to continue the process.
- Finally, click on Sort.
Sort in Excel by Date Using the Filter Command
Follow the following steps to sort dates in Excel by using the Filter command,
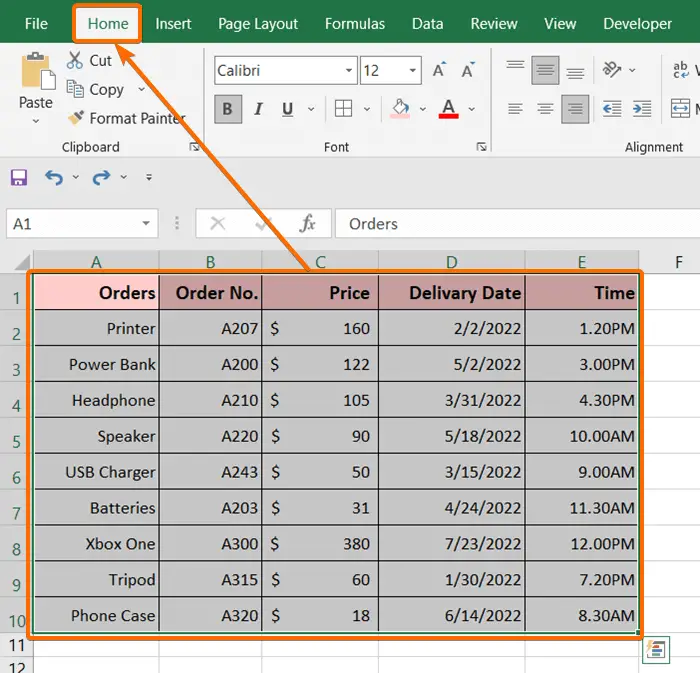
- Select the entire data set.
- Then, click on the Home tab.

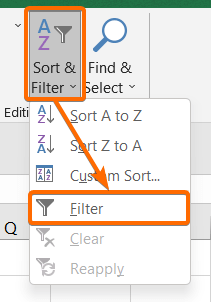
- Now under the Editing group, click on the Sort & Filter drop-down list and select Filter. Or you can use the shortcut CTRL + SHIFT + L.
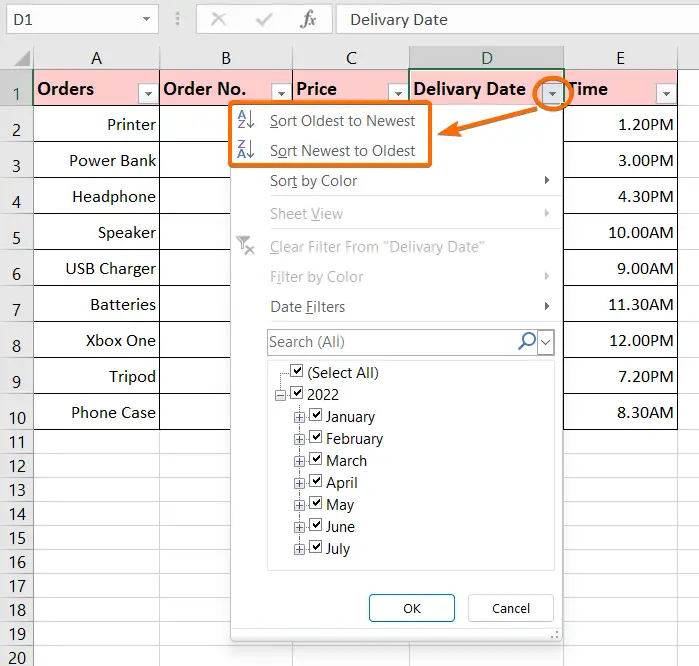
 You will see small drop-down arrows will appear for each heading.
 - Then click on the small arrow beside the date column header.
- Now hit Sort Oldest to Newest or Sort Newest to Oldest option.
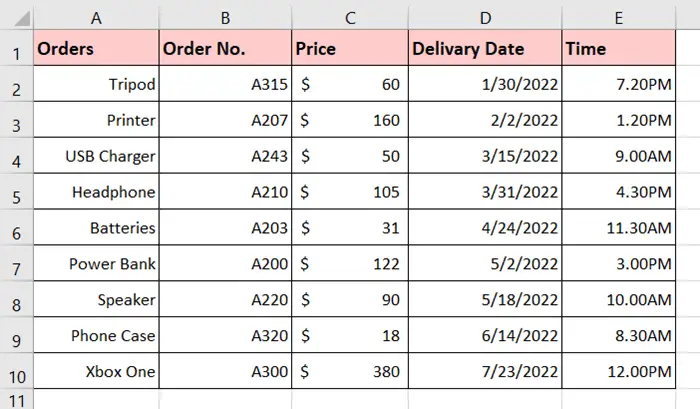
I have selected the Sort Oldest to Newest option for my data sheet and here is the resulting date arrangement in the image below:
Sort in Excel by Date Applying Custom Sort Command
To sort in Excel by date using the Custom Sort command, go through these steps below:
- First, go to the Home tab.
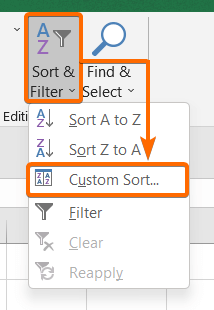
- Then, click on the Sort & Filter drop-down list (under the Editing group).
- Now, click on the Custom Sort command.
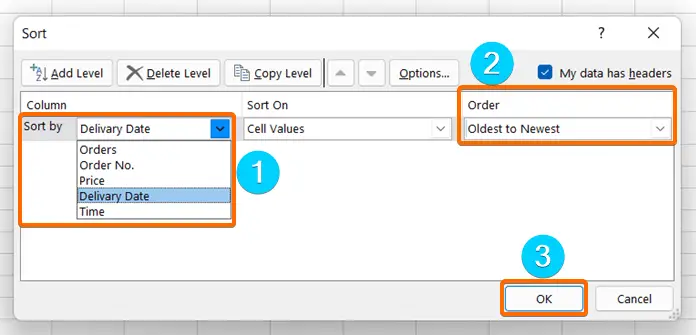
 You will see that the Sort dialog box will come along.
 - From the Sort by drop-down, select the date-related column header among the headers.
As for me, the date-related column header is the Delivery Date. - Then, change the Order. Make it Oldest to Newest or Newest to Oldest as per your choice.
- Finally, press OK.
Note: Put the cursor on any cell before clicking on the Custom Sort command or else the Sort dialog box won’t appear. Otherwise, a pop-up like this one will show up:
How to Insert Today’s Date in Excel
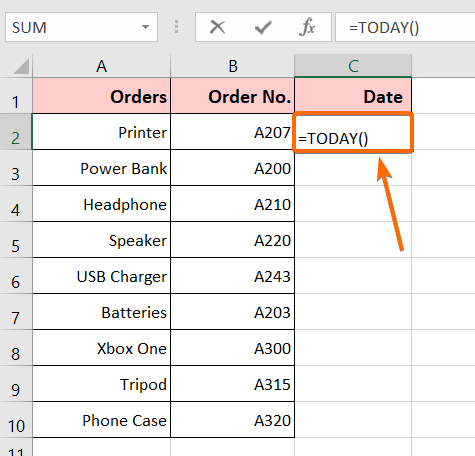
To insert today’s date in an Excel sheet, I use the following steps:
- Double-click on the cell where you want to put today’s date.
- Type the following formula of the TODAY function:=TODAY()

- Press ENTER.
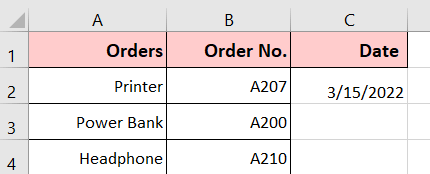
Today is March 15th, 2022. The date appeared on my sheet as it is.
How to Combine Date & Time into One Cell in Excel
Sometimes we need to insert the date and time into one single cell to keep our datasheet more managed.
Formula
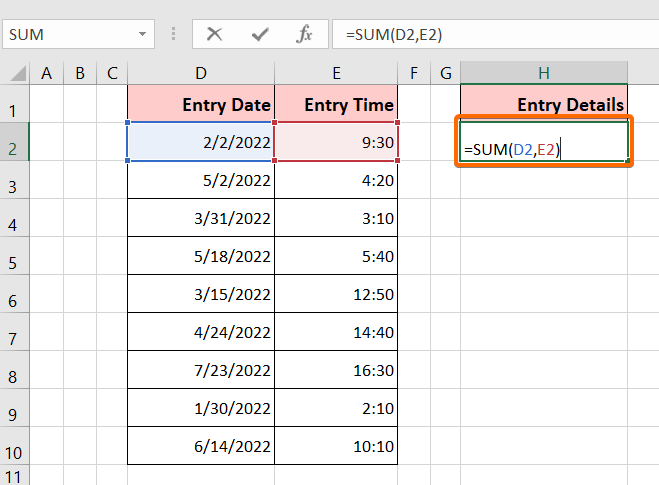
=SUM(D2,E2)Formula Explanation
- SUM > Responsible for combining the columns.
- D2, E2 > The column of date and time respectively.
To insert the date and time into one cell follow the following steps:
- Create a separate column where you want to get the time and date together.
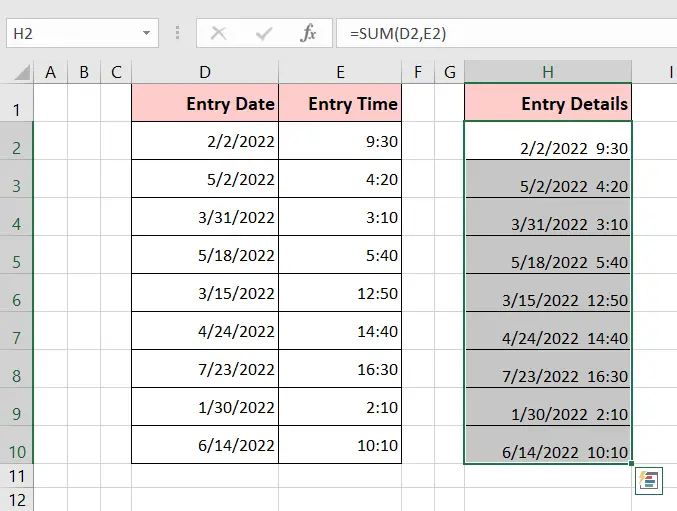
I made a separate column named Entry Details in column H. - Now, insert the following formula in the first cell of the new column: =SUM(D2,E2)
I have inserted the following formula of the SUM function inside the H2 cell.

- Now press the ENTER button to perform the above formula.
- Then hold the cursor on the Fill Handle and drag it from cell H2 to H10. Done!
Case 1: Date and Time not Appearing Together
Sometimes, you may find a situation where applying this formula won’t show the date and time together in a cell, rather only the date will appear in the new column.
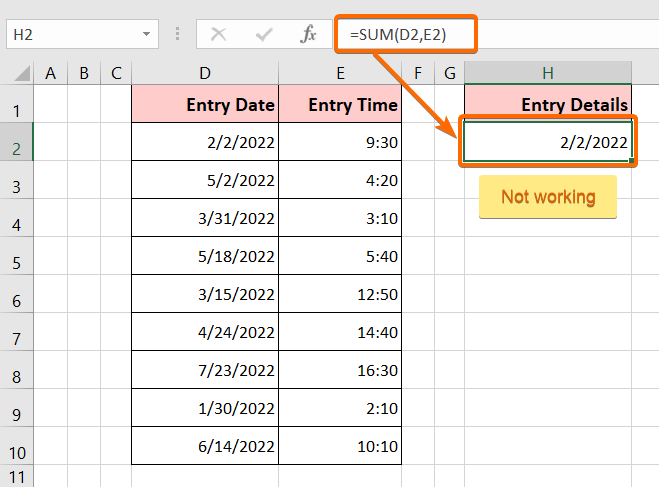
This problem happens when the cell format is wrong. To solve this issue, go through these steps below:
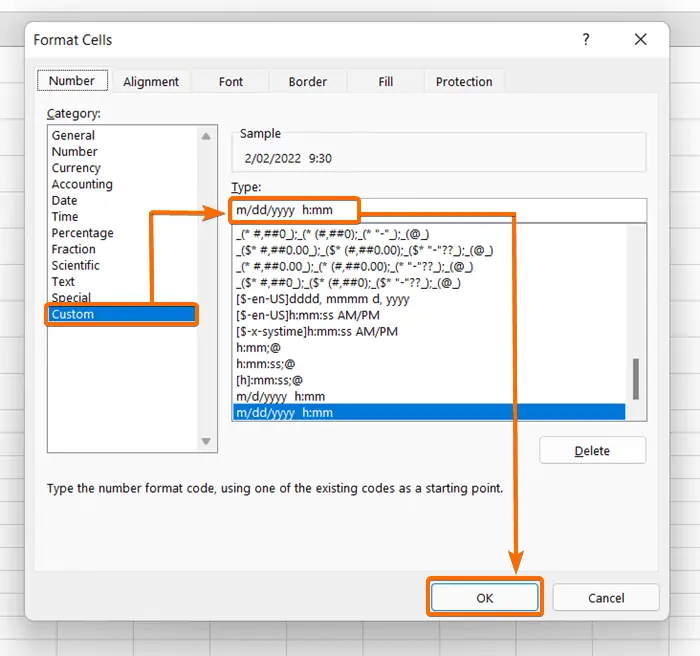
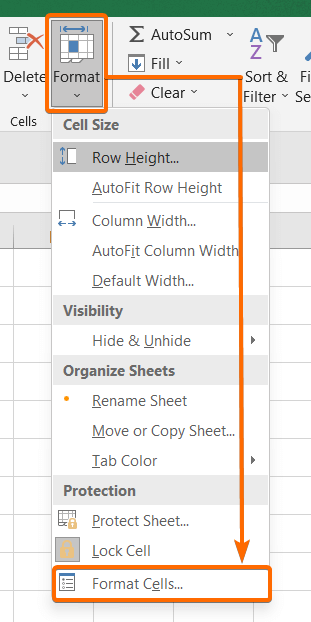
- Go to the Format drop-down under the Home tab and select the Format Cells command.
 The Format Cells Dialog Box will come along.
 - Under the Custom category, type the date and time format that you have chosen in the empty box.
I have the dates in m/dd/yyyy format and the time in h:mm format. - Hit OK to apply the change.
Case 2: Formula Return #### Error
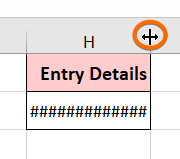
Sometimes, the cell will display characters like ##### error as the result. This problem occurs when the cell is not wide enough to fit in all the cell contents. Formulas that result in negative date and time will also display #####, as Excel does not support negative date and time.
To solve the ##### problem, double-click on the column header or drag its width to the right side as per your preference.
Sort Month in Excel DD/MM/YYYY
Sorting months from the dates in Excel is very useful in many cases. For instance, you may need to sort the months from the dates for delivering your upcoming project results or just simply remember your colleagues’ birthdays to have a birthday party.
Formula
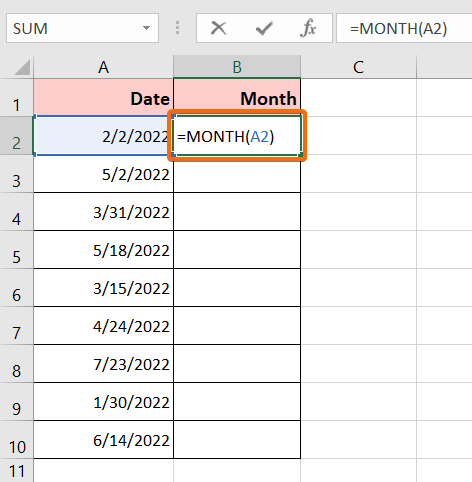
=MONTH(A2)Formula Explanation
- Month > It identifies the month.
- A2 > It is the first entry of the Date column.
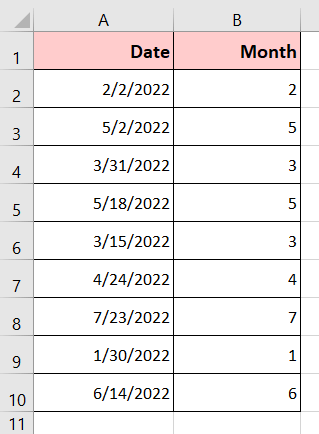
To sort the months in Excel from dates, here are the steps below:
- Create a new column for months.
I named the column header Month. - Select the first empty cell under that column.
- Insert the following formula of the MONTH function: =MONTH(A2)

- Press Enter.
- Then, drag the Fill Handle till the end of the column (B2-B10).
The end result will be like the image below:
Sort Year in Excel DD/MM/YYYY
Instead of months, you can sort only the years from the dates. Sorting the years can be very functional while drawing up a graph of several years of changing GDP or changing the annual average temperature of a country.
Formula
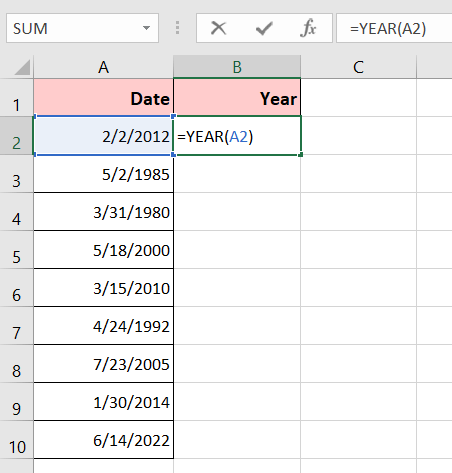
=YEAR(A2)Formula Explanation
- Year > It defines the years.
- A2 > It is the first entry of the Date column.
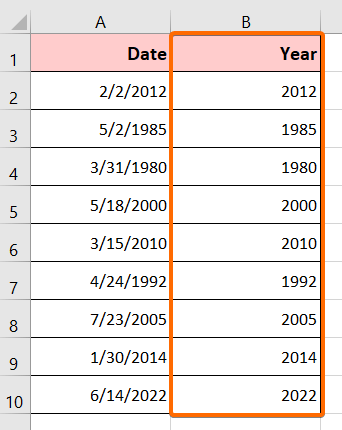
To sort years in Excel, perform these steps below:
- Add a new column for years.
I titled the column header Year. - Select the first empty cell under that column.
- Insert the following formula of the YEAR function: =YEAR(A2)

- Press Enter.
- Then, press and drag the Fill Handle till the end of the column (B2-B10).
And you are done! Here is the end result:
- How to Sort in Excel by Color (3 Techniques)
- How to Sort Data in Excel Using a Formula (7 Formulas)
- How to Sort by Number in Excel (4 Techniques)
How to Sort Dates in Excel Based on Month and Day
We often need to sort dates where the year is irrelevant to add. Excel allows you to sort the dates based on only month and day, not adding the year. You can sort the dates of your forthcoming meetings this way since mentioning the year is unnecessary here.
Formula
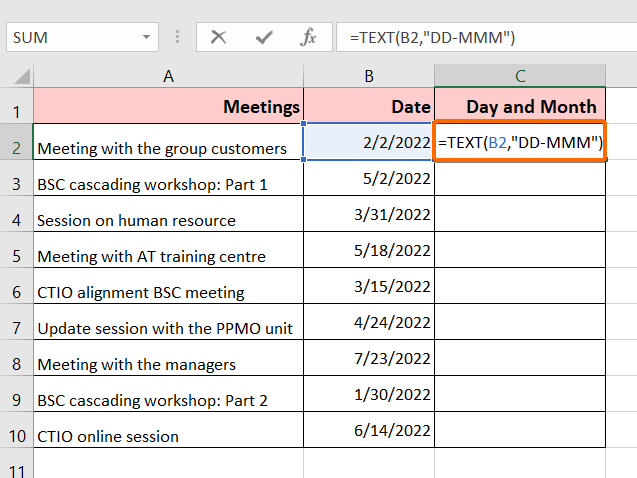
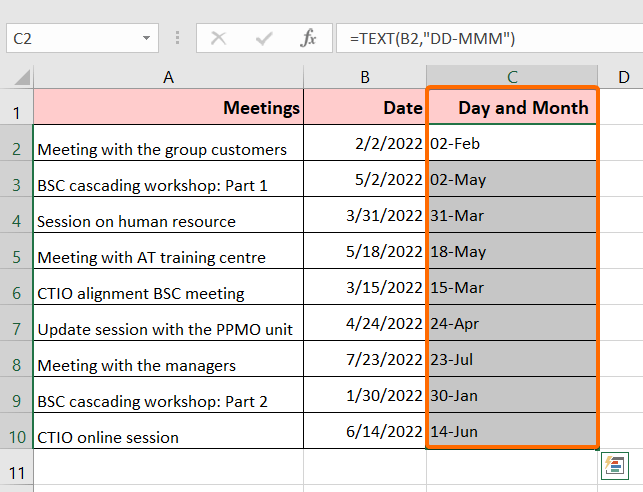
=TEXT(B2,"DD-MMM")Formula Explanation
- TEXT > It allows the name of the month to convert into text form.
- B2 > It is the first entry of the Date column.
- DD > It represents the day.
- MMM > It represents the first 3 characters of the month in text form.
Sort month and day with the TEXT function. So, here’s how:
- Insert a new column on the Excel sheet and give it a header.
I named it Day and Month. - Then, insert the following formula of TEXT function in the first cell of the new column: =TEXT(B2,”DD-MMM”)

- Press ENTER to apply the formula.
- Now drag the Fill Handle through the end of the column (C2-C10).
Now, you can sort the dates chronologically using the Sort command.
Sort by Date in Excel Not Working
If the sorting techniques do not work in your datasheet, don’t panic! It is probably a formatting issue and it’s very easy to solve. Your dates are most probably formatted in text strings that Excel can not read as dates. So you need to change the format to normal Excel dates.
To solve this problem, follow these steps:
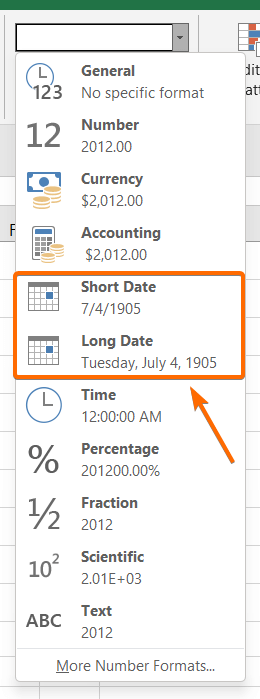
- Select the column of dates and go to the Home tab.
- Then, click on the Drop-down menu (under the Number group).
- Select Short Date or Long Date as per your preference.
Conclusion
I hope these above techniques to sort the dates will be enough for you to solve any kind of date-sorting problems. Now you can easily sort the dates in different chronological commands, whichever you like! If you find something confusing, feel free to let us know in the comment section.
Frequently Asked Questions
What is the date function in Excel?
The DATE function in Excel is used to create a date by specifying the year, month, and day. The syntax is: =DATE(year, month, day)
- year: The year for the date.
- month: The month for the date (1-12).
- day: The day of the month (1-31).
Example: =DATE(2022, 12, 31)
This formula returns the date December 31, 2022. The DATE function is useful for constructing dates dynamically based on specific criteria or calculations.
Why can’t I Sort by date in Excel?
If you’re unable to sort by date in Excel, ensure that your date values are recognized as dates by Excel. Follow these steps:
- Check Date Format: Confirm that your date values are formatted as dates. Right-click on the column header with dates, choose Format Cells, and ensure the selected format is Date.
- Convert Text to Date: If your dates are stored as text, use the DATEVALUE function to convert them to dates. Example: =DATEVALUE(A2) where A2 contains a date in text format.
- Recognize Date as Header: When sorting, ensure that Excel recognizes the row with dates as a header. Click within the column you’re sorting, and go to the Data tab. Click Sort and check the box labeled “My data has headers“.
- Use the DATE Function: If your dates are in separate columns for year, month, and day, use the DATE function to create a new column with combined date values.
- Check for Blank Cells: Ensure there are no blank cells in the column you’re sorting. Blank cells might disrupt the sorting process.
After performing these checks, attempt to sort by date again. Excel should now recognize and sort your date values correctly.
How do I sort by date in Excel not A to Z?
To sort by date in Excel in chronological order, follow these steps:
- Highlight the column containing the dates or select the entire data range.
- Press ALT + D + S sequentially to open the Sort dialog box.
- In the Sort dialog box, select the column by which you want to sort under Sort by.
- Choose Oldest to Newest for ascending order (chronological) or Newest to Oldest for descending order.
- Once you’ve configured your sorting options, click OK to apply the sort.
This will arrange the data based on the dates in chronological order. By following these steps, you can easily sort your data by date in Excel, ensuring that the dates are arranged from the oldest to the newest or vice versa.
 You will see small drop-down arrows will appear for each heading.

 The
The 