How to Sort in Excel by Name (3+ Methods)
Sort in Excel by Name through the Data Tab
To sort in Excel by name through the Data tab, follow these steps below:
- Select your data first.
- Go to the Data tab.
- Click on the A to Z or Z to A icon to sort data by name alphabetically.
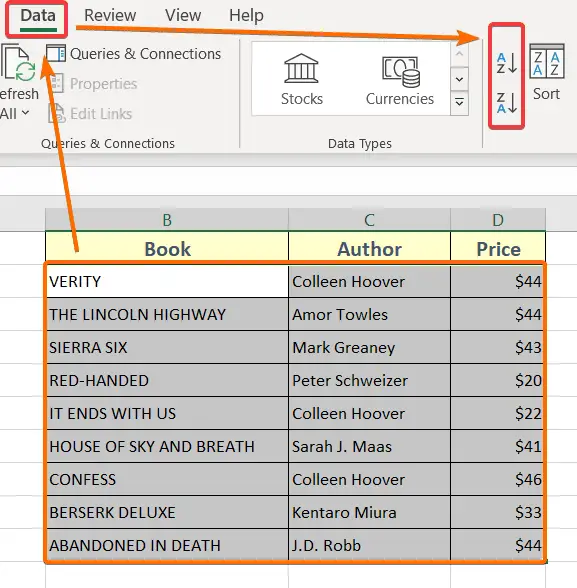
The result is in the following image:

Note: If you are looking for keyboard shortcut keys to sort in Excel by name,
- Press ALT > A > S > A sequentially to sort in A to Z order (ascending).
- Press ALT > A > S > D sequentially to sort in Z to A order (descending).
Sort in Excel by Name in Excel Using Sort & Filter Command
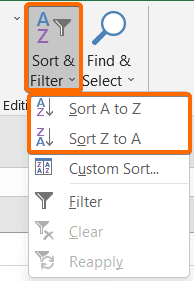
You can also sort data in Excel from the Home tab. Check out the following usage guide to learn in detail:
- Go to the Home tab.
- Then hit Sort & Filter drop-down from the Editing group.
- Now select Sort A to Z or Sort Z to A as per your preference.
Sort in Excel by Name Alphabetically Use the Filter Command
Applying a Filter will also assist in arranging a column with names in Excel. To do that, go through these steps below:
- Select any column header by clicking any one of them.
- Then click on the Home tab.
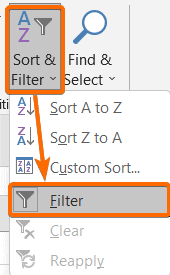
- Now select the Sort & Filter drop-down.
- Finally, click on the Filter command.

Note: You can also find the Filter command from the Data tab > Sort & Filter group > Filter.
 You will see drop-down arrows that will show up beside your column header(s).
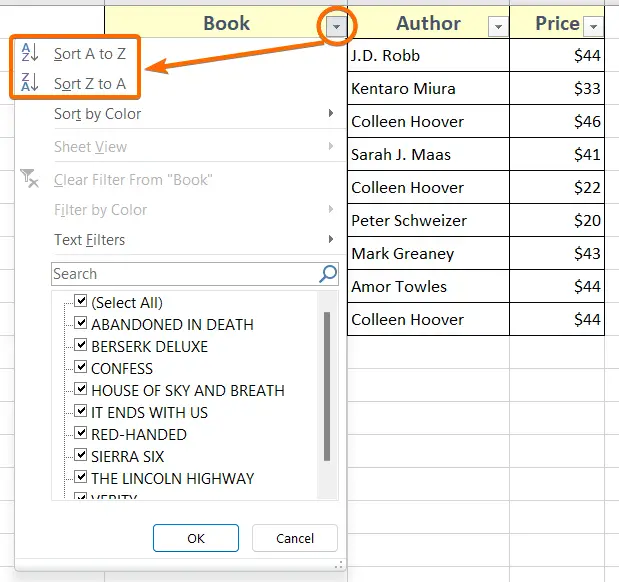
 - Click on the drop-down arrow of your selected column.
- Now choose either Sort A to Z or Sort Z to A.
How to Sort Alphabetically in Excel and Keep Rows Together
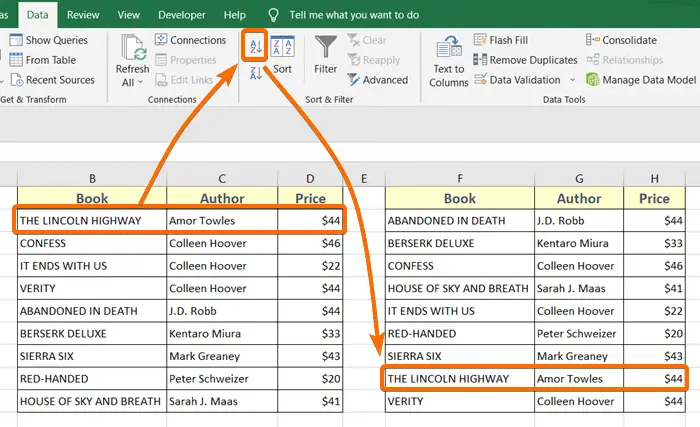
If you want to rearrange the rows alphabetically in your data table, here is how to do that:
- Select the data table and go to the Data tab.
- Then under the Sort & Filter group, click the A-Z or Z-A command.
This will sort your data alphabetically in Excel and keep all the rows together.
- How to Sort Data in Excel Using a Formula (7 Formulas)
- How to Sort in Excel by Date (3 Ways)
- How to Sort in Excel by Color (3 Techniques)
How to Sort in Excel by Last Name with RIGHT, LEN & FIND Functions
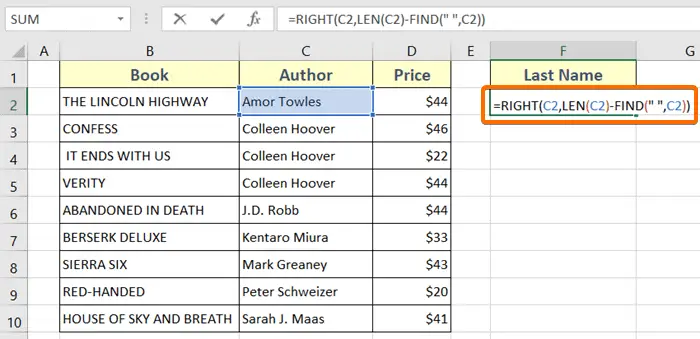
Sorting text data by their last words can be done very easily using a formula. I will use the RIGHT function, LEN function, and FIND function to create the formula.
Formula
=RIGHT(C2,LEN(C2)-FIND(" ",C2))Formula Explanation
- C2 is the cell address where you’ve stored the full name.
- LEN(C2) calculates the total number of characters in cell C2.
- FIND(” “,C2) finds out the position of the first space in cell C2.
- RIGHT(C2,LEN(C2)-FIND(” “,C2)) returns only the right part of the whole text in cell C2 after the first space is encountered.
Here are the steps below:
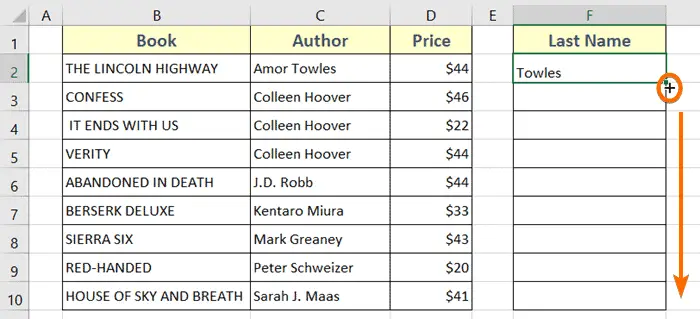
- Select a cell to insert the sorting formula.
In this case, I choose cell F2 for that. - Now write this formula in that empty cell: =RIGHT(C2,LEN(C2)-FIND(” “,C2))

- Now, press the ENTER key and drag the Fill Handle icon from cell F2 to F10 to apply the above formula all around the cell range.
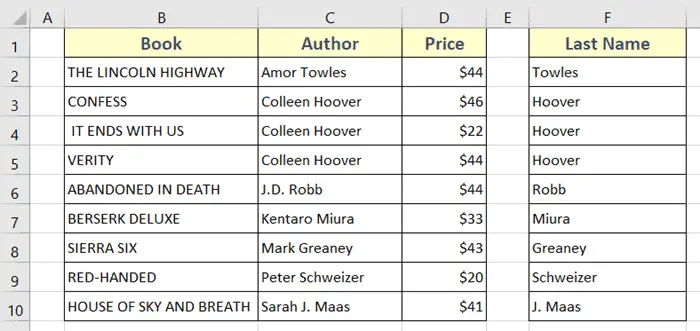
After following the above steps the resulting table will look like the image below:
Conclusion
In this article, I tried to assist you in sorting in Excel by names. If you find any issue regarding sorting in Excel, feel to let me know in the comment section. I will try to come up with solutions. Thanks.
Frequently Asked Questions
How do I sort by name and keep rows together in Excel?
To sort by name and keep rows together in Excel:
- Highlight the columns containing the names you want to sort, including any related data in other columns that you want to keep together.
- Press ALT + D + S sequentially to open the Sort dialog box.
- In the Sort dialog box, select the column by which you want to sort under Sort by. Choose Values from the drop-down menu to indicate that you are sorting by names.
- Choose the desired sorting order, either A to Z for ascending order or Z to A for descending order.
- If you have additional columns you want to sort by, click on Add Level in the dialog box and repeat steps 3-4 for each level.
- Check the Preserve cell formatting box if you want to maintain the formatting of the cells while sorting.
- Once you’ve configured your sorting options, click OK to apply the sort.
This will arrange the rows alphabetically based on the names in the specified column while keeping related data together. By following these steps, you can sort your data in Excel by name and ensure that the rows stay together, maintaining the relationships between different sets of data.
How do I sort alphabetically in Excel formulas?
In Excel formulas, you can use the SORT function to sort data alphabetically. Here’s a simplified example: =SORT(range)
range: The range of cells containing the data you want to sort. For example, =SORT(A2:A10)
This formula sorts the values in cells A2 to A10 alphabetically in ascending order. Adjust the range according to your data.
Remember to enter the formula in a cell outside the specified range to avoid overwriting your original data. Additionally, ensure your Excel version supports the SORT function, as it was introduced in later versions like Excel 365 and Excel 2019.
Note: This formula might not work in older Excel versions that do not support the SORT function.
How do I group Data by name in Excel?
To group data by name in Excel, follow these steps:
- Highlight the columns containing the data you want to group, including the column with names.
- Click on the Data tab in the Excel ribbon.
- Under the Data Tools group, find and click on the Group or Subtotal button.
- A dialog box will appear. Select the column by which you want to group, typically the one with names.
- After selecting the grouping options, click OK.
This will create groups based on the names in the selected column, collapsing the rows and allowing you to easily expand or collapse groups to view or hide the associated data.
Remember, this process works well when your data is already sorted by the column you want to group. If not, consider sorting the data before applying the grouping for better organization.
