How to Open an XML File in Excel [4 Ways]
About the Setup
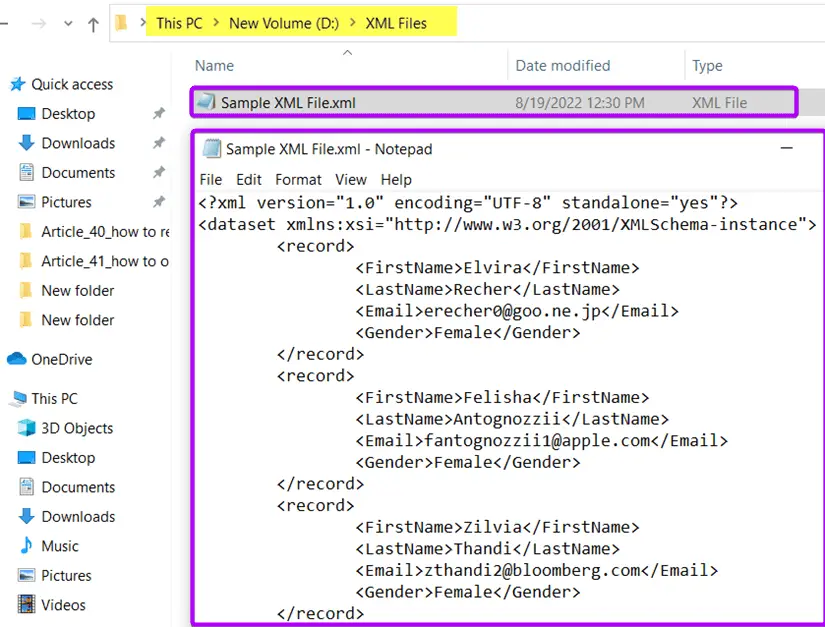
I’ve saved an XML file named “Sample XML File.xml” in the following directory:
D:\XML Files\Sample XML File.xmlIn this article, I will show you 4 different ways to open this XML file in Excel.
Open an XML File by Developer Tab in Excel
You can import your XML file from the XML group in the Developer tab. However, if you haven’t activated your Developer tab yet, read 2 ways to enable the Developer tab in Excel.
After enabling the Developer tab, follow these steps below to open an XML file:
- Select the Developer tab in the ribbon.
- Click on the Import button in the XML group.
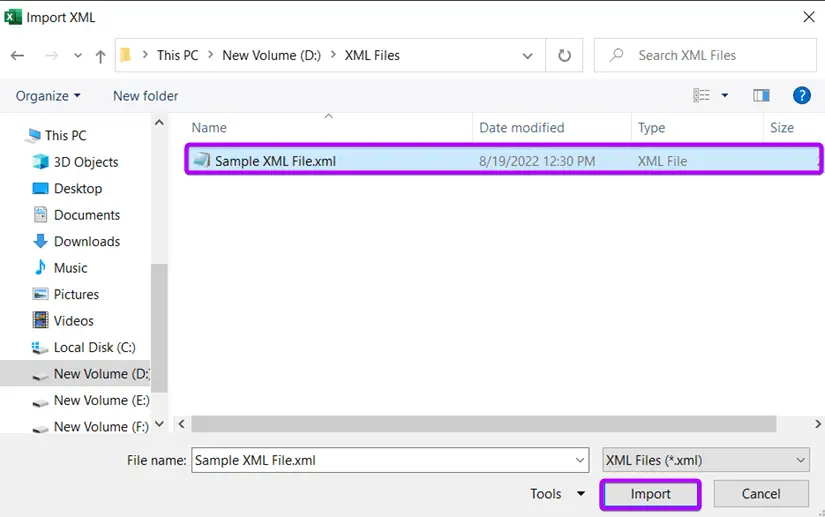
 Now, the Import XML dialog box will appear.
 - Navigate through the folder to locate your XML file.
- After selecting the right XML file hit the Import button.
 After that, a rectangular dialog box will open with the following message: “The specified XML source does not refer to a schema. Excel will create a schema based on the XML source data.”
 - Just hit the OK button to proceed.
 Now the Import Data dialog box will appear.
Here, you can specify whether you want to put the XML file in the existing worksheet or in a new worksheet. - Choose a destination option.
Here, I’m going with the “XML table in existing worksheet” option. - Then click on a cell to locate your XML file.
I’m choosing cell A1 in sheet1. - Finally, hit the OK button.
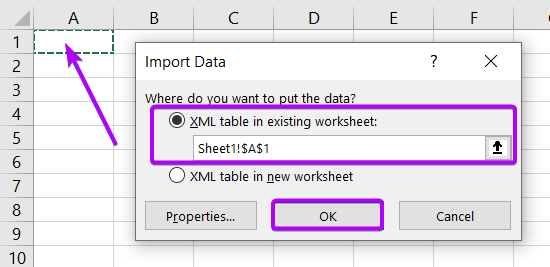
Now, you will notice that the XML file has been imported in cell A1 of sheet1. Have a look:

- 2 VBA Codes to Open an XML File in Excel
- How to Remove XML Mapping in Excel (Quickest Way)
- How to Create an XML Schema Using Data in Excel
- How to Import XML Data from Web to Excel
Load an XML File Using Power Query in Excel
The Power Query is a very powerful tool inside Microsoft Excel that enables you to import data from various sources. However, you can use the Power Query to import an XML file too.
For that, you can go through the following steps:
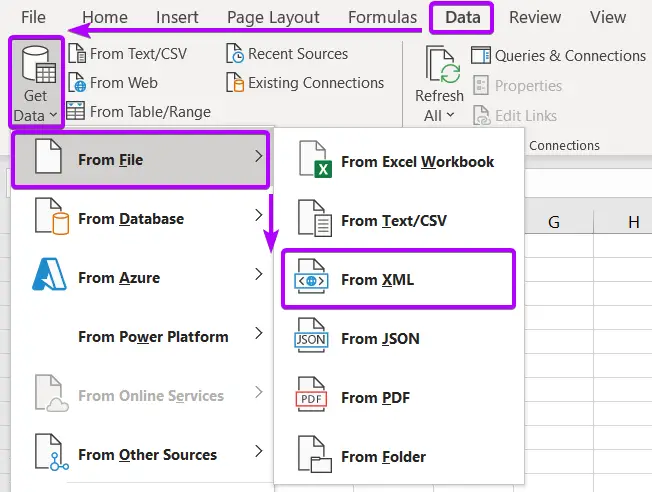
- Go to the Data tab > Get & Transform Data group.
- After that, select Get Data > From File > From XML.

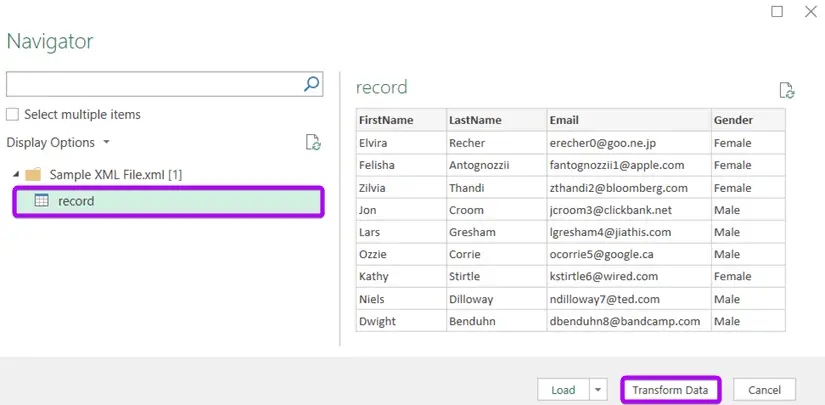
- In the Navigator window, select “record” just below your XML file.
- After that, hit the Transform Data command.
 This will take you to the Power Query Editor window. Where you will find your XML file already interpreted as an Excel table. If you need to perform any processing, you can do that here.
To import the data table from Power Query Editor to your Excel worksheet, - Hit the Close & Load button.
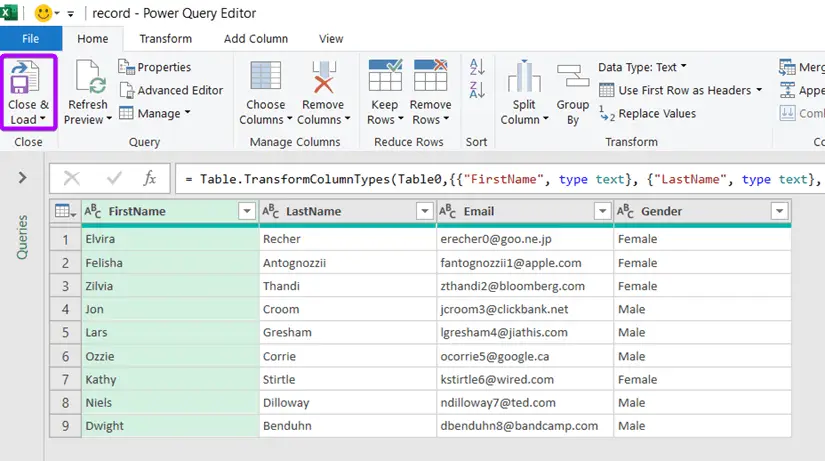
Now, you have successfully imported your XML file to the Excel worksheet. Take a look:

- A Complete Guide to Convert a CSV File to an XML File in Excel
- 5 Steps to Convert an Excel File to XML File
Import an XML File with Visual Basic Script in Excel
If you are a VBA freak, you can use the following Visual Basic Script to import your XML file inside an Excel worksheet. To do that, here are the steps below:
- Press ALT + F11 to open the Visual Basic Editor.
- Go to Insert > Module to open a new module inside the Visual Basic Editor.
- Then, paste the following Visual Basic Script inside the new module.
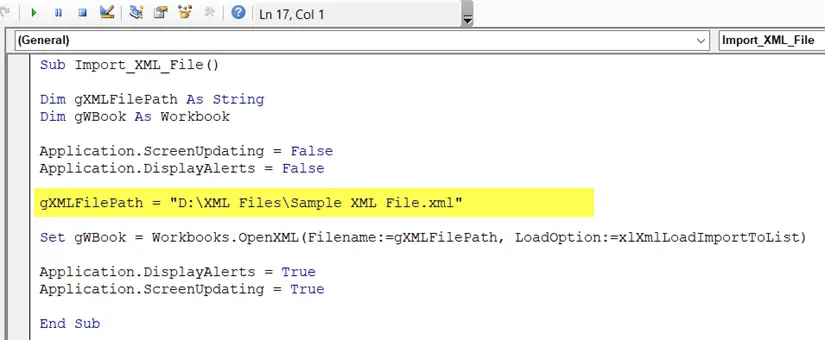
Sub Import_XML_File() Dim gXMLFilePath As String Dim gWBook As Workbook Application.ScreenUpdating = False Application.DisplayAlerts = False gXMLFilePath = "D:\XML Files\Sample XML File.xml" Set gWBook = Workbooks.OpenXML(Filename:=gXMLFilePath, LoadOption:=xlXmlLoadImportToList) Application.DisplayAlerts = True Application.ScreenUpdating = True End Sub - Insert the directory path of the XML file in the VBA code.
Look at the following screenshot to get an idea of where to insert the directory path of the XML file.
Get the Directory Path of Your XML File
If you don’t know how to get the directory path of your XML file,
- Browse through the folders where you’ve kept the XML file.
- Then click on the address bar.
The address of your XML file will be highlighted in blue color.
- Press CTRL + C to copy it.
- Before pasting the directory path in the VBA code, add a backward slash “\” followed by the XML file name.
For example, the copied address from the address bar is:
D:\XML FilesThe complete address for the VBA code is:
D:\XML Files\Sample XML File.xml
- After pasting the VBA code, come back to your worksheet and choose a cell to put the XML file.
Here I’ve selected cell A1. - Press ALT + F8 to open the Macro dialog box.
- Select the subroutine “Import_XML_File” and then hit the Run button.
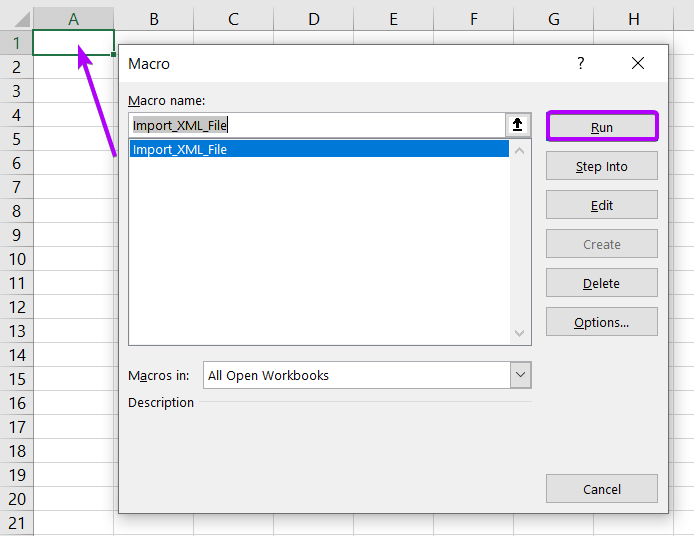
Now, you have successfully imported your XML file to the Excel worksheet. Take a look:

Open an XML File From File Menu in Excel
You can also open an XML file while starting your Excel program using the Open option. You can also find the Open option in the File menu.
Anyways, here are the steps to follow:
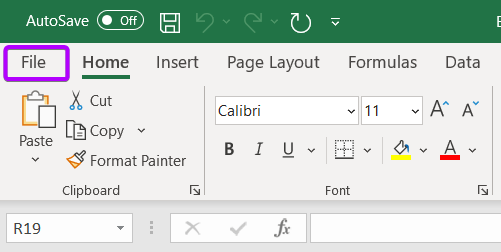
- Select the File menu in the ribbon.

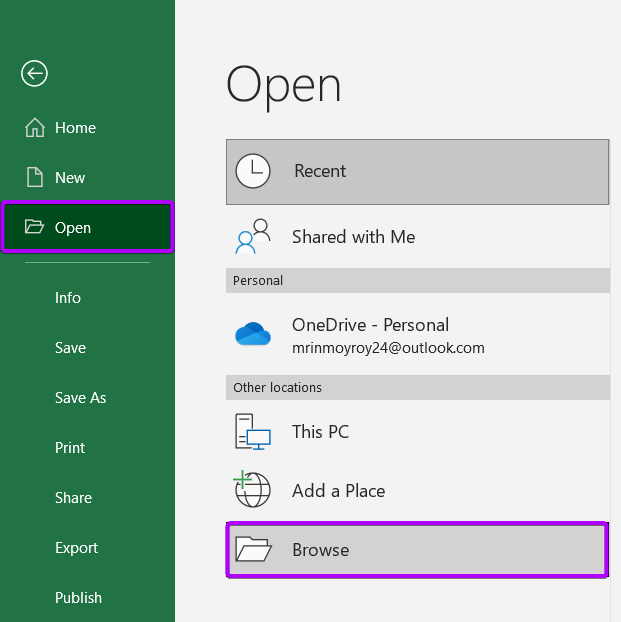
- Now, go to Open > Browse.
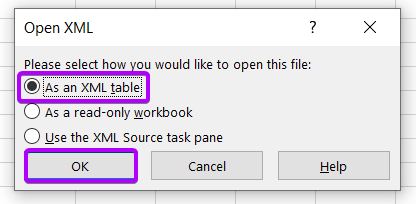
 The Open XML dialog box appears with 3 available options:
- As an XML table.
- As a read-only workbook
- Use the XML Source task pane
- To open the XML file with full flexibility to just like an Excel table, select the “As an XML table” option.
- Then hit the OK button.
 A rectangular dialog box appears.
 - Just hit the OK button to proceed.

Finally, you can see that the XML file has been imported inside an Excel worksheet. Just take a look:

Refresh XML Data
When you import an XML file inside an Excel worksheet, a direct link establishes between your Excel file and the XML file. Thus, if you change your XML file, you can see the changes in your Excel worksheet. But as the connection is semi-dynamic, you have to refresh your Excel worksheet to see that changes.
There are multiple ways to refresh your Excel worksheet. I’m showing you them all one by one.
Using Refresh Data Command
Just go to the Developer tab in the ribbon. Then hit the Refresh Data command in the XML group.

Using Refresh All Command
You will find the Refresh All command in the Queries & Connections group under the Data tab. Just click on the Refresh All command to refresh your Excel worksheet.

Using the Context Menu
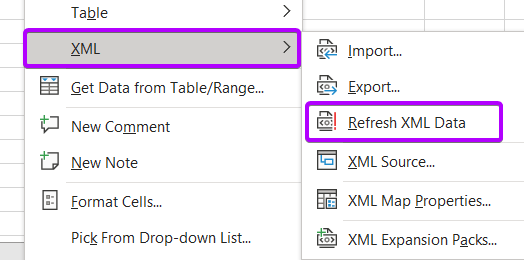
You need to select any of the cells of your Excel Table that were created by importing the XML file. Then right-click on the cells. From the context menu, go to XML > Refresh XML Data to refresh your Excel worksheet and see the changes made.
Practice XML File
<?xml version="1.0" encoding="UTF-8" standalone="yes"?>
<dataset xmlns:xsi="http://www.w3.org/2001/XMLSchema-instance">
	<record>
		<FirstName>Elvira</FirstName>
		<LastName>Recher</LastName>
		<Email>erecher0@goo.ne.jp</Email>
		<Gender>Female</Gender>
	</record>
	<record>
		<FirstName>Felisha</FirstName>
		<LastName>Antognozzii</LastName>
		<Email>fantognozzii1@apple.com</Email>
		<Gender>Female</Gender>
	</record>
	<record>
		<FirstName>Zilvia</FirstName>
		<LastName>Thandi</LastName>
		<Email>zthandi2@bloomberg.com</Email>
		<Gender>Female</Gender>
	</record>
	<record>
		<FirstName>Jon</FirstName>
		<LastName>Croom</LastName>
		<Email>jcroom3@clickbank.net</Email>
		<Gender>Male</Gender>
	</record>
	<record>
		<FirstName>Lars</FirstName>
		<LastName>Gresham</LastName>
		<Email>lgresham4@jiathis.com</Email>
		<Gender>Male</Gender>
	</record>
	<record>
		<FirstName>Ozzie</FirstName>
		<LastName>Corrie</LastName>
		<Email>ocorrie5@google.ca</Email>
		<Gender>Male</Gender>
	</record>
	<record>
		<FirstName>Kathy</FirstName>
		<LastName>Stirtle</LastName>
		<Email>kstirtle6@wired.com</Email>
		<Gender>Female</Gender>
	</record>
	<record>
		<FirstName>Niels</FirstName>
		<LastName>Dilloway</LastName>
		<Email>ndilloway7@ted.com</Email>
		<Gender>Male</Gender>
	</record>
	<record>
		<FirstName>Dwight</FirstName>
		<LastName>Benduhn</LastName>
		<Email>dbenduhn8@bandcamp.com</Email>
		<Gender>Male</Gender>
	</record>
</dataset>
Conclusion
Here, I’ve discussed 4 unique methods to open an XML file in Excel. I hope you will find this article helpful. If you have any queries regarding the XML file in Excel, feel free to let me know in the comment section. I will try to respond as soon as possible. Thank you.
Frequently Asked Questions
How do I convert an XML file to Excel?
To convert an XML file to Excel, follow these steps:
- Launch Microsoft Excel on your computer.
- In Excel, go to the Data tab on the ribbon.
- Click on Get Data or Get External Data and choose From XML from the drop-down menu.
- Navigate to and select the XML file you want to convert and click Import.
Excel will open the XML Import Wizard. - Follow the wizard to specify how Excel should handle the XML data. This includes defining the XML source, mapping elements to columns, and choosing the import options.
Once the import is complete, Excel will display the XML data in a tabular format. - Review the data to ensure it’s correctly structured.
- Click Load or Load To to import the XML data into Excel. This will populate a new worksheet with the XML data.
- Save the Excel file in XLSX or another Excel-compatible format to preserve the converted data.
Your XML file is now successfully converted to Excel. Keep in mind that the exact steps may vary slightly depending on the version of Excel you are using, so refer to the specific instructions for your version if needed.
Can I edit XML in Excel?
Yes, you can edit XML in Excel by following these steps:
- Launch Microsoft Excel on your computer.
- Go to the File menu and select Open.
- Choose the XML file you want to edit.
- Excel will prompt you to import the XML file.
- Follow the wizard to specify how Excel should treat the data, including defining the XML source and mapping elements to columns.
- Once imported, the XML data will be displayed in Excel’s spreadsheet format. You can now view and edit the data as you would with any other Excel spreadsheet.
- After making edits, save the file in Excel format (XLSX). This preserves both the original XML structure and your modifications.
Note: The ability to edit XML directly in Excel may depend on the complexity and structure of the XML file. For more advanced XML editing, consider using specialized XML editors or tools.
Make sure to adapt these steps based on the version of Excel you are using, as the process may vary slightly between versions.
How to install XML software?
To install XML software, follow these steps:
- Select XML Software: Choose the XML software that suits your needs, such as an XML parser, editor, or database.
- Verify System Requirements: Check that your system meets the software’s minimum requirements in terms of operating system and hardware.
- Download Software: Visit the official website of the chosen XML software and download the installer or package compatible with your operating system.
- Install Software: Follow the installation instructions provided by the software’s documentation. This may involve running an installer, extracting files, or using a package manager.
- Configure Settings (if necessary): Set up any required configurations as outlined in the documentation, such as file paths or connection settings.
- Test Installation: Verify a successful installation by performing a basic test, such as parsing an XML file or editing a document depending on the software type.
- Troubleshoot (if needed): If any issues arise during installation, consult the troubleshooting guide or community forums for assistance.
- Update Software (Optional): Periodically check for updates and follow the provided instructions to ensure you have the latest features and security patches.
Remember to adapt these steps based on the specific XML software you choose. Always refer to the official documentation for accurate and detailed installation instructions.
 Now, the Import XML


 The Open XML dialog box appears with 3 available options:
 A rectangular dialog box appears.