How to Convert an Excel File to XML File [A Complete Guide]
Converting an Excel file to an XML file may seem like a complex task, but with the right guidance, it can be a straightforward process. In this step-by-step guide, I’ll show you how to convert your Excel data into an XML file in just five easy steps. Whether you need to share structured data with others or integrate it into a different system, converting to XML can be a valuable skill to have. Let’s get started!
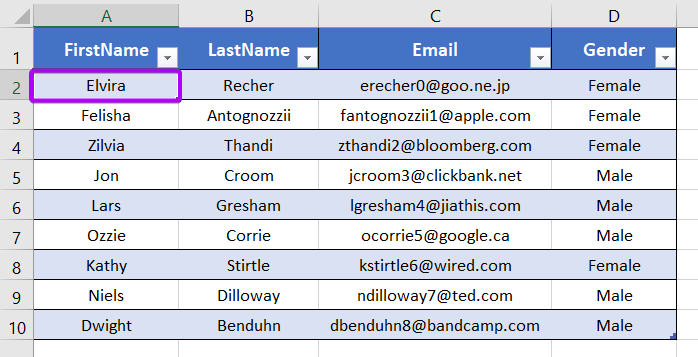
I’ve created the following dataset in a new worksheet. Now I’m gonna export this dataset as an XML file.

5 Steps to Convert an Excel File to XML
Follow these steps to convert an Excel file to an XML file:
Step 1: Create an XML Schema
To export your Excel worksheet as an XML file, the first thing you need to do is create an XML schema.
I’ve made a different tutorial on creating an XML schema using data in Excel. If you don’t know how to create an XML schema for your own dataset, I’m recommending you go through that tutorial first.
Anyways, the following markup code is the schema for my dataset. In this XML schema, I’ve described how data from my Excel worksheet will be stored in the XML file.
<?xml version='1.0' encoding='UTF-8'?>
<dataset>
  <record>
    <FirstName>Ulrick</FirstName>
    <LastName>Copner</LastName>
    <Email>ucopner0@naver.com</Email>
    <Gender>Male</Gender>
  </record>
  <record>
    <FirstName>Tabbie</FirstName>
    <LastName>Aysik</LastName>
    <Email>taysik1@topsy.com</Email>
    <Gender>Female</Gender>
  </record>
</dataset>
- A Complete Guide to Convert a CSV File to an XML File in Excel
- An Overview of XML in Excel
- How to Map an XML File in Excel (Complete Guide)
Step 2: Open XML Source Task Pane
XML file-related commands are available in the XML group. You will find the XML group in the Developer tab. However, by default, you may not find the Developer tab in the main ribbon. If you don’t see it in the main ribbon, you have to activate it first. From the following link, you can read 2 ways to add the Developer tab in Excel.
To open the XML Source task pane:
- First, select the Developer tab.
- Then, click on the Source command in the XML group.

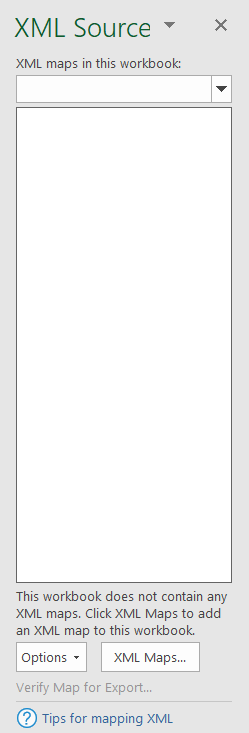
Now, the XML Source task pane will appear on the right side of your Excel worksheet.
Step 3: Open Your XML Schema
At this stage, you need to import the XML schema that you’ve created at the beginning. To do that:
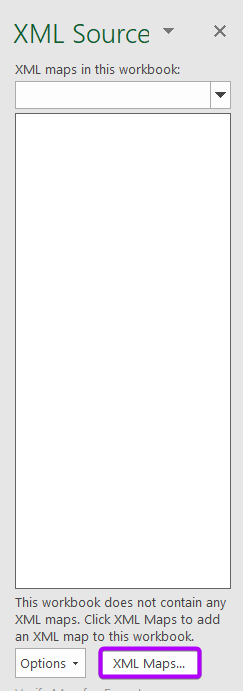
- Click on the XML Maps command at the bottom of the XML Source task pane.

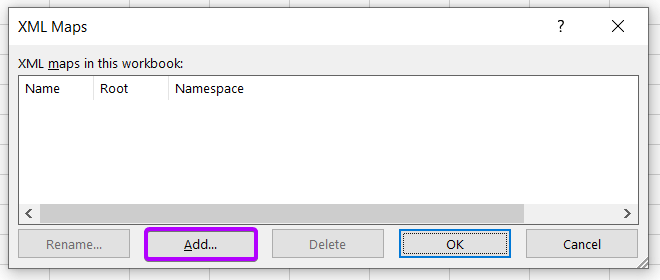
The XML Maps dialog box will appear. - Click on the Add button in the XML Maps dialog box.
- Now navigate to the folder where you’ve saved the XML schema.
- Double-click on the XML schema to add it to the XML Maps dialog box.
 After selecting the XML Schema, the following dialog box will appear.
 - Just hit the OK button to proceed.

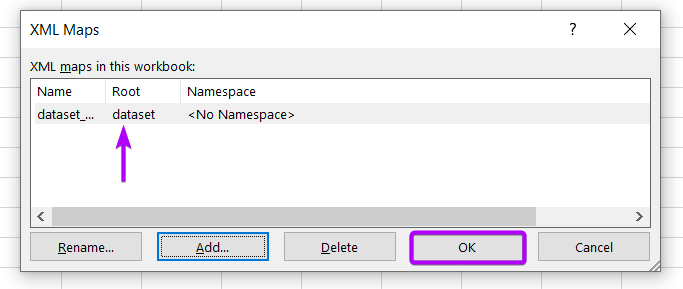
Now, check out the XML Maps dialog box. You will see the XML schema has been added to the XML Maps dialog box. - Hit OK to go back to your worksheet.

Now, you will see all the column names of your XML schema in the XML Source task pane. This means you have successfully added your XML schema to your Excel file.
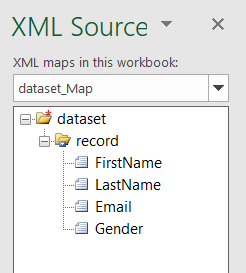
Step 4: Map XML File to Excel File
Now you need to create a map between your Excel dataset and XML file. For that:
- Drag each column name from the XML Source task pane.
- Then drop each of them in the corresponding column header of your Excel dataset.
- Repeat dragging and dropping until you’re done with all of your columns.
As you drag and drop the column names from the XML Source task pane, the columns in your Excel dataset will be converted into tables. Thus, you can be sure that the mapping has been done correctly.
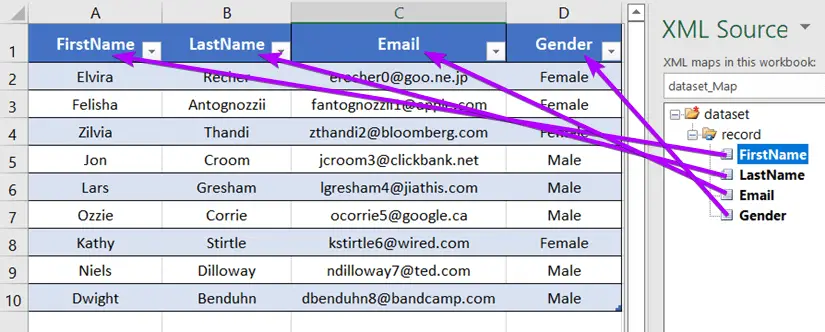
Also, you will see that each of the column names in the XML Source task pane has been turned into bold letter format. This is another way to be sure that the mapping has been done correctly.
To check it, you can click on any column names in the XML Source task pane. After selecting a column name in the task pane, the corresponding column in the Excel dataset will automatically be highlighted straightway.
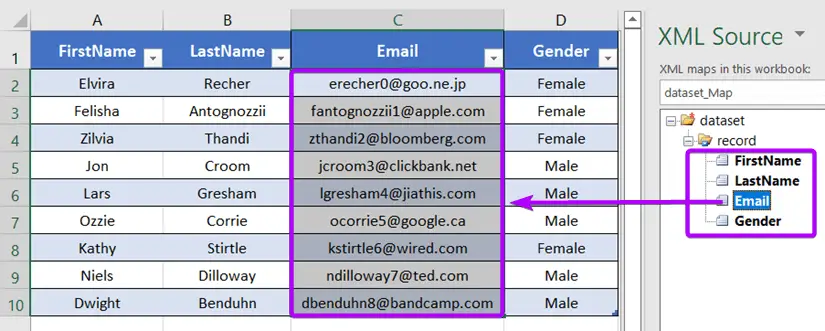
Step 5: Convert Excel File to XML File
To export your Excel file as an XML file:
- Select any cell of your dataset.

- Go to the Developer tab in the main ribbon.
- Click on the Export button in the XML group.

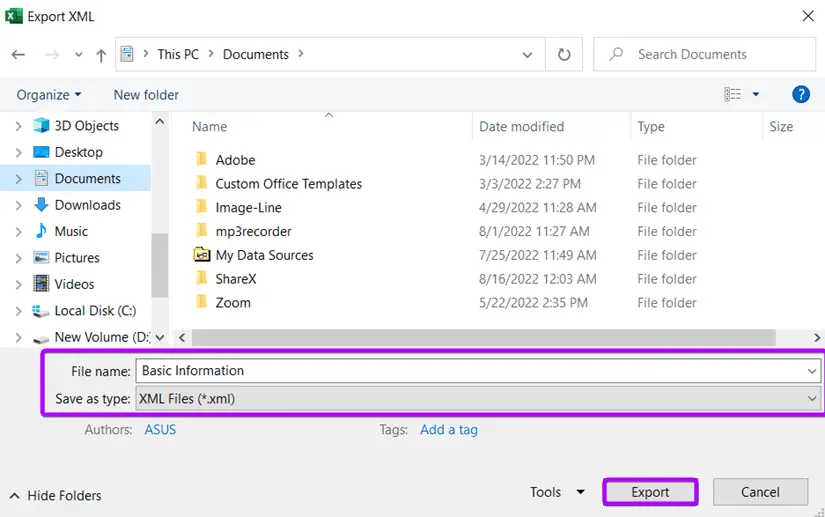
The Export XML dialog box will appear. - Give your XML file a name in the File Name box.
- Then hit the Export button to start exporting your Excel dataset.

To check whether your Excel dataset has been converted into an XML file or not:
- Navigate to the folder where you have saved your XML file.
- After that open the XML file.
The result will look like the following picture. There you will see that each of the rows of the Excel dataset has been saved inside the “record” tag.
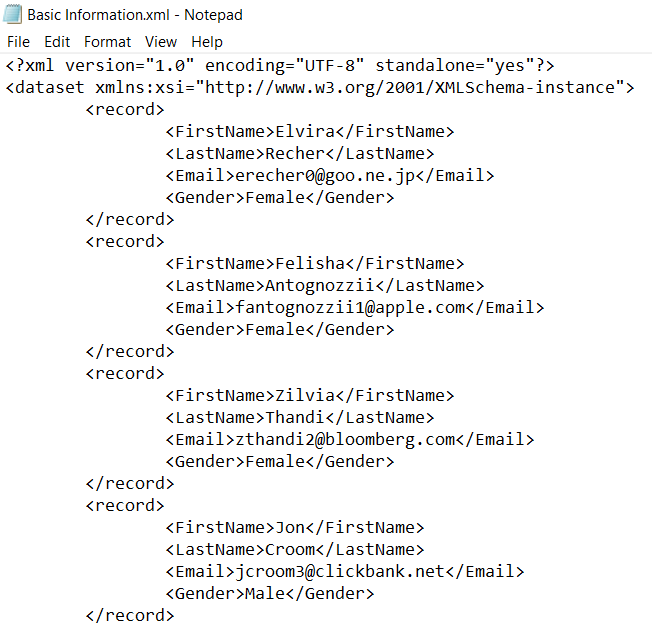
Conclusion
Throughout the article, I’ve tried to show you how to convert an Excel file to an XML file with 5 simple steps. I hope, after reading this blog, you can export your own Excel file as an XML file with ease. Still, if you face any problems, let me know in the comment section. Regards!
Frequently Asked Questions
What is the purpose of converting an Excel file to an XML file?
Converting an Excel file to an XML file is often done to facilitate data exchange between different software systems and to maintain structured data for analysis.
Are there any tools or software required to convert Excel to XML?
You can convert Excel to XML using Microsoft Excel itself; no additional software is necessary. However, you may need an XML schema if you want to maintain a specific data structure.
How do I create an XML schema for my Excel data?
You can create an XML schema manually using XML schema definition language (XSD) or use online tools to generate one based on your Excel data.
What’s the advantage of using XML for data storage and exchange?
XML is a platform-independent format that is both human-readable and machine-readable, making it suitable for sharing data across different systems and for long-term data archiving.
Are there any limitations to converting Excel to XML?
While XML is versatile, it may not preserve all Excel formatting, and complex formulas or macros may need adjustment after conversion.
Is there a way to automate the Excel to XML conversion process?
Yes, you can use VBA (Visual Basic for Applications) macros to automate Excel to XML conversions for recurring tasks, saving time and effort.
Can I revert an XML file back to an Excel file if needed?
Yes, you can import XML data back into Excel using the XML Source task pane and recreate the Excel file if necessary.
Related Articles

 After selecting the XML Schema, the following dialog box will appear.


Good study & explanation. How to join your blog for an exchange of thoughts on excel.
Thanks for your feedback! You can submit your queries through the contact page.