How to Remove Duplicates in Excel [14+ Different Methods]
I’m going to use a 3-column data table to show you to remove the duplicates. It has customer names in the Customer Name column. Their corresponding area is listed in the Region column. And the amount of money each of the customers ordered is recorded in the Order Amount column.
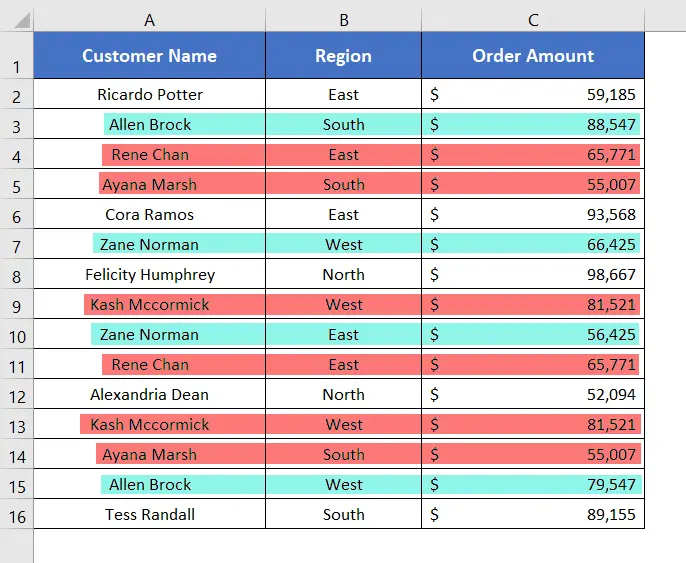
If an entire row matches with another row, then we’ll call it a duplicate. Otherwise, if any of the columns has a different value, then we’ll leave it as a unique value.
In the picture below, the rows marked by sky blue color are unique. Though the customer names and the order amount is the same. Their region is different from one another which makes them unique. And the rows colored reddish are duplicates.
Remove Duplicates in Excel without Using Any Formulas
First, I will show you how to remove duplicates without using any kind of formula. So let’s begin.
Method 1: For Large Data Using Remove Duplicates Command (Static, and Case-Insensitive)
Let’s say you have a very large file that contains thousands of rows and columns. In such a case, it would be very difficult to manually select rows and columns to remove the duplicates.
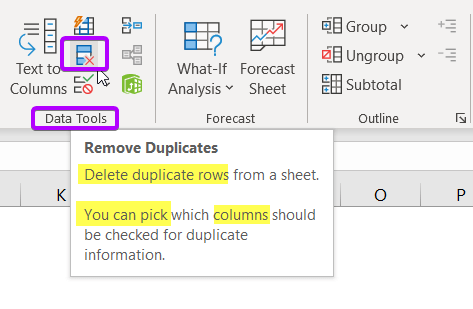
To lessen the hassles while removing duplicates for a large set of data, Excel has provided the command Remove Duplicates.
All you need to do is click somewhere within your dataset, and you are ready to go. Follow these steps for Excel to delete the duplicate rows from your worksheet:
- Select any cell in your datasheet.
- Go to the Data tab > Data Tools group.
- In the Data Tools group, click on the Remove Duplicates command.

- In the next dialog box, select ‘My data has headers’ (if there are any).
- Then, tick all the columns from where you want to remove the duplicates.
I want to check every column in my dataset for duplicates . So, I’ve selected all the columns. You can select one, two, or any number of columns. - After selecting the columns, click OK.
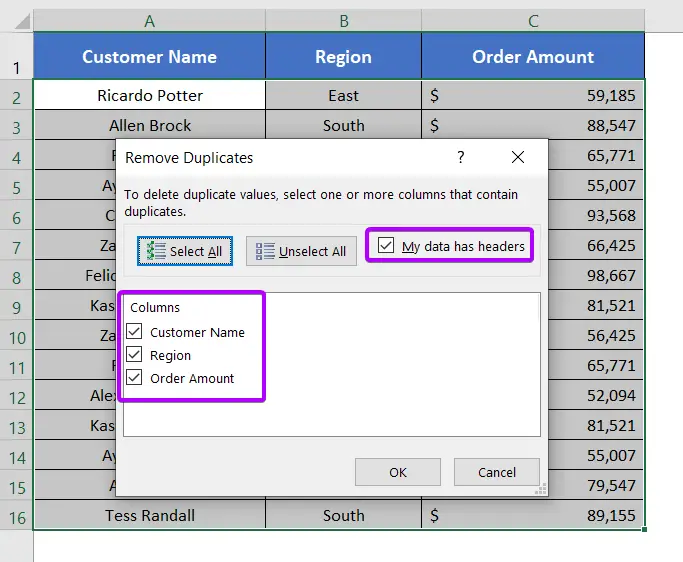
The Remove Duplicates command clears all the duplicates from the selected columns. But it keeps the first instance of the duplicates. This means, it just removes all the duplicate copies and leaves one unique version of each row.
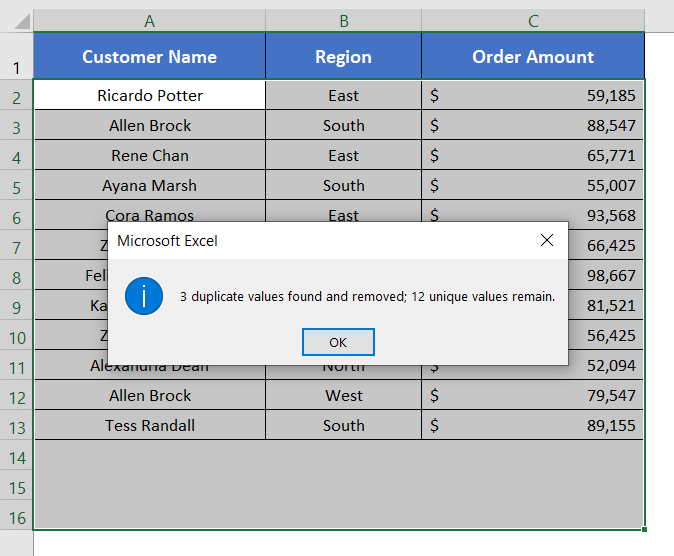
Note: This is a static process of removing duplicates. This means if any changes occur in the source data table, it doesn’t update the output. In fact, this tool applies the changes directly to your source data. So be very careful, as it permanently deletes all duplicates found in your source data.
Method 2: Use the Advanced Filter (Static and Case-Insensitive)
The Advanced Filter allows us to filter out all the unique rows in the midst of a mixture of duplicate as well as unique values.
Suppose you have two identical rows. We can apply an Advanced Filter to keep the first row, but filter out the second one, as it will be counted as a duplicate. Excel’s Advanced Filter feature can remove all the duplicate values but keep the first instance of each value.
To remove duplicates using the Advanced Filter, follow the steps below:
- Select the Data tab > Sort & Filter group > Advanced command.
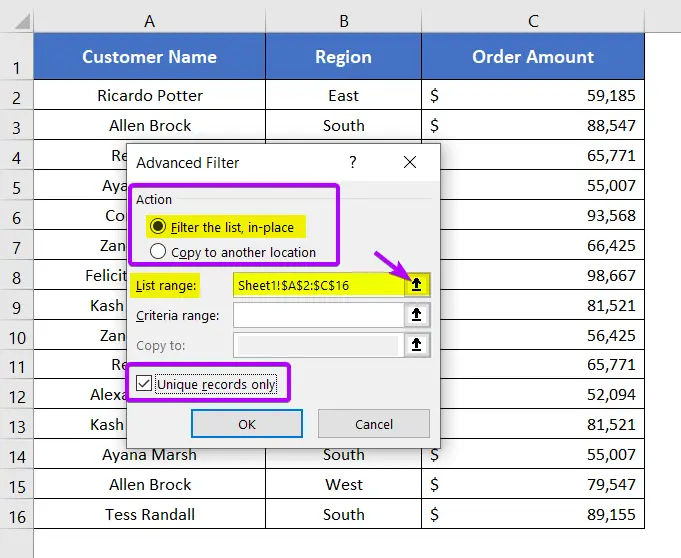
- Under the Action section, two options are available: Filter the list, in place & Copy to another location.
However, I want to replace the source data with the filtered data. So I’m selecting ‘Filter the list, in place’. - Now, indicate your data range in the ‘List Range’ field.
Or, select the data range manually by clicking on the up arrow icon in the ‘List Range’ field. - Now check ‘Unique records only’ to filter out all the duplicates and hit OK.
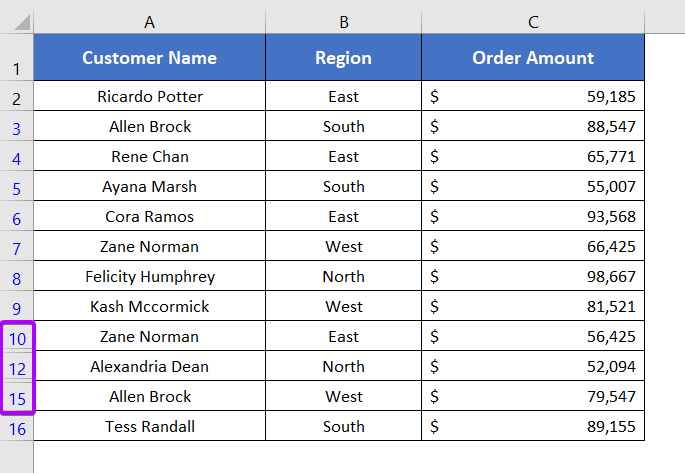
 All the duplicate rows will be filtered out, as Advanced Filter will hide the duplicate rows.
- To show all data again, select the Data tab > Sort & Filter group > Clear command.
Or, press CTRL + Z.

Remember, you can paste the list of unique values elsewhere in your workbook, or even into a different workbook, by selecting “Copy to another location” above, instead of “Filter the list, in place“.
Method 3: Apply Power Query (Case-Sensitive & Semi-Dynamic)
So far all the methods I’ve discussed are static. If you need to update your source datasheet frequently, you have to repeat the entire process of removing duplicates. Here comes the benefits of using the Power Query.
To apply Power Query, follow these steps to remove duplicates:
- Go to the Data tab > Get & Transform Data group > From Table/Range option.

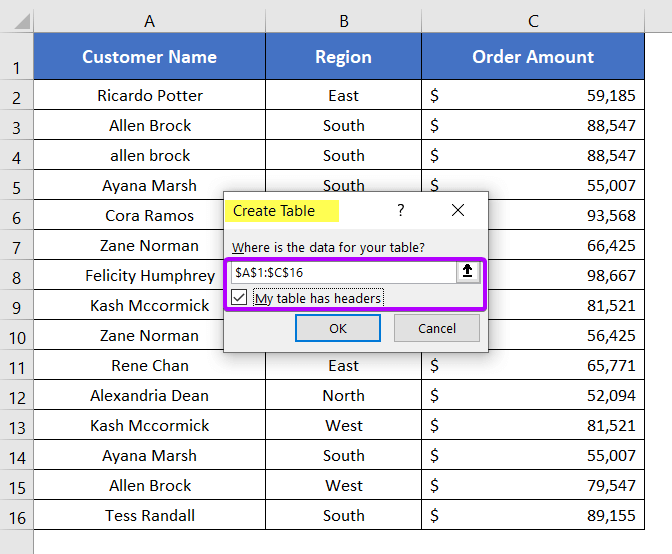
- Select the data range in the Create Table dialog box.
- Check ‘My table has headers’ if you have any and click OK.
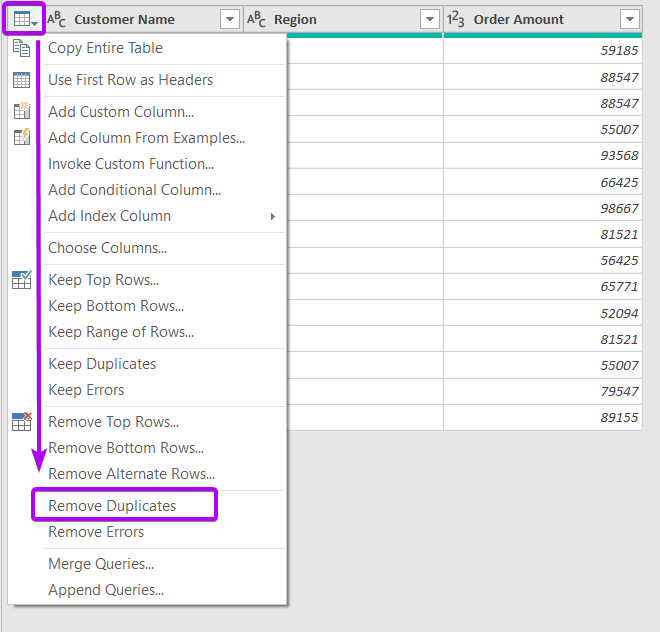
 To remove duplicates from the entire table,
 - Click on the Table drop-down icon at the top-left corner of your data table.
- Then, select Remove Duplicates from the drop-down menu.

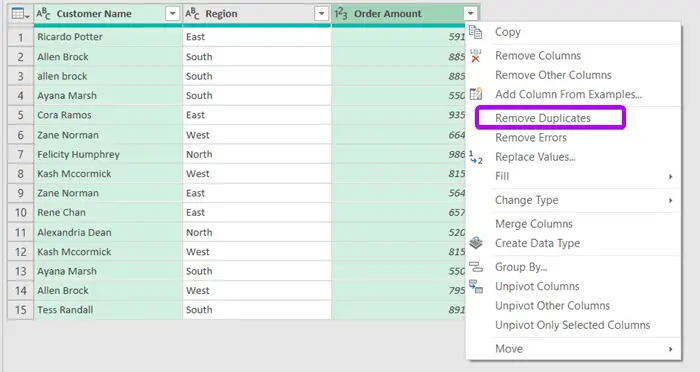
- In the Power Query Editor window, right-click on the column header and select Remove Duplicates from the context menu.
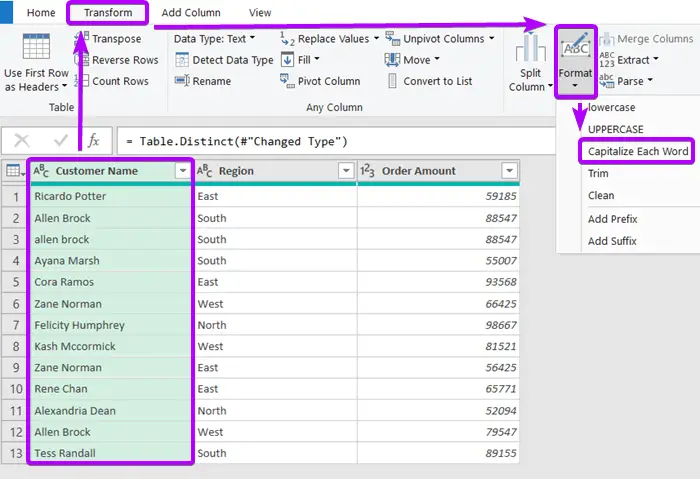
 It will remove all the duplicates from the data table right away. However, rows 2 & 3 both contain the same data with different letter cases.
 - As their letter cases are different, the Power Query considers them unique. [Power Query is a case-sensitive tool.]
 To avoid this,
 - Select the column. Then, follow: Transform tab > Text Column group > Format drop-down > Capitalize Each Word.

- Hit the Table drop-down icon > Remove Duplicates command.
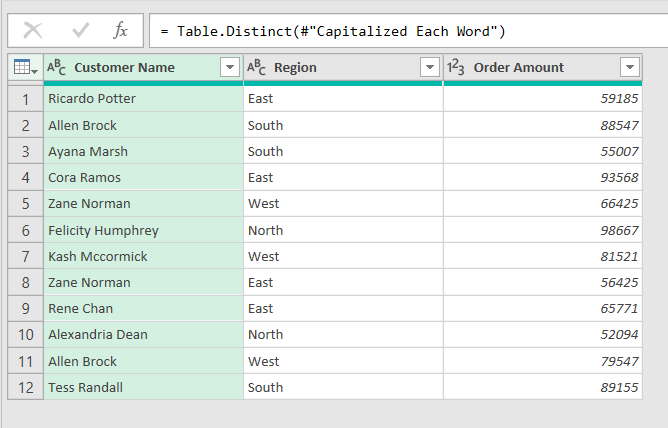
 Lastly, it removes all duplicates even when letter cases are not similar.
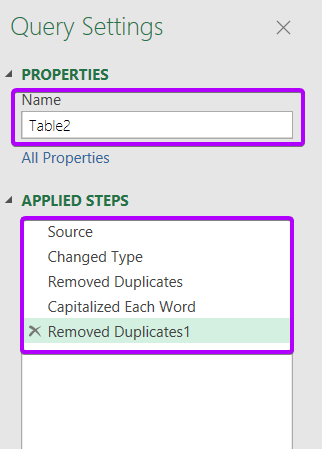
Now, you can make changes using PROPERTIES & APPLIED STEPS drop-downs in the Query Setting dialog box.
- Go to the Home tab > Close & Load command.
It will close the Power Query Editor window and import the data table into a new worksheet.

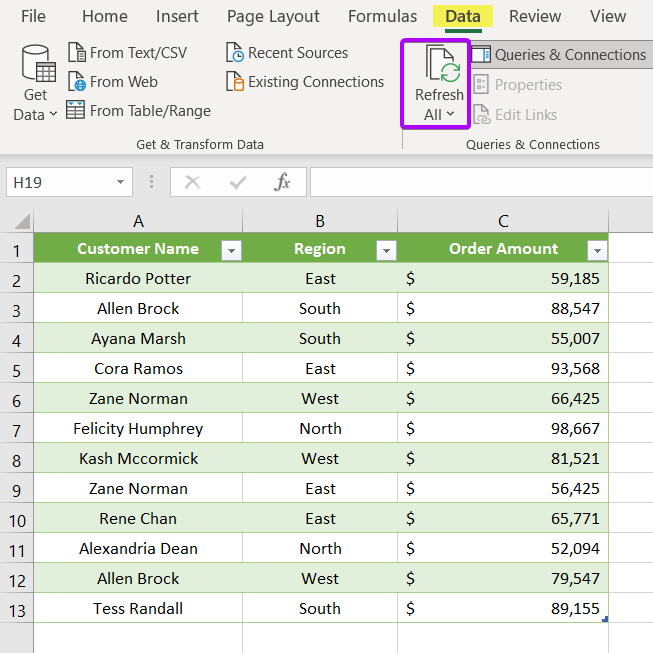
- Click on the Refresh All button to update the output.
Remove Duplicates in Excel Using Dynamic Formula
Removing duplicates using formulas has some benefits over methods that don’t require any formula. Write a formula and apply the formula in a range of cells. If we input any duplicate rows, they will vanish automatically.
Method 4: Use a Helper Column [Uses functions: IFERROR, INDEX, SMALL, IF, COUNTIF, ROW, & ROWS. Supports All Versions of Excel]
This formula requires a helper column to perform its task. The helper column is basically the concatenation of every cell in a row. To create the helper column either CONCAT or CONCATENATE function can be used. Here, I used the CONCAT function.
The main dynamic function is made up of IFERROR, INDEX, SMALL, IF, COUNTIF, ROW, & ROWS functions.
Feature of this Formula
- Supports all versions of Microsoft Excel.
- A dynamic formula, that remove duplicates automatically from a specified range.
- Also remove duplicates but keep the first instance of the duplicates.
Creating Helper Column
- Create a helper column beside dataset.
- Then, insert the formula in the first row: =CONCAT(B2:D2)
- Next, copy it down.
It will merge all cells of each column respectively.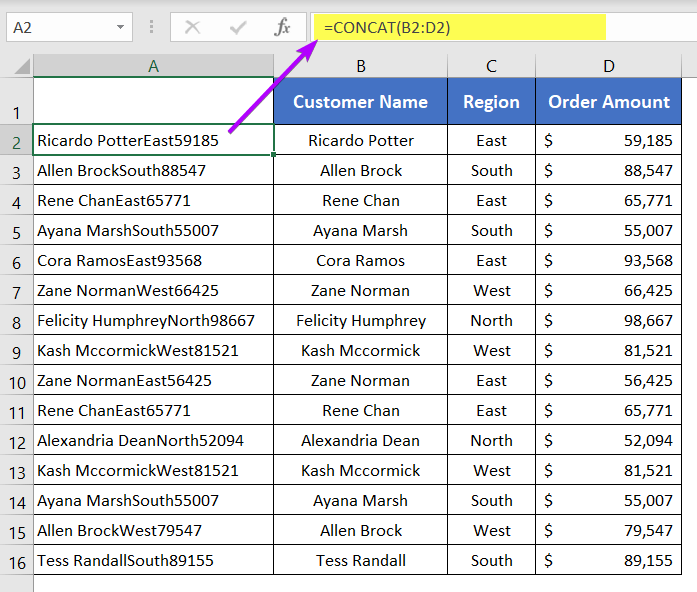
Main Formula
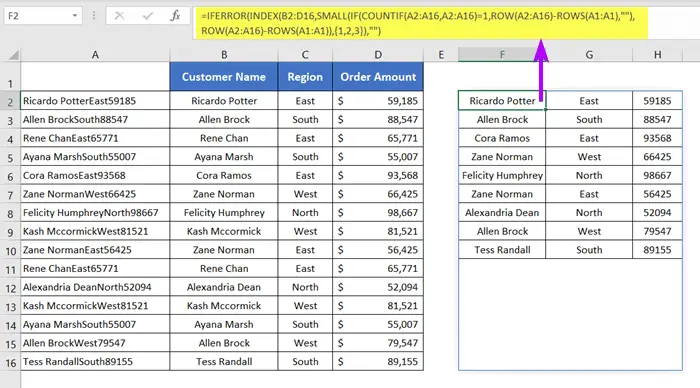
Use the formula below in a blank cell beside the main dataset. Then, press ENTER. As the formula is dynamic, it will populate by itself.
=IFERROR(INDEX(B2:D16,SMALL(IF(COUNTIF(A2:A16,A2:A16)=1,ROW(A2:A16)-ROWS(A1:A1),""),
ROW(A2:A16)-ROWS(A1:A1)),{1,2,3}),"")
Formula Explanation
This formula combines INDEX, SMALL, IF, ROW, COUNTIF, and IFERROR functions to extract unique rows from B2:D16 based on the criterion that each value in column A appears only once. The COUNTIF(A2:A16, A2:A16)=1 checks for uniqueness. IF returns an array of row numbers for unique values. SMALL retrieves the smallest values (unique rows), and INDEX extracts corresponding rows from B2:D16. The {1,2,3} array within INDEX ensures extraction of the first three columns. IFERROR handles errors, returning an empty string if any occur.
Method 5: Helper Column but Keep the First Instance [Uses functions FILTER and COUNTIF. Supports Excel for MS 365]
This formula also requires a helper column to work. This time I used the CONCATENATE function to create the helper column. The main formula consists of the FILTER and the COUNTIF functions.
Feature of this Formula
- It’s a dynamic formula.
- It can remove duplicates automatically from a specified range.
- It can remove all the duplicates.
- It can remove also duplicates but keep the first instance of the duplicates.
Creating Helper Column
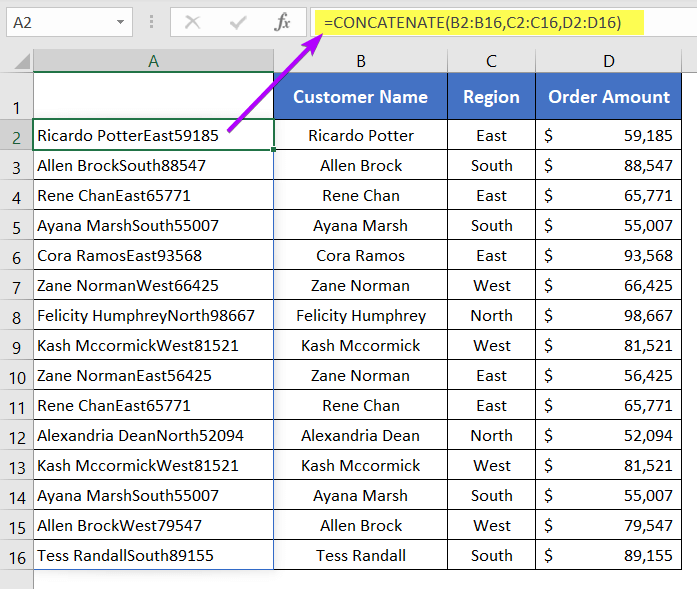
Use the following formula to create a helper column beside the main dataset.
=CONCATENATE(B2:B16,C2:C16,D2:D16)Here, B2:B16, C2:C16, & D2:D16 are the ranges of the first, second, and third columns of my data table respectively.
Clear Duplicates but Keep the First Instance
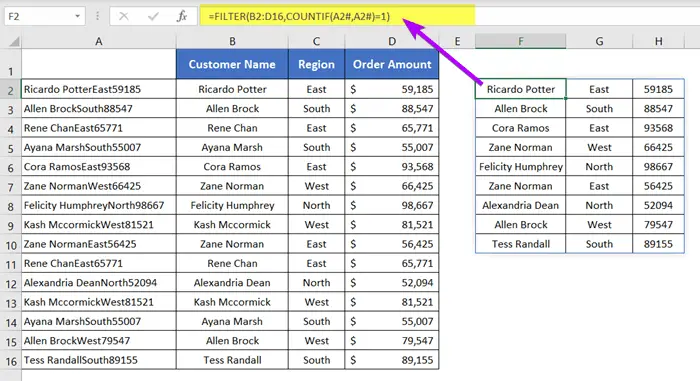
Use the formula below in a blank cell beside the main dataset. After that, press ENTER. As the formula is dynamic, it will populate automatically by itself.
Main Formula
=FILTER(B2:D16,COUNTIF(A2#,A2#)=1)Formula Explanation
This formula utilizes COUNTIF(A2#, A2#)=1 to remove duplicates in A2:A16, retaining only the first instance of each value. Using 2 instead of 1 would delete all instances of duplicates.
 Clear All Duplicates
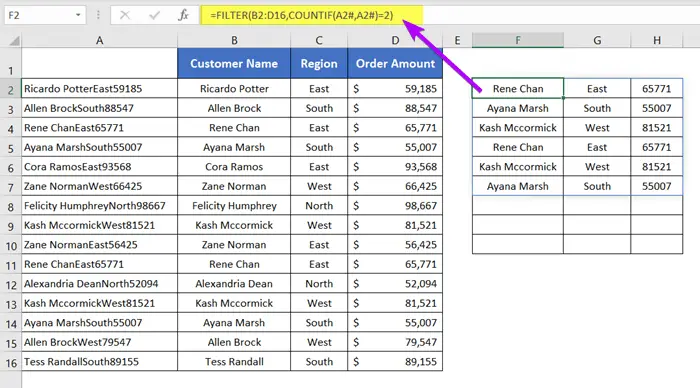
Use the formula below in a blank cell beside the main dataset. After that, press ENTER. As the formula is dynamic, it will populate automatically by itself.
Main Formula
=FILTER(B2:D16,COUNTIF(A2#,A2#)=2)Formula Explanation
This formula, COUNTIF(A2#, A2#)=2, removes all instances of duplicates in A2:A16. Inserting 1 instead of 2 retains the first instance of each duplicate value while removing the subsequent ones.
 Method 6: Without Helper Column [Uses function UNIQUE. Supports Excel for MS 365]
This formula consists of the UNIQUE function. This function is available only in
- Excel for Microsoft 365 for Windows
- Excel for Microsoft 365 for Mac
- Excel for the web
- Excel 2021
Features of this Formula
- It’s a dynamic formula.
- Automatically removes duplicates in the specified range.
- It can remove all the duplicates.
- It can remove duplicates but keep the first instance.
Clear Duplicates but Keep the First Instance
Syntax
=UNIQUE(array,[by_col],[exactly_once])Formula
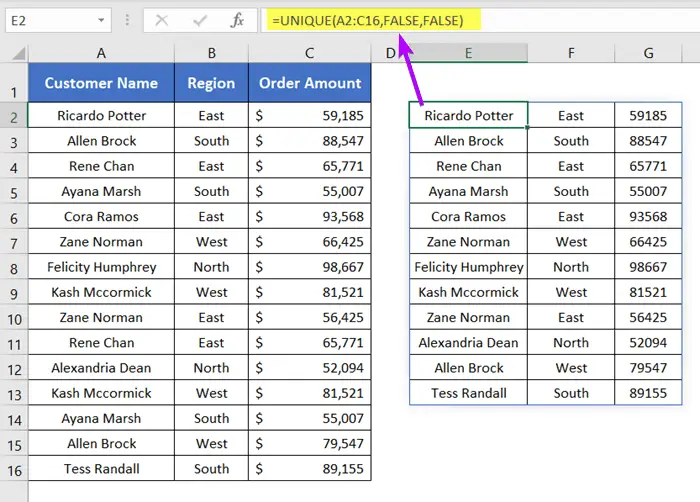
=UNIQUE(A2:C16,FALSE,FALSE)Function Explanation
Use A2:C16 as the data range. For unique rows, enter FALSE; for unique columns, use TRUE. FALSE removes duplicates, retaining only the first instance of each duplicate value.
Clear all Duplicates
Syntax
=UNIQUE(array,[by_col],[exactly_once])Formula
=UNIQUE(A2:C16,FALSE,TRUE)Function Explanation
In A2:C16, use FALSE for unique rows or TRUE for unique columns. TRUE removes all instances of duplicate values, ensuring only unique rows are retained.
 Method 7: Use VLOOKUP Function [Supports All Versions of Excel]
The lookup formula used in this method includes the IF, ISERROR, & VLOOKUP functions.
Features of this Formula
- It supports all versions of Excel.
- Using this formula you can remove every instance of all duplicates between two data tables.
Formula
=IF(ISERROR(VLOOKUP(E2&F2&G2,$A$2:$A$16&$B$2:$B$16&$C$2:$C$16,1,FALSE)),"Unique","Duplicate")Formula Explanation
This formula uses VLOOKUP to check if the concatenation of E2, F2, and G2 exists in the virtual data table created by $A$2:$A$16&$B$2:$B$16&$C$2:$C$16. If the value is not found (ISERROR returns TRUE), it’s labeled “Unique”; otherwise, it’s labeled “Duplicate”.
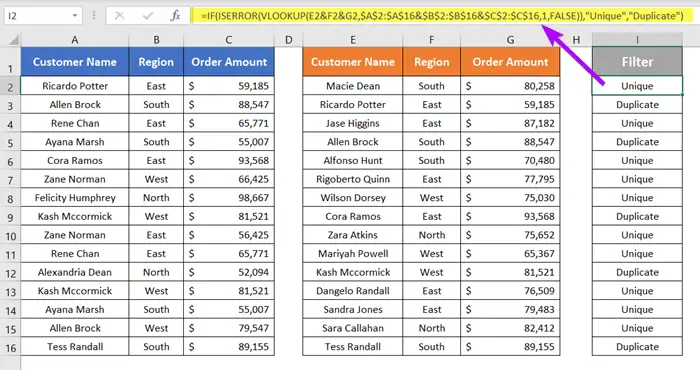
I’m using two sets of data. Both contain 3 columns each. I want to remove all the rows that are common between two-column data sets. To do that, go through the steps below:
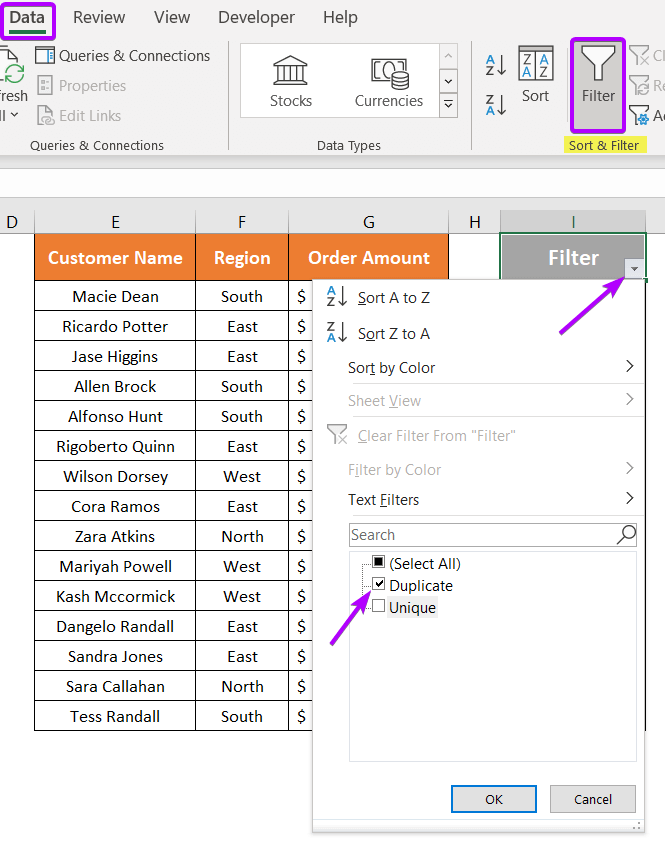
- Select the entire Filter column. Then press CTRL + SHIFT + L to apply the AutoFilter.
you can follow the Data tab > Sort & Filter group > Filter command.
This will also apply the AutoFilter to the Filter column. - After that, extend the drop-down menu at the bottom-right corner of the Filter column header.
- Select Duplicate from the list and click OK to filter only the duplicate value.

- Now select all rows of the filtered duplicate rows.
- Press CTRL + – to delete all the duplicate rows.

- Now select the Data tab > Sort & Filter group > Clear command to remove the AutoFilter from the selection area.
 Only the unique values are left.
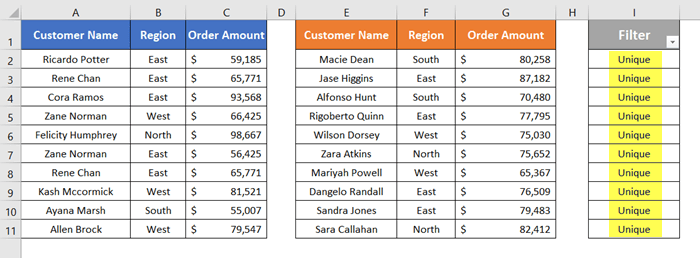
Method 8: Apply XLOOKUP Function [Supports Excel for MS 365]
This duplicate removal formula is composed of the XLOOKUP function. Using this formula, you can remove every instance of all duplicate values. Unfortunately, you can use the XLOOKUP function only in Excel for Microsoft 365 and later versions.
About the Setup
I’m using two sets of data. Both contain 3 columns each. I want to remove all the rows that are common between two-column data sets.
Formula
=XLOOKUP(E2&F2&G2,$A$2:$A$16&$B$2:$B$16&$C$2:$C$16,$A$2:$C$16,"",0)Formula Explanation
This formula utilizes XLOOKUP to search for the concatenation of E2, F2, and G2 in the virtual data table $A$2:$A$16&$B$2:$B$16&$C$2:$C$16. If found, it returns the corresponding row from $A$2:$C$16; otherwise, it returns an empty string. The “0” indicates an exact match.
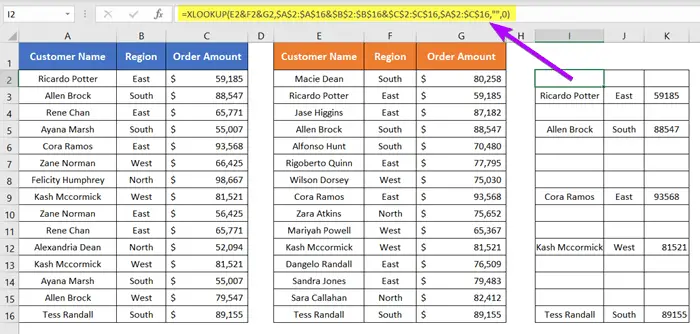
The above formula will return only the duplicate records. To filter out duplicate records, follow these steps below:
- Select the range I1:K11.
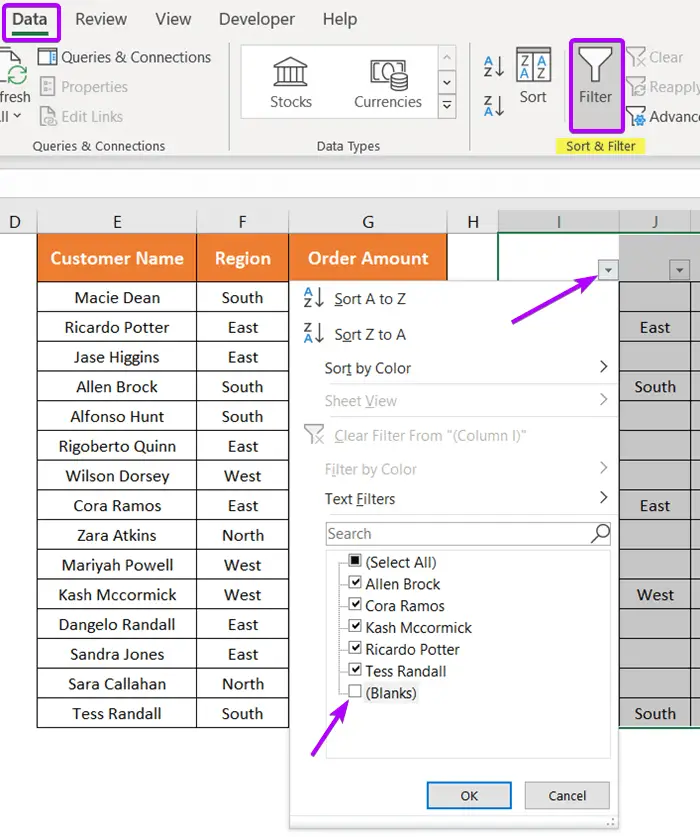
Here I’ve selected one extra row above the required selection range. Because there’s no column header here. Without a column header, the AutoFilter considers the first row of the data table as a table header. - Press CTRL + SHIFT + L to apply the AutoFilter.
Or, just select the Data tab > Sort & Filter group > Filter command. - Expand the AutoFilter drop-down and uncheck Blanks only.
- Then click OK.

- Select all the filtered rows and press CTRL + – to delete them all.

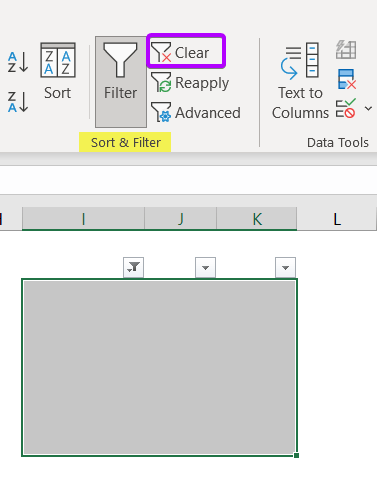
- Now go to the Data tab > Sort & Filter group > Clear command.
All instances of every duplicate value have been removed from the two data tables.

Method 9: Insert COUNTIF Function but Keep First Instance
To remove duplicates using the COUNTIF function, you need a helper column.
To create a helper column, use this formula:
=CONCATENATE(B2:B16,C2:C16,D2:D16)Formula Explanation
- B2:B16: First column range of the data table.
- C2:C16: Second column range of the data table.
- D2:D16: Third column range of the data table.
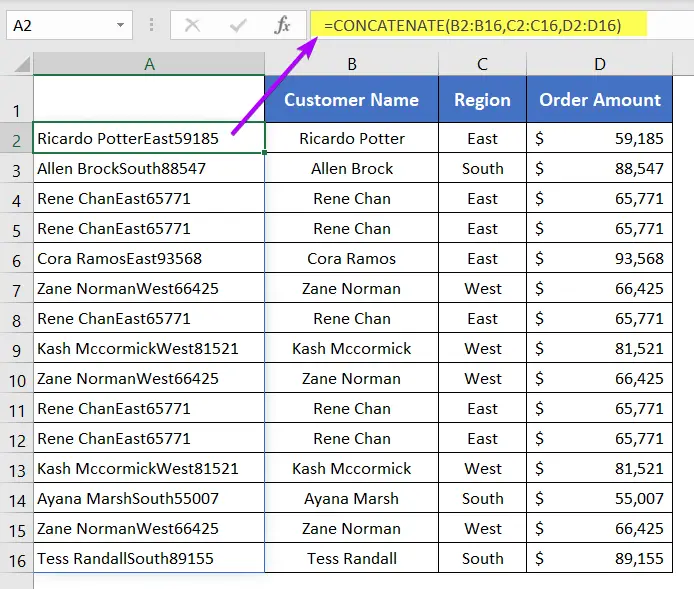 Now create a blank column beside your dataset. Then, count every instance of all the records using the following formula of the COUNTIF function:
=COUNTIF($A$2:A2,A2)Formula Explanation
- $A$2:A2: An expandable range of the first column of my dataset.
- A2: The first cell of the first column of my dataset. This works as a criterion.
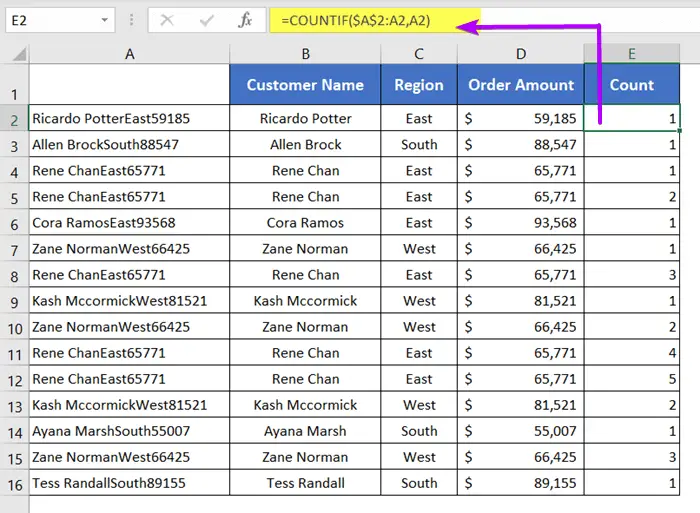 Now select the entire count column and press CTRL + SHIFT + L to apply the AutoFilter. After that, expand the AutoFilter drop-down from the lower-right corner of the Count column header. Then, select 1 from the list and click OK.
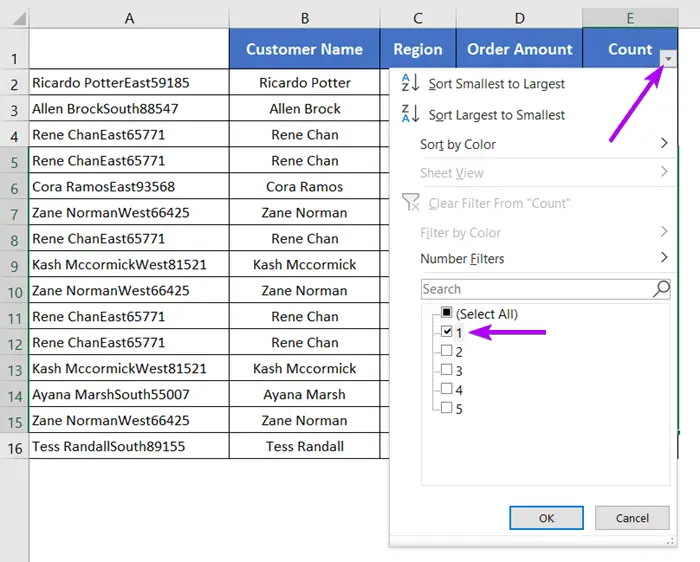
You will get every distant record of your dataset. You can copy and paste this filtered result to a different location.

Remove Duplicates with Conditions in Excel
Method 10: Replacing Duplicates with Blank Cells without Shifting Cells
Remove Duplicates but Keep Every Distinct Record
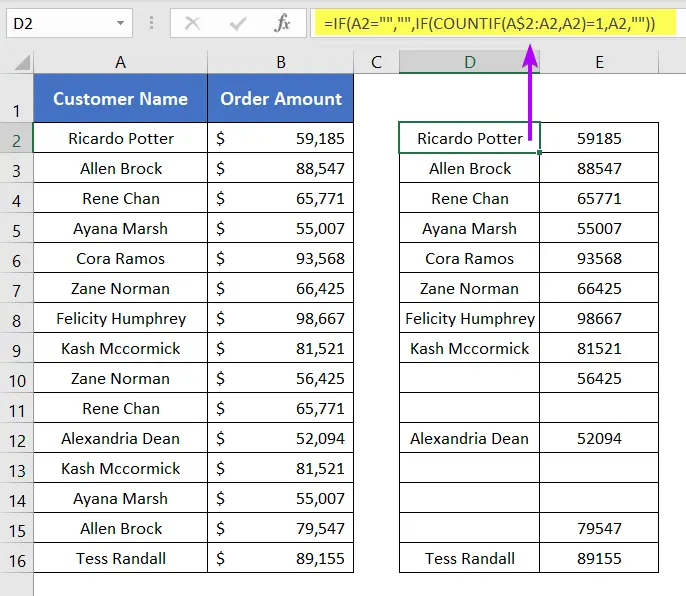
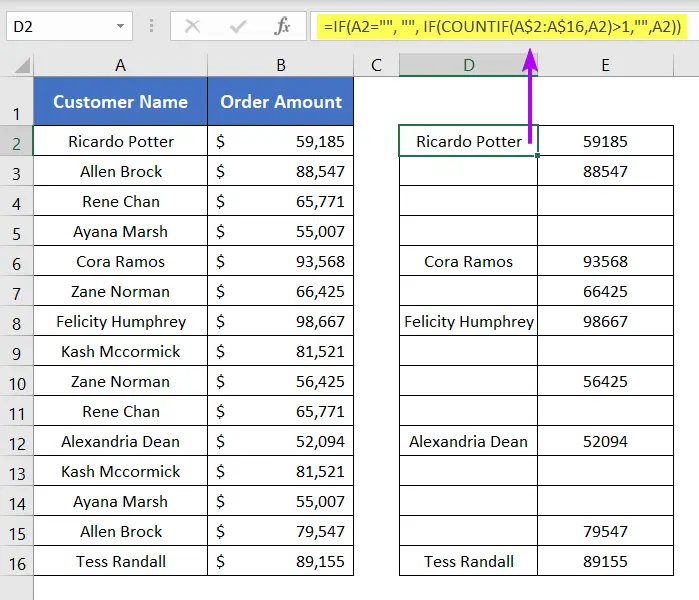
This formula will remove duplicates but keep the first instance of every duplicate value. In addition to that, it will replace all the duplicate copies with blanks. Thus, the duplicates will be deleted without shifting cells, rows, or columns. The formula consists of the IF and COUNTIF functions.
Formula
=IF(A2="","",IF(COUNTIF(A$2:A2,A2)=1,A2,""))Usage Guide
Apply the formula in cell D2. They drag down the formula using Fill Handle up to cell D16. Then again drag the formula to the right-next column using the Fill Handle again.
Formula Explanation
- COUNTIF(A$2:A2,A2)=1 returns every instance of all the records present in the datasheet.
- IF(COUNTIF(A$2:A2,A2)=1,A2,””) keeps the first instance of every record intact. It replaces other instances of the records with blanks.
- IF(A2=””,””,IF(COUNTIF(A$2:A2,A2)=1,A2,””)) leaves all the blank cells as they are. But if a cell is not blank, it handles the cell using IF(COUNTIF(A$2:A2,A2)=1,A2,””).
Remove All Instances of the Duplicates
This formula will remove all the duplicates from your datasheet completely. This formula is also made up of the IF and COUNTIF functions.
Formula
=IF(A2="", "", IF(COUNTIF(A$2:A$16,A2)>1,"",A2))Usage Guide
Apply the formula in cell D2. They drag down the formula using Fill Handle up to cell D16. Then again drag the formula to the right-next column using the Fill Handle again.
Formula Explanation
- COUNTIF(A$2:A$16,A2)>1 returns only the unique records present in the datasheet.
- IF(COUNTIF(A$2:A$16,A2)>1,””,A2)) replaces all instances of the duplicate records with blanks.
- IF(A2=””, “”, IF(COUNTIF(A$2:A$16,A2)>1,””,A2)) leaves all the blank cells as they are. But if a cell is not blank, it handles the cell using IF(COUNTIF(A$2:A$16,A2)>1,””,A2)).
Method 11: Apply Conditional Formatting in a Single Column
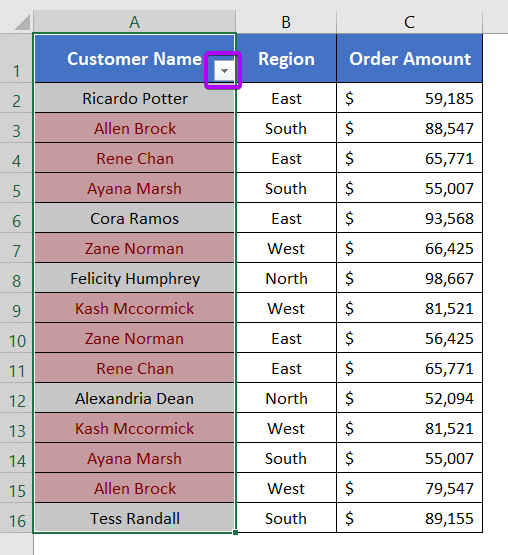
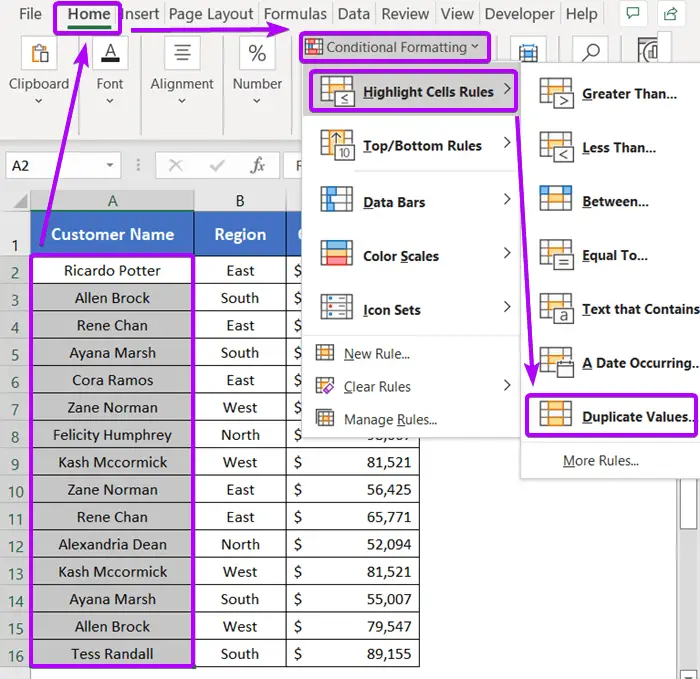
We can also remove duplicate values out of a single column with the help of the Conditional Formatting feature in Excel. To apply Conditional Formatting in single column, follow these steps:
- Select a column range first.
- Then go to the Home tab > Conditional Formatting drop-down menu > Highlight Cells Rules menu > Duplicate Values command.
 A small dialog box appears that allows you to pick a color to highlight all the duplicates.
 - Choose a color combination and click OK.
- Now select the column again but this time with the column header too.
- Press CTRL + SHIFT + L to apply the AutoFilter.

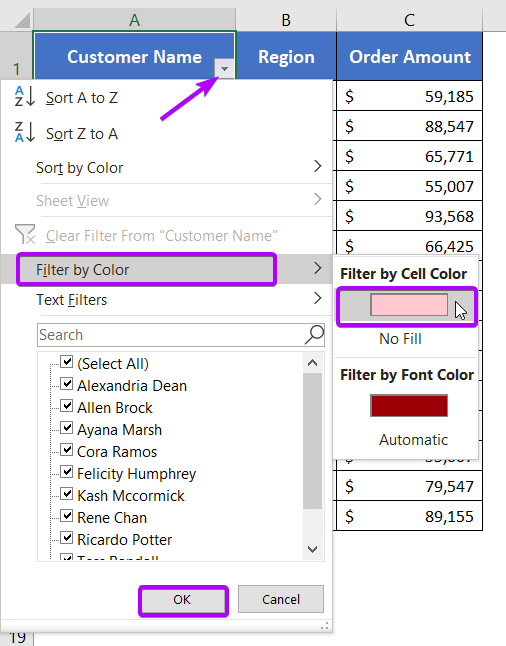
- Expand the AutoFilter drop-down at the lower-right corner of the column header name.
- Select Filter by Color.
- Then choose either Filer by Cell Color or Filter by Font Color. I’m choosing Filter by Cell Color.
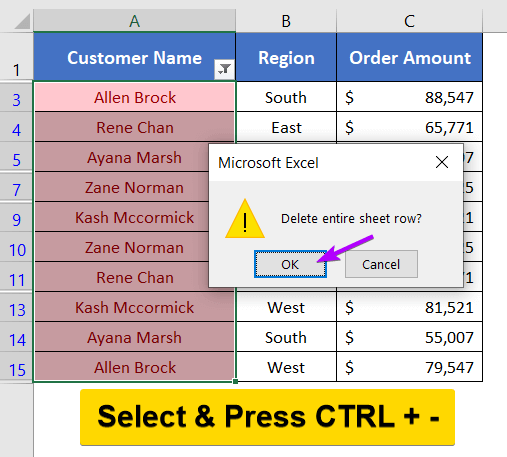
 Now only the duplicate rows will be filtered out.
 - Select all the filtered results and press CTRL + – to delete them all.

- Now navigate to the Data tab > Sort & Filter group > Clear command.

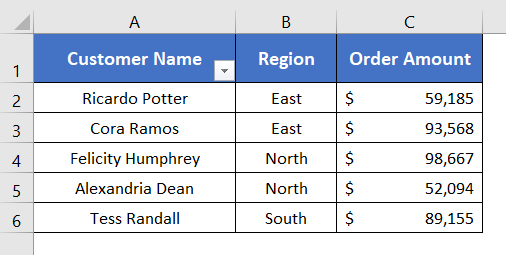
You will one only the Unique values based on one column that you’ve selected.
Remove Duplicates in Excel Using VBA
Method 12: Use a VBA Code in a Specified Range
This piece of code can remove duplicates from the range A2:C16 based on columns 1,2, &3.
Sub Duplicate_Eraser()

Range("A2:C16").RemoveDuplicates Columns:=Array(1, 2, 3), Header:=xlYes

End Sub
Editable Line
Range("A2:C16").RemoveDuplicates Columns:=Array(1, 2, 3), Header:=xlYesJust update the data range inside the Range function according to your datasheet. If you want to remove duplicates based on a single column, use just 1 instead of Array(1, 2, 3).
But if you want to remove duplicates based on multiple columns, update the Array function. For example, Array(2, 3) will remove duplicates based on columns 2 and 3 in a specified data range. Array(5, 1, 3) will remove duplicates based on columns 1,3, &5. Here you don’t need to maintain the order.
Method 13: Apply a VBA Code in a Pre-Selected Range
This piece of VBA code can remove duplicates from a pre-selected range. Here I’ve mentioned the word ‘Pre-Selected’ because you need to select your data range first. Then you can run the code. Otherwise, it won’t work.
Sub Duplicate_Eraser()

Dim gRng As Range
Set gRng = Selection
gRng.RemoveDuplicates Columns:=Array(1, 2, 3), Header:=xlYes

End Sub
Editable Line
gRng.RemoveDuplicates Columns:=Array(1, 2, 3), Header:=xlYesJust update the column index numbers inside the Array function.
For example, Array(2, 3) will remove duplicates based on columns 2 and 3 in a specified data range. Array(5, 1, 3) will remove duplicates based on columns 1,3, &5. Here you don’t need to maintain the order.
Method 14: Write a VBA Code from an Excel Table
This code will remove duplicates from an Excel Table of the active worksheet.
Sub Duplicate_Eraser()

ActiveSheet.ListObjects("Table_Name").DataBodyRange.RemoveDuplicates Columns:=Array(1, 2, 3), _
Header:=xlYes

End Sub
Editable Lines
ActiveSheet.ListObjects("Table_Name")First, update the Table_Name inside the ListObjects property.
RemoveDuplicates Columns:=Array(1, 2, 3)Now update the column index numbers inside the Array function.
For example, Array(2, 3) will remove duplicates based on columns 2 and 3 in a specified data range. Array(5, 1, 3) will remove duplicates based on columns 1,3, &5. Here you don’t need to maintain the order.
Bonus tip: Keyboard Shortcut to Remove Duplicates in Excel
Follow the steps to learn the shortcuts to remove duplicates in Excel:
- At first, select any cell of your dataset.
- Then press CTRL + A to select the entire data table.
- Next, press and hold the ALT key.
- After that, press A (Selects the Data tab) > and press M (Select the Remove Duplicates command).
Now, the Remove Duplicates dialog box will appear. - Check ‘My data has headers’ if you have any.
- Then choose the columns.
- And hit OK.
This will remove all the duplicates from your datasheet. But it keeps the first instance of every duplicate record.

Remove Duplicates in Excel Not Working?
Addressing duplicate values in Excel can sometimes be challenging due to factors like invisible characters, cell formatting, decimal places, range selection, and formula accuracy. If you encounter difficulties in removing apparent duplicates, consider the following solutions:
- Presence of Spaces: Leading or trailing spaces in your data may hinder duplicate removal. Utilize the TRIM function to eliminate these spaces, ensuring a clean dataset. After space removal, attempt to remove duplicates again.
- Cell Format Issue: Suppose, you have inserted two numerical values in two different cells. Well, let me make it easier for you. You inserted 100 in two different cells. But you applied the Text cell format in one cell and the Number cell format in another cell. In this case, Excel will consider both of them Unique. Because their format is different from one another. If such things happen to you, just make sure you applied the right cell format. After that try again to remove the duplicates. Hope this might work this time.
- Different Decimal Places: Decimal fraction numbers with varying decimal places might be treated as distinct values. Standardize the number of decimal places for all numerical values to enable successful duplicate removal.
- Range Issue: If you insert a wrong range in your duplicate removing formula, it won’t return your desired result. So make sure you use the correct range while removing duplicates using formulas or VBA codes.
- Wrong Formula: Ensure the accuracy of your formulas. Incorrect usage of absolute and relative cell references can disrupt the duplicate removal process. Be conscious of using the right references to prevent unintended changes in cell ranges and to achieve effective duplicate removal.
Conclusion
I’ve discussed some effective techniques to find, highlight, and delete duplicates in Excel. I expect you’ve found this article useful. You can read more articles relating to Excel from the Blog page of our website. Have a fantastic workday!
Frequently Asked Questions (FAQs)
What is the formula to remove duplicates?
The formula to remove duplicates in Excel involves using the Remove Duplicates feature:
- Highlight the column or range containing potential duplicates.
- Navigate to the Data tab on the ribbon at the top.
- Find and click on the Remove Duplicates option in the Data Tools group.
- In the Remove Duplicates dialog box, select the columns where you want to identify and remove duplicates.
- Click OK to execute the removal process.
This simple process utilizes the built-in functionality of Excel to efficiently identify and remove duplicate values from the specified columns. Adjust column selections as needed for your specific dataset.
Can Excel automatically remove duplicates?
Yes, Excel can automatically remove duplicates with the Remove Duplicates feature:
- Highlight the column or range containing potential duplicates.
- Navigate to the Data tab on the ribbon.
- Find and click on Remove Duplicates in the Data Tools group.
- In the Remove Duplicates dialog box, select the columns where you want to remove duplicates.
- Click OK to automatically identify and remove duplicate values.
This built-in Excel feature streamlines the process, allowing users to effortlessly remove duplicate entries based on selected criteria. Adjust column selections as needed for your specific dataset.
How do you remove duplicates in Excel count?
To remove duplicates in Excel and count unique values:
- Highlight the column or range containing potential duplicates.
- Navigate to the Data tab on the ribbon.
- Find and click on Remove Duplicates in the Data Tools group.
- In the Remove Duplicates dialog box, select the columns where you want to remove duplicates.
- Click OK to remove duplicates.
For counting unique values, use the COUNTA or COUNT functions on the cleaned dataset. This process ensures that duplicate values are removed from the specified columns, and you can subsequently count the remaining unique values using appropriate counting functions. Adjust column selections as needed for your specific dataset.
 All the duplicate rows will be filtered out, as Advanced Filter will

 To remove duplicates from the entire table,
 To avoid this,
 Lastly, it removes all duplicates even when letter cases are not similar.




 A small dialog box appears that allows you to pick a color to highlight all the duplicates.