2 Ways to Stop Excel from Rounding Up Percentages
When working with data in Microsoft Excel, it’s essential to maintain accuracy in the calculations to make informed decisions. However, Excel has a tendency to round up percentages to whole numbers, which can sometimes lead to errors. In situations where precision is critical, it’s important to prevent Excel from rounding up percentages. This article will explore two practical methods that you can use to stop Excel from rounding up percentages, ensuring your data is accurate and reliable.
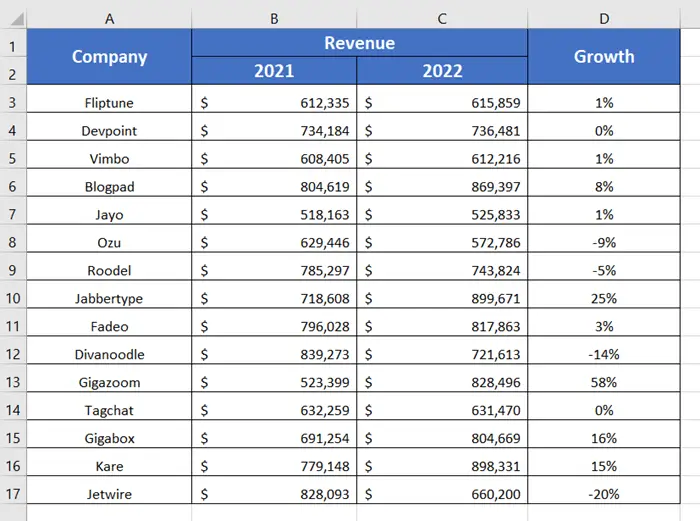
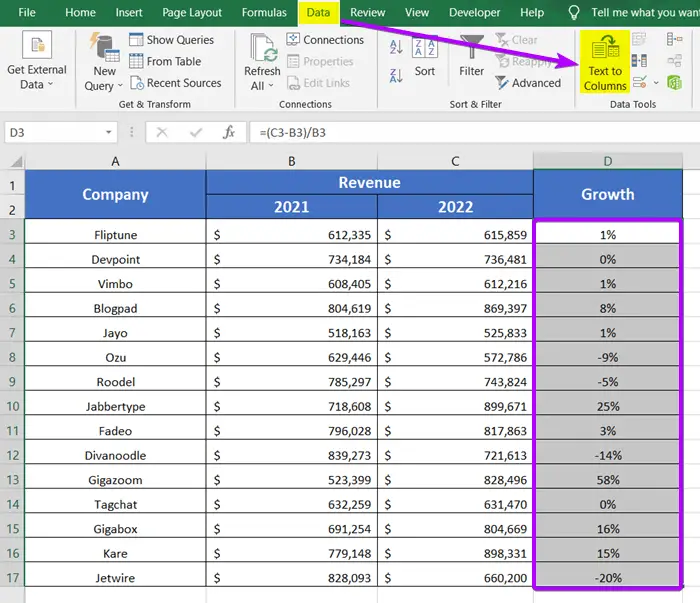
In this dataset, you can see I have some company names and their yearly revenue for two years, 2021 and 2022. The annual growth is calculated in the column Growth in percentages.
As I applied the percentage format to the column, Excel automatically rounded up the numbers. It makes the actual growth rate unclear. So, I will show you how I stop Excel from rounding up the percentages automatically.
Stop Excel from Rounding up Percentages by Using Increase Decimal Button
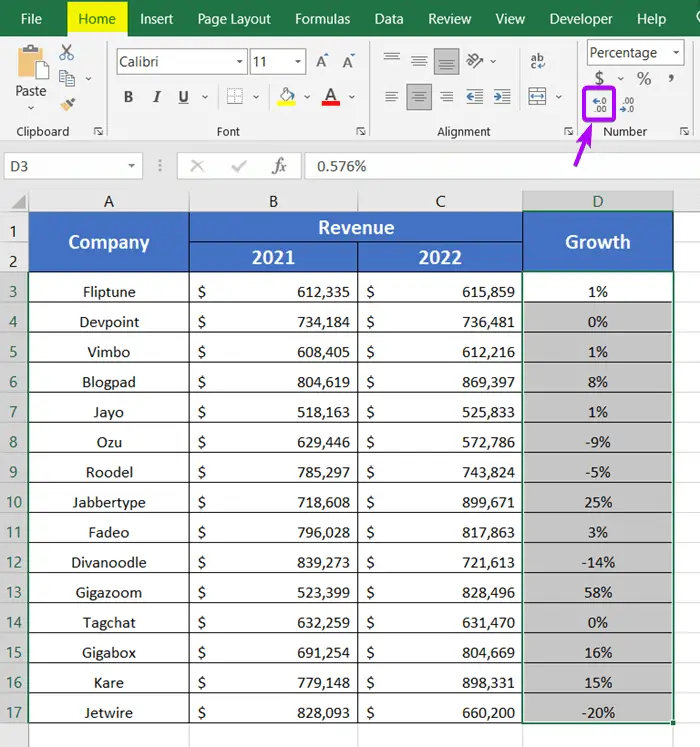
To prevent percentages from being rounded up, change the decimal place by using the Increase Decimal button. The Increase Decimal button will allow you to increase the number of decimal places after the decimal point in a selected cell or range of cells. To do that, go through these steps below:
- First, choose the cells that contain the percentages you want to modify.
In this case, I’ve selected the range D3:D17. - Then go to the Home tab.
- Finally, click on the Increase Decimal button located in the Number group.
You can see the result in the following image:
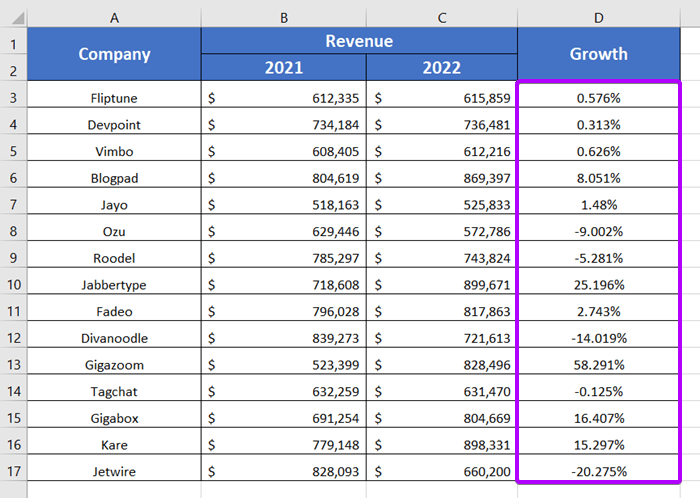
In this case, I wanted three decimal places after the decimal point. That’s why I clicked on the Increase Decimal button three times.
- 2 Ways to Round to Nearest 50 Cents in Excel
- 4 Formulas to Round Off Prices To Nearest 10 Cents in Excel
- 3 Formulas to Round Time to the Nearest Minute in Excel
- 5 Ways to Round Up a Formula Result in Excel
Stop Excel from Rounding up Percentages by Converting Numbers into Text
Another way to stop Excel from rounding up percentages is by using the Text to Columns feature to turn your values into text. By doing so, Excel will retain all the decimal places after the decimal point. Additionally, even though those numbers are now saved as text, you may still perform calculations on them just like you would on actual numbers.
Follow these steps to convert numbers into text to stop rounding up percentages:
- At first, select the cell range (Here, cell D3 to D17).
- Then, go to the Data tab.
- Now, click on the Text to Columns command from the Data Tools group.
 You will see a dialog box pop up on the Excel sheet.
 - Here, select the Delimited option as the file type.
- Hit Next.
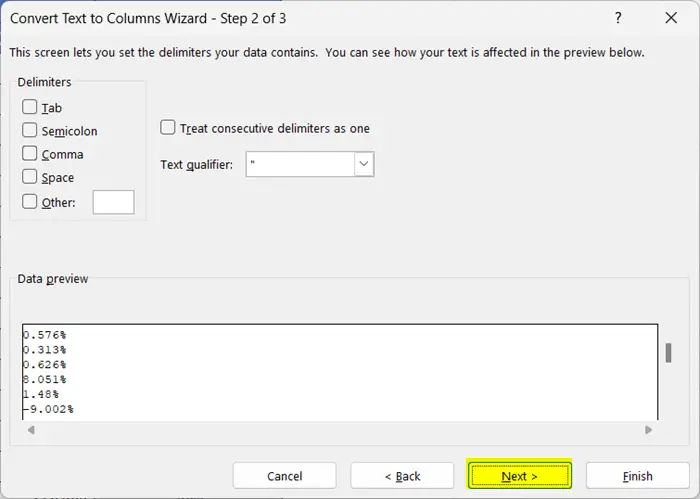
- Now, skip the Delimiters list.
- Just, click on the Next button.

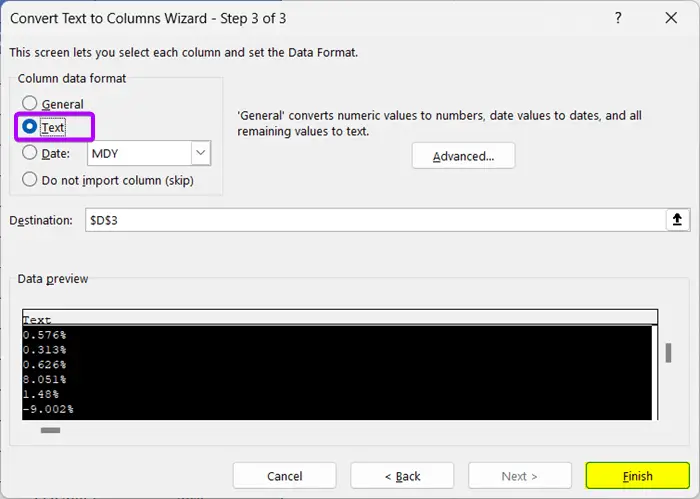
- Now, select Text from the Column Data Format.
- Finally, click the Finish button.
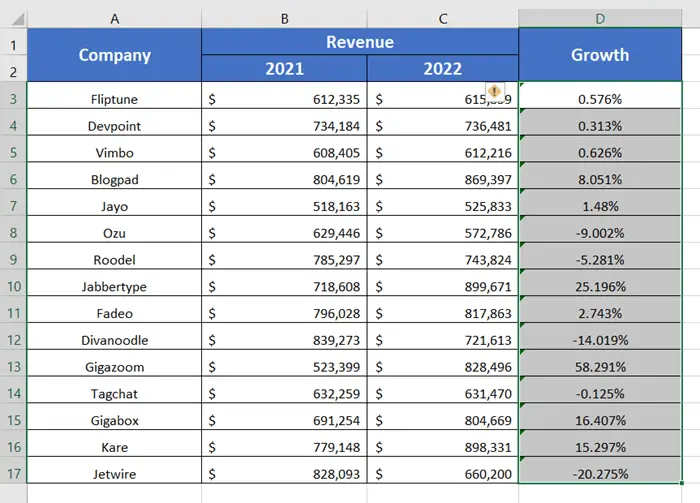
 Now you will see that Excel has restored all the decimal places after the decimal point.
 These are alert signs if you are worried about the green little triangle signs.
You can remove the error signs by following the below steps:
- Click on the yellow alert button located in the top-left corner of the top cell.
- Then select Ignore Error from the drop-down menu.
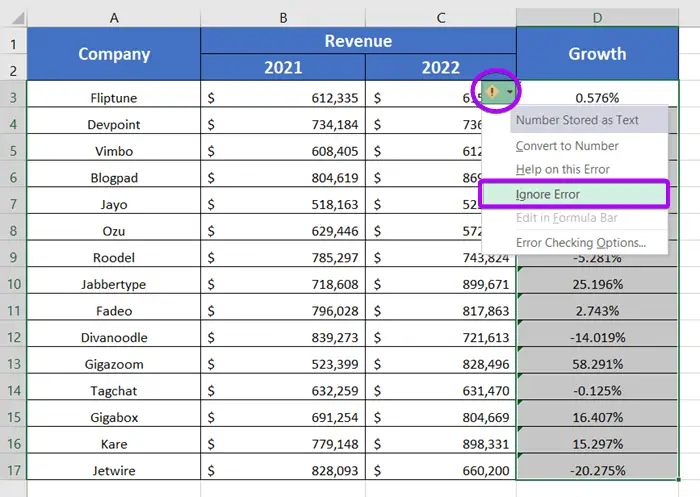
You can see the corrected result without any errors in Excel.

You can see Excel has removed the Green Error sign, and you are good to go.
Conclusion
I’ve shown 2 techniques for stopping Excel from rounding percentages. I hope you find this article helpful. Moreover, feel free to ask any questions you may have about this subject in the comment box below. For more articles like this one on Excel, please visit our Blog page. Thank you, and have a good day!
Frequently Asked Questions
How do I fix rounding up in Excel?
To address rounding issues in Excel, you can use the ROUND function. To round a number to a specific number of decimal places, use the following formula: =ROUND(number, num_digits)
Replace “number” with the value you want to round, and “num_digits” with the number of decimal places you desire. For example: =ROUND(A1, 2)
This formula rounds the value in cell A1 to two decimal places. Adjust the cell reference and decimal places as needed for your specific scenario.
How to calculate percentages in Excel?
To calculate a percentage in Excel, use the formula: = (Part / Total) * 100
Replace “Part” with the specific value you want to find the percentage of, and “Total” with the total value. Multiply the result by 100 to get the percentage. For example: = (A1 / B1) * 100
This formula calculates the percentage of the value in cell A1 compared to the total in cell B1. Adjust the cell references as needed for your specific data.
Does Excel round 0.5 up or down?
Excel uses a method called round half to even, also known as bankers’ rounding. When rounding a number ending in 0.5, Excel rounds to the nearest even number. So, 0.5 is rounded down to 0, and 1.5 is rounded up to 2. This method minimizes rounding bias.
Related Articles
- How to Round Off Numbers in Excel (9 Methods)
- 3 Formulas for Rounding Time to the Nearest Hour in Excel
- [3 Formulas] Round Off Time to Nearest Multiple of 15 Minutes in Excel
- 5 Ways to Round a Formula with SUM Function in Excel
- How to Stop Excel from Rounding 16-Digit Numbers (2 Methods)
- [3 Ways] Round Off Time to Nearest Multiple of 5 Minutes in Excel
 You will see a dialog box pop up on the Excel sheet.
 Now you will see that Excel has restored all the decimal places after the decimal point.
 These are alert signs if you are worried about the green little triangle signs.