How to Use ROW Function in Excel [3 Examples]
Are you looking to streamline your Excel workflows and boost productivity? Understanding the ROW function can be a game-changer. In this guide, we’ll delve into the intricacies of the Excel ROW function, its syntax, practical examples, and key takeaways to empower your Excel proficiency.
What Does the Excel ROW Function Do?
The ROW function actively retrieves the row number of a specified cell reference, serving as a powerful tool. It belongs to the category of Lookup & Reference functions and offers immense utility in various data manipulation tasks. By simply providing a cell reference as its argument, the ROW function dynamically returns the row number of that cell, facilitating efficient data analysis and management.
What is the Syntax of the Excel ROW Function?
The syntax of the ROW function is straightforward:
=ROW([reference])What are the Arguments of the Excel ROW Function?
The ROW function requires a single argument:
- [reference]: This argument specifies the cell reference for which you want to retrieve the row number.
What is the Output of the Excel ROW Function?
The output of the ROW function is a numerical value representing the row number of the specified cell reference.
3 Examples of Using the ROW Function in Excel
Let’s dive into practical examples to grasp the versatility of the ROW function:
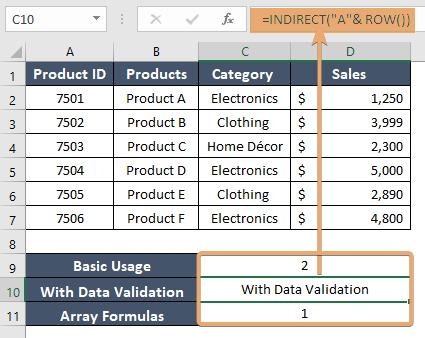
Example 1: Basic Usage
This formula returns the row number of cell A1, which is 1.
=ROW(A1)Example 2: Applying ROW with Data Validation
In this example, combining the ROW function with INDIRECT creates a dynamic reference, actively returning the value from column A corresponding to the current row.
=INDIRECT("A"&ROW())Example 3: Utilizing ROW in Array Formulas
In an array formula, the ROW function actively generates an array of row numbers ranging from 1 to 7.
=ROW(A1:A7)
Things to Remember
- The ROW function is volatile, meaning it recalculates whenever there’s a change in the worksheet.
- Ensure consistent referencing to avoid errors in ROW function usage.
- Experiment with nested functions to unlock advanced functionalities.
Conclusion
Mastering the ROW function in Excel opens up a plethora of possibilities for efficient data manipulation and analysis. By understanding its syntax, leveraging practical examples, and adhering to best practices, you can elevate your Excel skills and streamline your workflow with ease.
Frequently Asked Questions
Can the ROW function be used with other functions?
Yes, you can combine the ROW function with various Excel functions to accomplish intricate data processing tasks.
Is the output of the ROW function affected by row insertion or deletion?
Yes, the output dynamically adjusts to reflect changes in the worksheet structure.
Are there any limitations to using the ROW function?
While powerful, the ROW function may lead to performance issues in large datasets due to its volatile nature.
Is the ROW function volatile?
Yes, the ROW function is volatile, meaning it recalculates whenever there is a change in the worksheet. This can affect performance in large datasets.
Can I combine the ROW function with other functions in Excel?
Absolutely! The ROW function can be combined with various other Excel functions to create dynamic formulas for data analysis, filtering, and referencing tasks.
Can the ROW function be used in array formulas?
Yes, users can employ the ROW function in array formulas to create arrays of row numbers or execute operations on multiple rows concurrently.
Is there an alternative to the ROW function for retrieving row numbers?
Yes, an alternative approach to retrieving row numbers is by using the ROWS function in combination with array formulas. However, users more commonly choose the ROW function for its simplicity in achieving this purpose.
