Remove Non-Printable Characters in Excel [5+ Methods]
While working on an Excel spreadsheet, you’ll often find texts with non-printable characters. If you download Excel files from the internet, this tends to happen very often. The problem with non-printable characters is often you won’t see them in the cell even if they are present. Consequently, it becomes impossible to manipulate the data while these characters are still present. So, you’ll need to remove all the non-printable characters from there. Here, I’m going to show you 6 simple methods to remove non-printable characters from Excel.
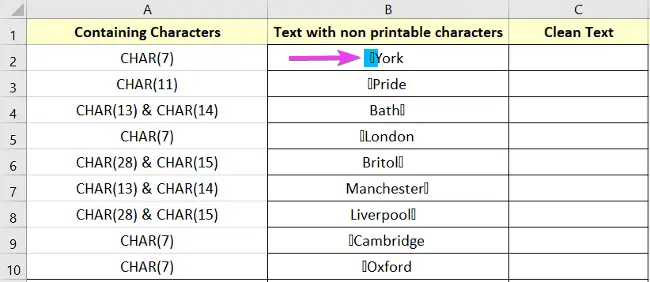
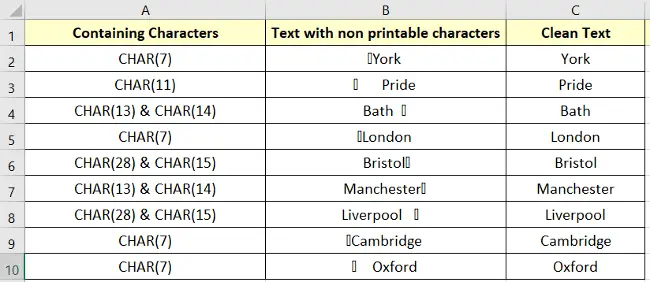
Here, I’ll be using a three-column dataset. In the first column, I put non-printable characters. ASCII values from 0-31 are non-printable characters, which can be written as CHAR(25), and so on. Then, I put texts that contain those characters. Some are visible with a blank box and some are not. In the last column, Clean Text I’ll put texts without any sort of non-printable characters.
The List of Non-Printable Characters in Excel
To remove non-printable characters, you first need to know which ones are non-printable characters. Generally, ASCII values from 00 to 31 are non-printable characters. I’m giving a list of those characters down here:
| Character | Unicode Value | Description |
|---|---|---|
| NUL | 0 | Null character |
| SOH | 1 | Start of heading |
| STX | 2 | Start of text |
| ETX | 3 | End of text |
| EOT | 4 | End of transmission |
| ENQ | 5 | Enquiry |
| ACK | 6 | Acknowledge |
| BEL | 7 | Bell |
| BS | 8 | Backspace |
| TAB | 9 | Horizontal tab |
| LF | 10 | Line feed (new line) |
| VT | 11 | Vertical tab |
| FF | 12 | Form feed (new page) |
| CR | 13 | Carriage return |
| SO | 14 | Shift out (start of extended ASCII) |
| SI | 15 | Shift in (end of extended ASCII) |
| DLE | 16 | Data link escape |
| DC1 | 17 | Device control 1 (XON) |
| DC2 | 18 | Device control 2 |
| DC3 | 19 | Device control 3 (XOFF) |
| DC4 | 20 | Device control 4 |
| NAK | 21 | Negative acknowledge |
| SYN | 22 | Synchronous idle |
| ETB | 23 | End of a transmission block |
| CAN | 24 | Cancel |
| EM | 25 | End of medium |
| SUB | 26 | Substitute |
| ESC | 27 | Escape |
| FS | 28 | File separator |
| GS | 29 | Group separator |
| RS | 30 | Record separator |
| US | 31 | Unit separator |
Remove Non-printable Characters in Excel Using the CLEAN Function
The easiest method is to use the CLEAN function. It will remove all the non-printable characters both visible and invisible.
Syntax
=CLEAN(cell)Formula
=CLEAN(B2)Here, cell B2 has a non-printable character. This formula will remove all non-printable characters from cell B2.
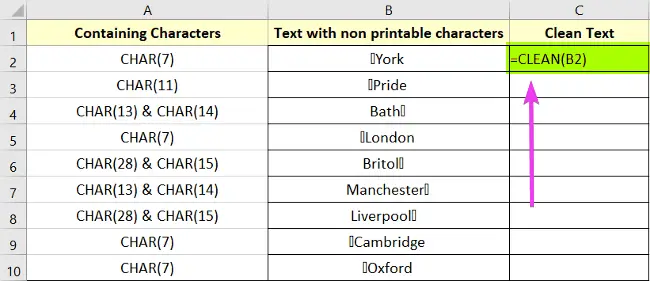
These are the steps to follow to remove the non-printable characters in Excel:
- Select a cell.
- Type the formula: =CLEAN(B2)
- Press the ENTER key.
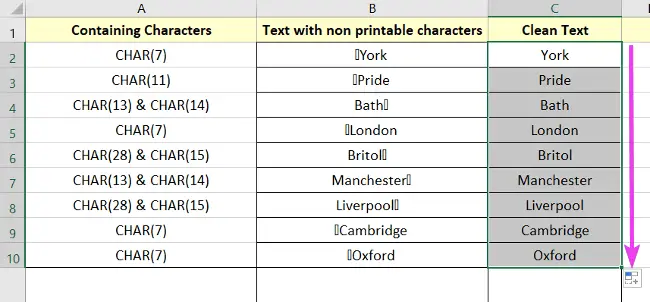
- Use the Fill Handle to copy the formula down.
All non-printable characters are removed now as you desire.
Note: The CLEAN function can not remove non-printable spaces.
Remove the Non-printable Characters in Excel Using the SUBSTITUTE Function
Even though the CLEAN function can not remove spaces, the SUBSTITUTE function can remove non-printable characters and extra spaces.
Syntax
=SUBSTITUTE(cell,”old_string”,”new_string”)Formula
=SUBSTITUTE(B2, CHAR(7),"")Formula Breakdown
B2 is the cell having non-printable characters and CHAR(7) is a non-printable character which is an old_string. Here, “” is used to replace the text in cell B2 with an empty string.
To remove the non-printable characters in Excel using the SUBSTITUTE function, use this guide:
- Select a cell.
- Type the formula: =SUBSTITUTE(B2, CHAR(7),””)
- Press ENTER to insert the formula.
- Drag the Fill Handle icon to your desired range (cell C2:C10).
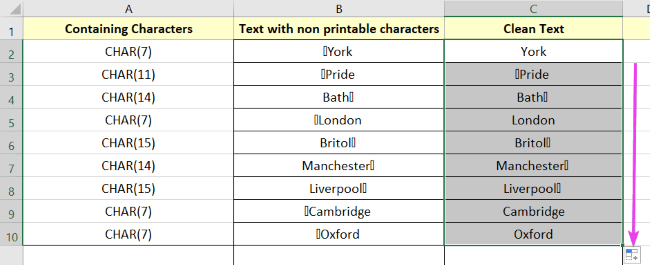
You’ll notice all the characters have not been removed yet. This is because the formula contains CHAR(7).
Now specify all the ASCII values in formulas in their respective cells like this:
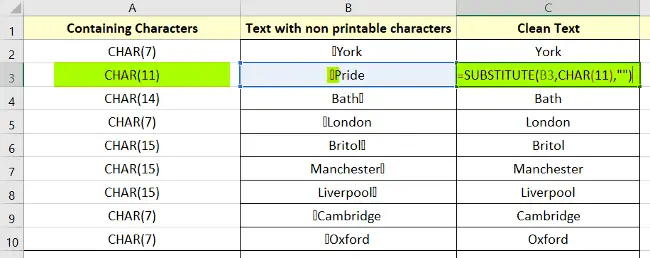
Similarly, for CHAR(14), it will be: =SUBSTITUTE(cell, CHAR(14),””)
For CHAR(15), it will be: =SUBSTITUTE(cell, CHAR(15),””)
and so on.
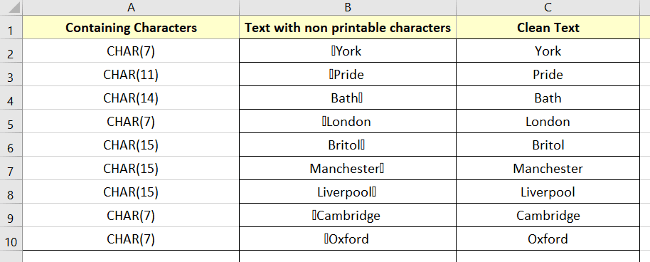
Here, look at the final result:
- 7+ Methods to Remove Characters from Left in Excel
- 5 Approaches to Remove Characters from the Right in Excel
- 3+ Ways to Remove Dashes in Excel
Remove Non-printable Characters in Excel Using CLEAN & SUBSTITUTE Function
While the CLEAN function and SUBSTITUTE function help you to remove non-printable ASCII characters quite well, there are some non-printable characters that don’t belong to the ASCII range. This includes numbers 127, 129, 143, 141, 144, and 157. For those characters, you can use the CLEAN and SUBSTITUTE functions both at the same time.
Syntax
=CLEAN(SUBSTITUTE(cell,”old_string”,”new_string”))Formula
=CLEAN(SUBSTITUTE(B2, CHAR(144), CHAR(7)) Formula Explanation
B2 is the cell having non-printable characters and CHAR(144) is a non-printable character which is an old_string. Here, CHAR(7) is used to replace CHAR(144).
To remove the non-printable characters with CLEAN & SUBSTITUTE functions:
- Select cell C2.
- Type the formula: =CLEAN(SUBSTITUTE(B2, CHAR(144), CHAR(7))
- Press ENTER to see the result in the cell.
- Now, do the same for other cells which having non-ASCII values.

Delete the Non-printable Characters in Excel Using the Nested SUBSTITUTE Function
If your data has multiple non-printable characters in one cell, you can use the Multiple Substitute function nested with each other and then the CLEAN function.
Syntax
=SUBSTITUTE(SUBSTITUTE(SUBSTITUTE(cell,”old_string”,”new_string”),”old_string”,”new_string”),”old_string”,”new_string”)Formula
=(SUBSTITUTE(SUBSTITUTE(B2, CHAR(13),”” ),CHAR(14),””)Formula Breakdown
- B2 is the cell having non-printable characters
- CHAR(13) & CHAR(14) are non-printable characters that are an old_string.
- “” is the new_string.
Steps to remove the non-printable characters in Excel using the SUBSTITUTE function:
- Select a cell.
- Type this formula: =(SUBSTITUTE(SUBSTITUTE(B2, CHAR(13),”” ),CHAR(14),””)
- Press the ENTER key.
- Now specify all the ASCII values in formulas in their respective cells like this:

You will get your desired result in column C:

- 4 Ways to Remove First Word in Excel
- 6 Ways to Remove the First 2 Characters in Excel
- 6 Ways to Remove the First 4 Characters in Excel
Remove the Non-printable Characters in Excel Applying the TRIM & CLEAN Functions
Sometimes you’ll find data with extra spaces. To get rid of all the extra spaces along with non-printable characters, wrap the CLEAN Function with a Trim function.
Syntax
=TRIM(CLEAN(cell))Formula
=TRIM(CLEAN(B2)) Here, cell B2 has a non-printable character and extra spaces. This formula will remove all non-printable characters including spaces from cell B2.
Steps to remove the non-printable characters in Excel using TRIM & CLEAN functions:
- Take an empty cell.
- Type the formula: =TRIM(CLEAN(B2))
- Hit the ENTER key.
- Copy the formula and press CTRL+D.
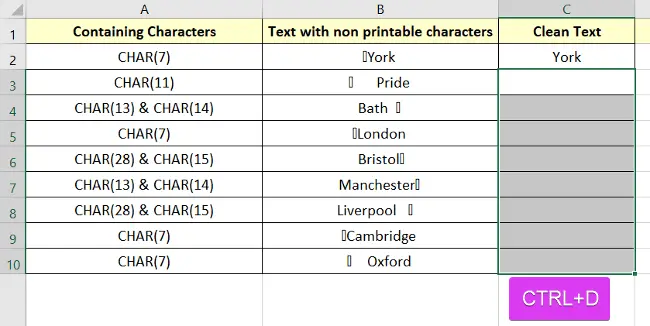
The formula will be copied to the selected area (cell range C2:C10).
Remove Non-Printable Characters Using VBA in Excel
You can create your own User-Defined Function to remove all non-printable characters by using VBA codes. Down here I’m attaching a VBA code that works for this dataset.
Function Remove_NP_Chars(egText As String, Optional gSubText As String = " ")

Dim g As Integer
Dim gTxt
Dim gWF As WorksheetFunction

Set gWF = Application.WorksheetFunction
gTxt = Array(Chr(7), Chr(11), Chr(13), Chr(14), Chr(15), Chr(28))

For g = 1 To 31
egText = gWF.Substitute(egText, Chr(g), gSubText)
Next
For g = 0 To UBound(gTxt)
egText = gWF.Substitute(egText, gTxt(J), gSubText)
Next

Remove_NP_Chars = egText
Set gWF = Nothing

End Function
Editable Lines
gTxt = Array(Chr(7), Chr(11), Chr(13), Chr(14), Chr(15), Chr(28))Just update the ASCII codes of the non-printable characters in this line.
This code creates a user-defined function called Remove_NP_Chars. It just requires a cell address having non-printable characters inside it.
Syntax
=Remove_NP_Chars(cell)To remove the non-printable characters in Excel using VBA code, follow this guide:
- Right-click on the sheet name and choose View Code to open Visual Basic Editor.
- Go to Insert > Module.
- Copy the code mentioned above and paste it.
- Select Run.
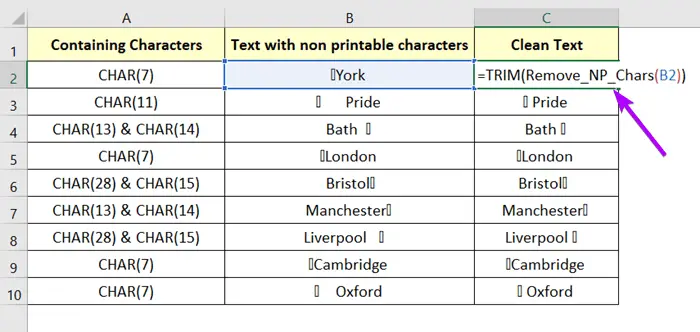
- In cell C2, type the formula: = Remove_NP_Chars(B2)
- Hit the ENTER key.
- Double-click on the Fill Handle.
The formula will remove all the non-printable characters along with leading and trailing spaces.
How to Type Non-Printable Characters in Excel
Now let me show you how can you insert those non-printable characters in Excel.
Syntax
=CHAR(number)&”TEXT”Now, let’s consider our data on cell B2. Type the following formula in that cell and press ENTER.
=CHAR(7)&”York” It will show the text York with a non-printable character. Here ASCII value 7 is used.

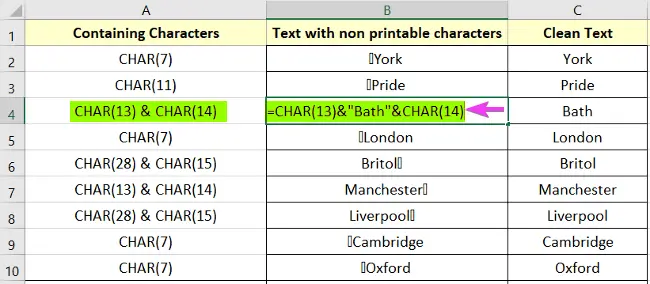
Let’s look at another one. In the B4 cell, it is written as
=CHAR(13)&”Bath”&CHAR(14)Conclusion
Here, I’ve tried to show you some easy methods that you can implement in Excel while working with data that has non-printable characters. Often these characters are undetectable. So, to remove them you can choose any of the methods according to your needs. I hope this will help you with your work greatly. Thank you.
Frequently Asked Questions
What is Char 10 in Excel?
In Excel, Char 10 represents a line feed character. To use it in a formula, you can reference it within the CHAR function. For example: =SUBSTITUTE(cell_reference, CHAR(10), “”)
Replace “cell_reference” with the reference to the cell containing the text. This formula replaces all instances of Char 10 (line feed) with an empty string, effectively removing line breaks from the specified cell in Excel. Adjust the cell reference as needed for your specific case.
How can I identify non-printable characters in Excel?
The article guides users on different methods to identify non-printable characters, including using Excel functions like CLEAN, conditional formatting, or third-party tools.
Can I remove non-printable characters from a specific range of cells?
Yes, the article provides instructions on how to remove non-printable characters from a targeted range, an entire column, or even an entire worksheet using Excel functions and features.
How do I remove Char 160 in Excel??
To remove Char 160 (non-breaking space) in Excel, you can use the SUBSTITUTE function. Here’s a concise formula: =SUBSTITUTE(cell_reference, CHAR(160), “”)
Replace “cell_reference” with the reference to the cell containing the text. This formula replaces all occurrences of Char 160 with an empty string, effectively removing non-breaking spaces from the specified cell in Excel. Adjust the cell reference as needed for your specific case.
How do I find hidden special characters in Excel?
To find hidden special characters in Excel, you can use a combination of functions, including CODE, LEN, and IF. Here’s a concise formula: =IF(CODE(MID(cell_reference, ROW(INDIRECT(“1:”&LEN(cell_reference))), 1))<=31, MID(cell_reference, ROW(INDIRECT(“1:”&LEN(cell_reference))), 1), “”)
Replace “cell_reference” with the reference to the cell containing the text. This formula identifies and returns any characters with ASCII codes less than or equal to 31, which often represent special characters or non-printable characters. Adjust the cell reference as needed for your specific case.
Related Articles
