How to Remove Duplicate Values in Power Query [2 Ways]
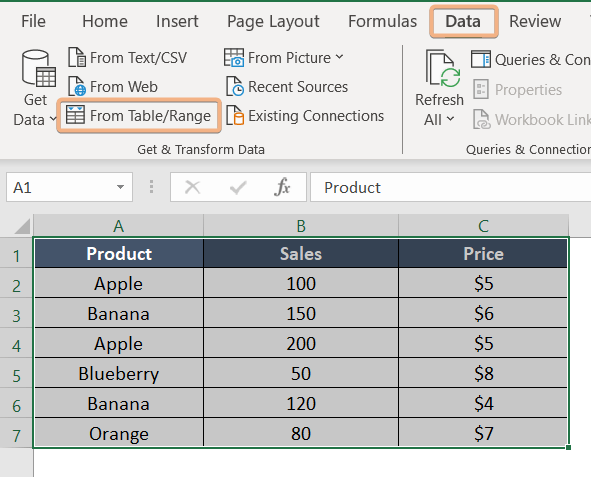
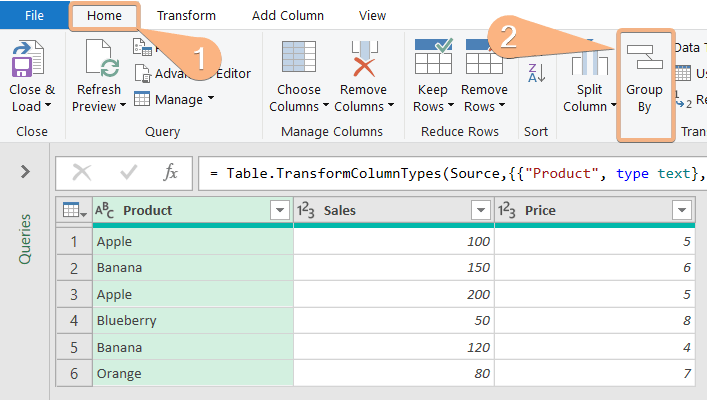
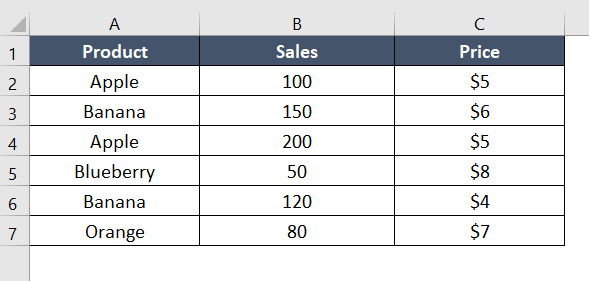
Removing duplicates in Power Query is a crucial step in refining and optimizing datasets within tools like Microsoft Excel and Power BI. This process involves identifying and eliminating identical entries in specified columns, ensuring data accuracy and integrity. With a user-friendly interface, Power Query simplifies this task, providing a seamless way to create cleaner datasets. In this article, I aim to demonstrate, how to use power query to remove duplicates in Excel. The dataset is given below:
Using Remove Duplicate Feature to Remove Duplicate Values in Power Query
The Remove Duplicate feature in Power Query allows users to efficiently clean and refine datasets by eliminating redundant entries. By identifying and removing identical records, this feature helps enhance data accuracy and streamline data processing workflows. Whether working with large datasets or smaller tables, Power Query’s Remove Duplicate feature is valuable for maintaining data integrity and optimizing data quality.
Here is the step-by-step method to eliminate duplicate values using the ‘Remove Duplicate’ feature in Power Query:
Step 1: Open Power Query Editor
- Choose the table.
- Select the “Data” tab after launching the Excel ribbon.
- After clicking “Get Data,” choose “From Table/Range.”

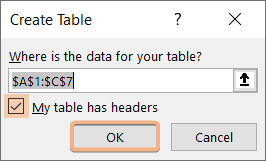
- Enable the feature “My Table has a Header.”

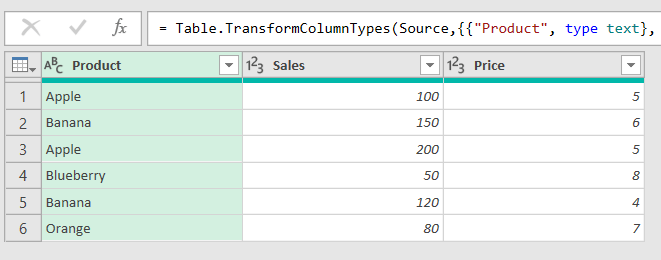
- Your data will be displayed when the Power Query Editor launches.

Step 2: Remove Duplicate Values from Tables/Ranges
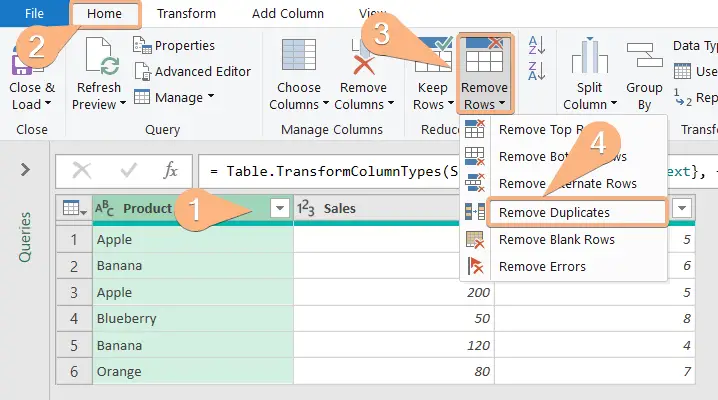
- Click on the header of the “Product” column.
- In the “Home” tab, click on “Remove duplicates” in the “Reduce Rows” group. The steps might look slightly different based on your version of Excel, but the general process remains the same.

- Power Query removes the duplicates based on the “Product” column.
- You will see a preview of the unique values in the Power Query Editor.

- Close the Power Query Editor and click “Close & Apply” to save the changes.
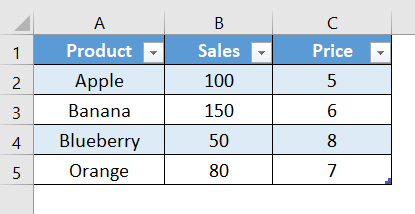
After completing these steps, your dataset will be updated to remove the duplicate values in the “Product” column, and you’ll have a unique list of products.
Using Group By Feature to Remove Duplicate Values in Power Query
The ‘Group By’ feature in Power Query is a powerful tool for data organization. It enables users to group data based on specific criteria and perform aggregate functions within those groups. This feature is useful for summarizing information, creating subtotals, and gaining deeper insights into your dataset. With ‘Group By,’ you can streamline your data analysis process and derive meaningful conclusions from complex datasets.
Effortlessly remove duplicate values with the ‘Group By’ feature in Power Query by following these simple steps:
- Open the Power Query Editor.

- In the “Home” tab, click on “Group By” in the “Transform” group.
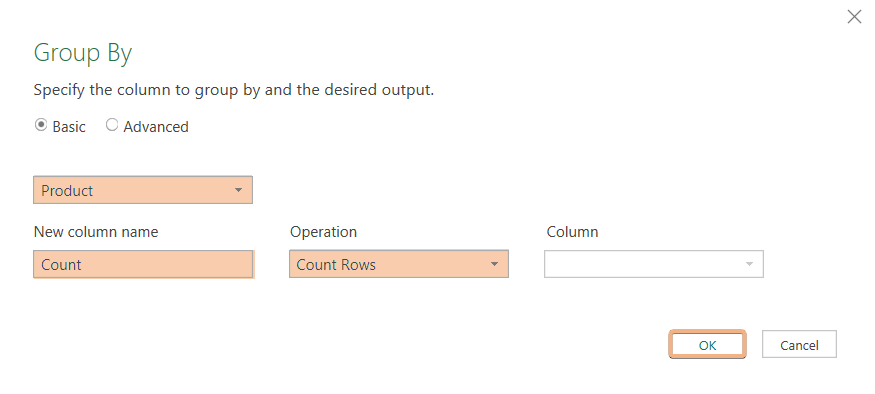
- Select the “Product” column in the “Group By” dropdown.

- Rename the “New column name” to something like “Count” (this is optional but helps you identify the purpose).
- Set the “Operation” to “Count Rows.”
- Click “OK.”

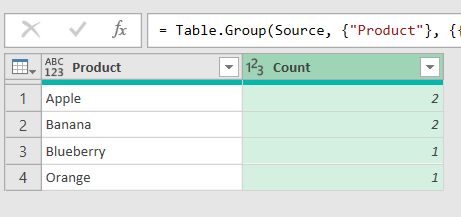
- This will create a new column that shows the count of each unique product. (In the “Count” column, filter out any rows where the count is greater than 1. This will keep only the rows with unique products.)

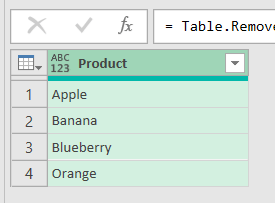
- If you don’t want to keep the “Count” column, you can right-click on the column header and choose “Remove.”

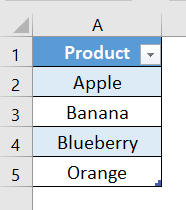
- You’ll see a table with unique values in the “Product” column.

- Close the Power Query Editor and click “Close & Apply” to save the changes.
This method uses the “Group By” feature to count the occurrences of each value in the selected column and then filters out the rows where the count is greater than 1, effectively removing duplicates.
Conclusion
In this comprehensive guide, I aim to illustrate the process of removing duplicate values in Power Query. I showcase two distinct methods for achieving this task, providing you with flexibility in choosing the approach that best suits your preferences or data requirements. Follow the step-by-step instructions outlined for each method to seamlessly enhance your data cleansing and manipulation capabilities.
Frequently Asked Questions
How do I remove duplicates based on multiple conditions in Power Query?
To remove duplicates based on multiple conditions in Power Query:
- Select the data range and go to the “Data” tab, then click “From Table/Range.”
- Once in the Power Query Editor, go to the “Home” tab.
- Select the columns you want to consider for duplicates.
- Click on “Remove duplicates” in the “Transform” group.
- In the dialog that appears, select the columns that define uniqueness.
- Click “OK” to remove duplicates based on the specified conditions.
- Review the results in the Power Query Editor.
- Close the Power Query Editor and click “Close & Apply” to save the changes.
How do I remove duplicates in the SELECT query?
To remove duplicates in a SQL SELECT query, use the DISTINCT keyword followed by the columns by which you want to identify unique records:
SELECT DISTINCT column1, column2, …
FROM your_table;
Replace your_table with the actual table name and list the columns (column1, column2, …) to determine uniqueness. This query retrieves distinct rows based on the specified columns, effectively removing duplicate entries from the result set.
