How to Enable & Disable Power Pivot Add-In in Excel
What is Power Pivot in Excel?
Power Pivot is a Microsoft Excel add-in that allows users to perform advanced data analysis and develop advanced analytical models. It is a built-in Excel tool for assessing huge data sets.
Users can import data from a variety of sources, including databases, spreadsheets, and text files, using Power Pivot. They can then use Pivot Tables, Pivot Charts, and other data visualization tools to analyze the data.
Users can also establish connections between sets of data with Power Pivot, which can be used to create comprehensive data models. These data models can be used to solve complex data queries.
Power Pivot Features
- Supports importing data from various sources such as databases, text files, Excel files, various spreadsheets,
- It can handle large data files up to 2GB.
- While importing data, it supports filtering data and renaming data tables and column headers.
- Creates relational data model among different data tables.
- Supports DAX (Data Analysis Expressions) language to write complex formulas.
- Generates KPIs (Key Performance Indicators).
Power Pivot Add-In Availability in Excel
The Power Pivot add-in is included in the recent versions of MS Excel. The older version of MS Excel is still missing out on this data analysis tool.
However, you will get the Power Pivot add-in included in MS Excel 2013 and later versions. But you won’t find this add-in enabled. You have to manually activate this add-in to start working with it.
In Microsoft Excel 2010, you can still use the Power Pivot add-in. But unfortunately, this add-in this not included with the official office product. You have to download the add-in first.
Unfortunately, the Power Pivot add-in is missing in older versions of MS Excel such as Excel 2007, Excel 2003, and so on.
Enable Power Pivot Add-In in the Main Ribbon in Excel
If you are using MS Excel 2013 or the later versions, follow this guide to activate the Power Pivot add-in. To do that, follow these steps below:
- Select the File menu.

- Select Options.

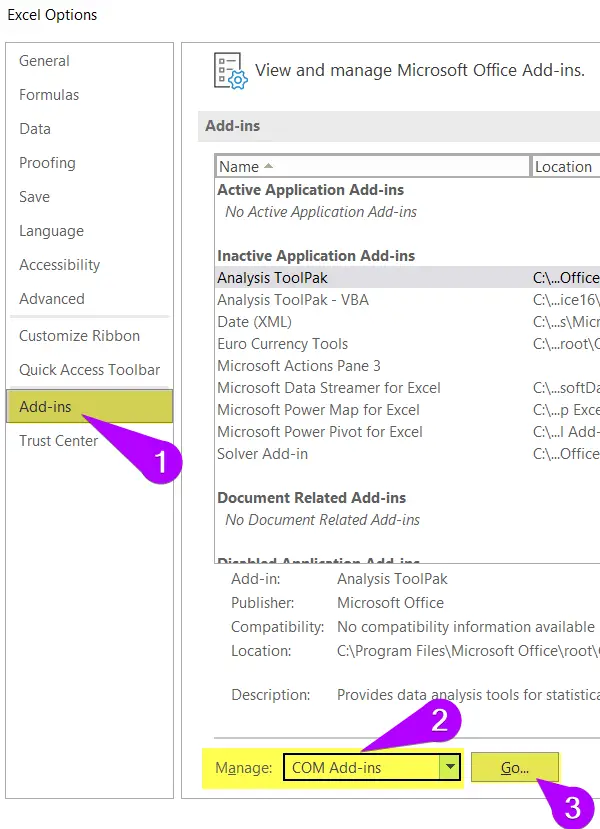
- Select Add-ins in the Excel Options dialog box.
- Choose COM Add-ins from the Manage drop-down.
- Now click on Go.

- Mark a tick beside the Microsoft Power Pivot for Excel option in the COM Add-ins dialog box.
- Click OK.
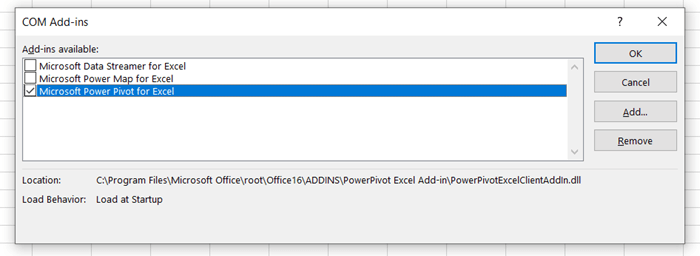
Check your Excel ribbon. You will find the Power Pivot menu in the main ribbon after the Help tab.

2 Ways to Add Developer Tab in Excel
Disable Power Pivot Add-In in the Main Ribbon in Excel
If you want to remove the Power Pivot add-in from the main menu in Excel, go through these steps below:
- Click the File tab.

- Select Options.

- Select Add-ins in the Excel Options dialog box.
- Select COM Add-ins in the Manage drop-down.
- Click the Go button to proceed with the selection.

- Unselect Microsoft Power Pivot for Excel in the COM Add-ins dialog box.
- Click OK.
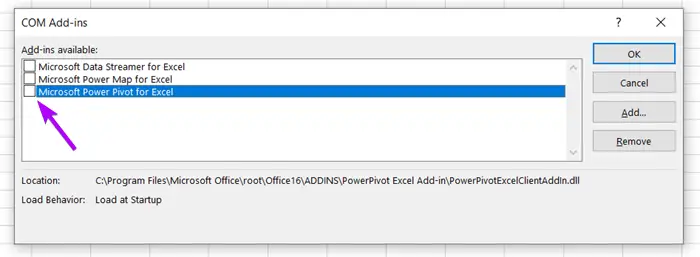
Excel will remove the Power Pivot add-in from the main ribbon. You can check it next to the Help tab.

[Solved] Power Pivot is Missing?
The Power Pivot is a heavy-weight data analyzing tool. You can literally support large data files up to 2GB. Such a powerful tool like Power Pivot when closed unexpectedly while the window is open, can prompt the Excel program unstable. Thus, Excel can disable the Power Pivot.
If such a case occurs and you can’t find the Power Pivot ribbon in the menu, follow along with the guide.
Using the Disabled Items to Restore Power Pivot Ribbon
To restore Power Pivot in the ribbon bar with disabled items in Excel, follow these steps below:
- Go to the File menu.

- Select Options.

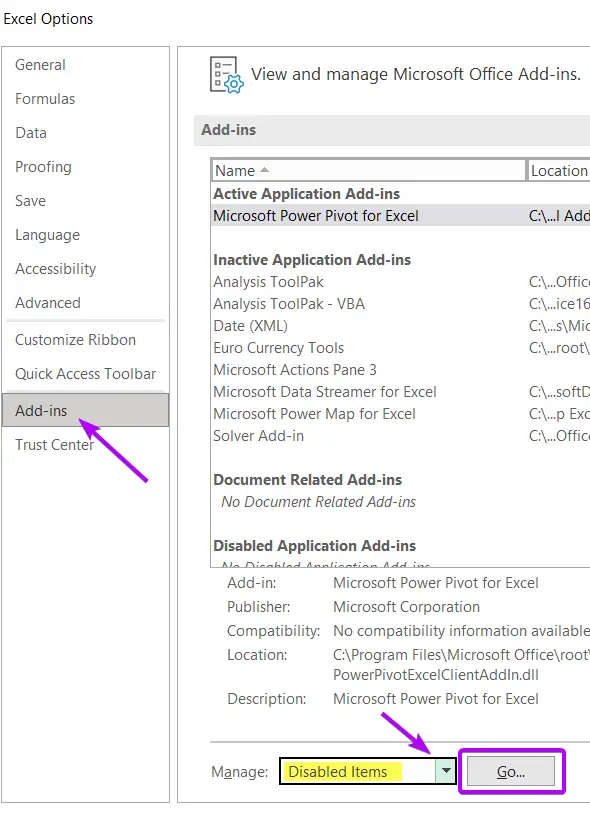
- Select Add-ins in the Excel Options dialog box.
- From the Manage drop-down choose Disabled Items.
- Then, hit Go.

- From the Disabled Items dialog box, select Microsoft Office Power Pivot and click Enable.
This will restore the Power Pivot in your Excel program. But, if this method doesn’t work for you, try the next method.
Using Registry Editor to Restore Power Pivot Ribbon
To restore Power Pivot in Excel ribbon using Registry Editor, here are the steps below:
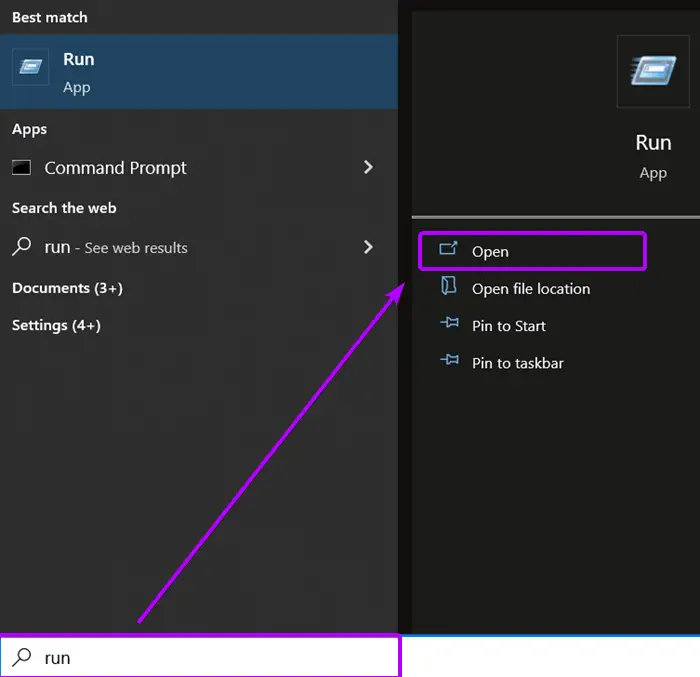
- Type Run in the Windows search box.
- Then click Open.
You can also press the WIN + R buttons to open the Run dialog box.

- Type regedit in the box beside Open and hit OK.
 Registry Editor appears.
 - Navigate the following path.
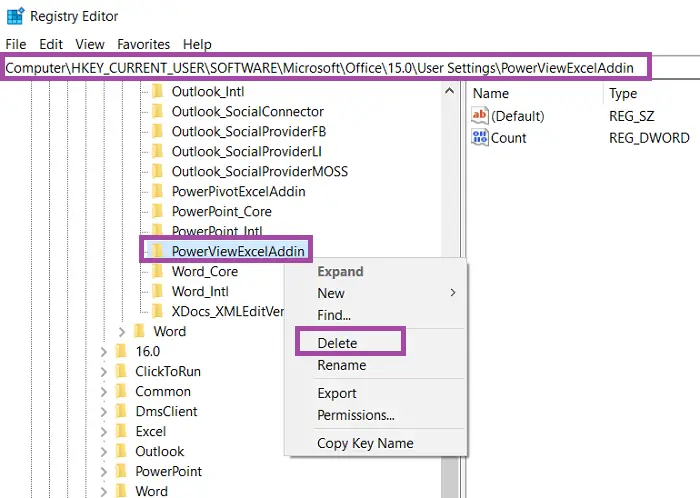
For Excel 2013: HKEY_CURRENT_USER > Software > Microsoft > Office > 15.0 > User Settings.
For Excel 2016: HKEY_CURRENT_USER > Software > Microsoft > Office > 16.0 > User Settings. - You will find PowerPivotExcelAddin under the User Settings. Right-click on it and select Delete.

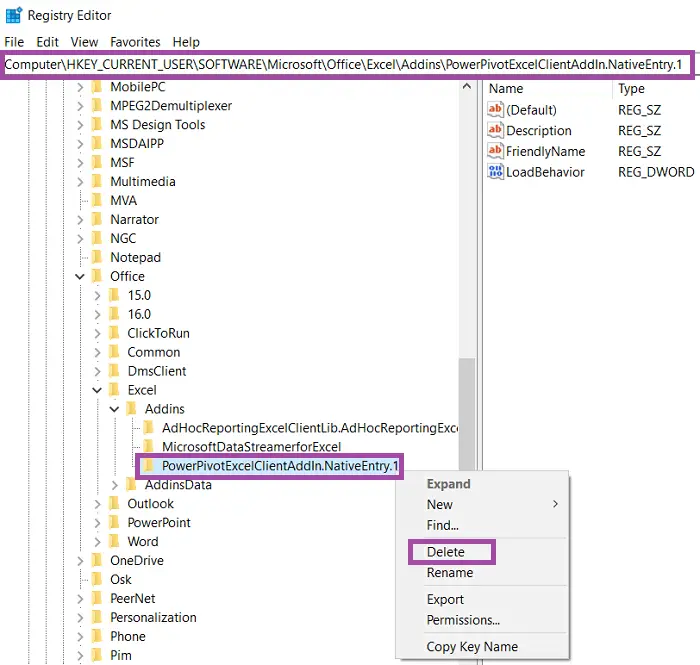
- Now navigate the path: HKEY_CURRENT_USER > Software > Microsoft > Office > Excel > Addins.
- This time select PowerPivotExcelClientAddIn.NativeEntry.1. Right-click on it and select Delete again.

- After that, close the Registry Editor dialog box.
- Now open the Excel program.
- Again enable the Power Pivot add-in and enjoy!
Conclusion
I’ve discussed how to enable and disable the Power Pivot add-in in Excel. I’ve also discussed the restoring techniques of the Power Pivot add-in if Excel disables it by itself. I expect you’ve found this article useful. You can read more articles relating to Excel from the Blog page of our website. Have a fantastic workday!
Frequently Asked Questions
How do I remove add-in Excel?
To remove an add-in in Excel, follow these steps:
- Go to the File tab.
- Select Options at the bottom of the left-hand menu.
- In the Excel Options dialog box, choose Add-ins from the left sidebar.
- In the Manage box at the bottom, select Excel Add-ins and click Go.
- In the Add-Ins dialog box, uncheck the box next to the add-in you want to remove.
- Click OK to apply the changes.
By following these steps, you can easily remove an add-in from Excel.
How do I enable Power Query in Excel?
To enable Power Query in Excel, follow these steps:
- Open Excel and go to the Data tab.
- Click on Get Data in the Get & Transform Data group.
- Choose the data source you want to connect to or select From Table/Range if you have data in the worksheet.
- Power Query Editor will open, allowing you to transform and manipulate your data.
By following these steps, you can enable Power Query in Excel and begin using its powerful data transformation features.



You need to use the correct idMso for the “Power Pivot” tab. Once you’ve identified the idMso for the “Power Pivot” tab, you can use it to control the visibility in your customization XML