How to Remove Duplicates Based on Multiple Columns in Power Query [3 Methods]
In Power Query, the ability to remove duplicates based on multiple columns adds a layer of sophistication to data cleaning. This feature enables you to precisely define criteria across various fields, ensuring a thorough elimination of duplicate entries. By exploring this capability, you enhance your data quality and analytical precision, creating a more nuanced and refined approach to dataset refinement.
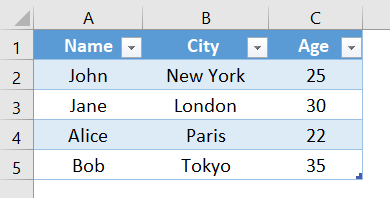
In this article, I’m excited to present a dataset featuring three columns: “Name,” “Age,” and “City.” We’ll explore how to effectively remove duplicates by focusing on the “Name” and “City” columns. This step-by-step guide will demonstrate the process, ensuring a clear understanding of how to refine your data. Look at the dataset provided below to follow along and enhance your skills in managing duplicates within Power Query.
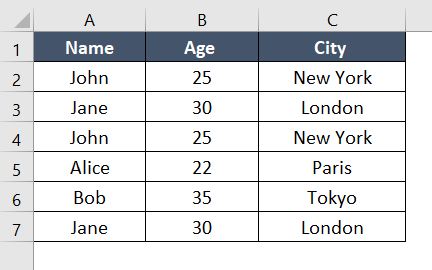
Using Remove Duplicates Feature to Remove Duplicates Based on Multiple Columns in Power Query
This process involves using Power Query’s Remove Duplicates feature to clean up data by removing repeated entries. Its ability to consider multiple columns when identifying and eliminating duplicates makes it powerful. This feature ensures a more precise and comprehensive approach to data cleaning in Power Query, enhancing the accuracy and reliability of your datasets.
To remove duplicates based on both the Name and City columns, you can follow these steps in Power Query:
Step 1: Open Power Query Editor
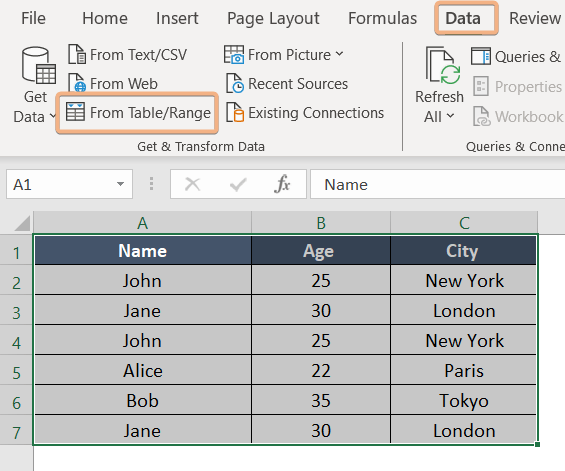
- Select the table.
- Open the Excel ribbon and select the “Data” tab.
- Select “From Table/Range,” then click “Get Data.”
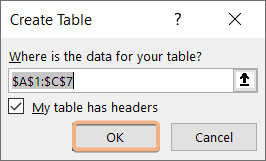
- Turned on “My Table has a Header.”
 Your data will be displayed when the Power Query Editor launches.
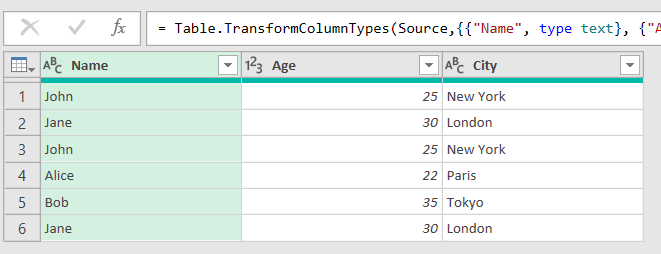
Step 2: Remove Duplicates Based on Multiple Columns
- Select both the “Name” and “City” columns by holding down the “Ctrl” key.
- Go to the “Home” tab in the Power Query Editor.
- Click on “Remove Rows”.
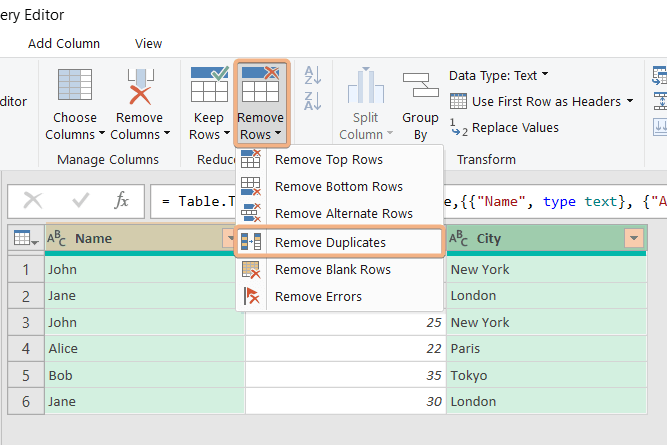
- Then select “Remove Duplicates.”

- After removing duplicates, click on the “Close & Apply” button to apply the changes and close the Power Query Editor.
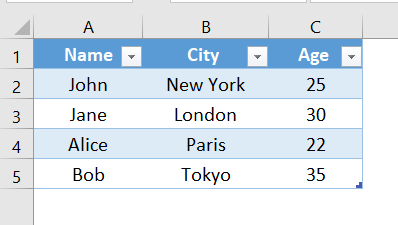
After these steps, the resulting dataset will look like this:

Using Power Query’s Group By Feature to Remove Duplicates Based on Multiple Columns
In this scenario, you employ Power Query’s “Group By” feature to streamline data by removing redundant entries across multiple columns. This functionality allows you to categorize and aggregate data based on specific columns, effectively eliminating duplicates. Utilizing the “Group By” feature ensures a systematic and efficient way to clean and refine datasets, enhancing the accuracy and clarity of your data in Power Query.
Here are the step-by-step instructions to remove duplicates based on several columns by Group By feature :
Step 1: Configure Group By Dialog
- Open Power Query Editor.
- In the Power Query Editor, select your dataset.

- Go to the “Home” tab in the Power Query Editor.
- Click on “Group By” in the “Transform” group.
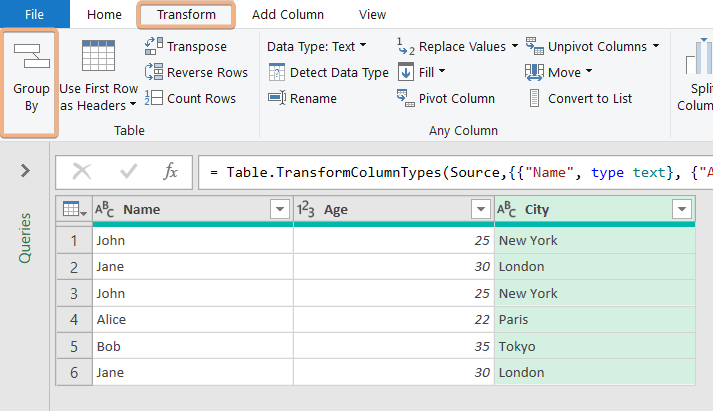
- Choose a New column name (e.g., “Grouped”).
- Click on the “Advanced” button.
- Select the columns based on which you want to group (e.g., “Name” and “City”).
- For each column you want to include in the grouping without aggregation, choose “All Rows” as the aggregation operation.
- After configuring the aggregation operations for all columns, click “OK” to apply the group by operation.
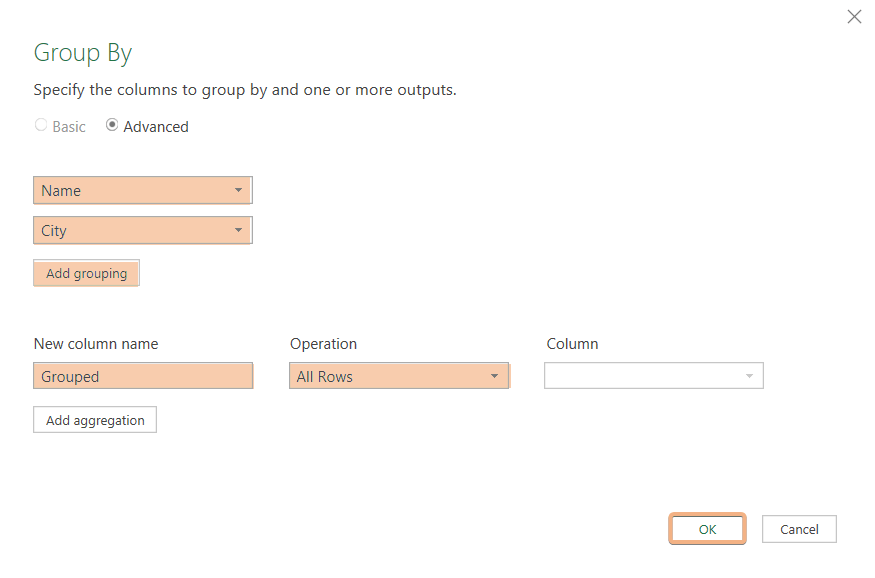
- You will see a new column named “Grouped” containing tables of grouped records.

Step 2: Expand the Grouped Column
- Click on the small box icon in the header of the “Grouped” column and unselect the “Use original column name as prefix” option.
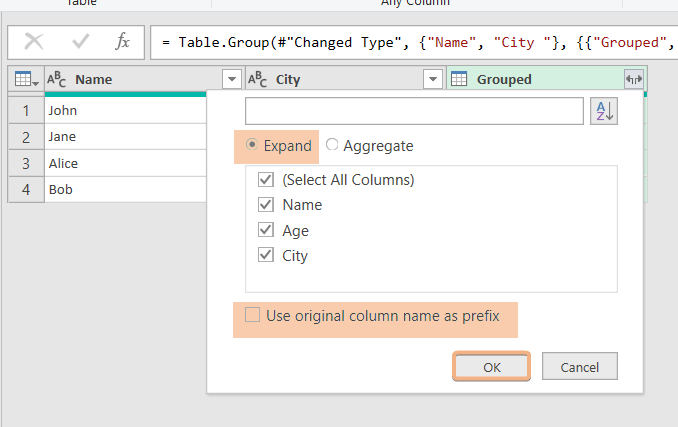
- Click “OK” to expand the grouped column.
- Remove any unnecessary columns, including the “Grouped” column.
- After making these changes, click on the “Close & Apply” button to apply the transformations.

After these steps, you will have a table with duplicates removed based on the specified columns.
Using M codes in Power Query’s Advanced Editor Feature to Remove Duplicates Based on Multiple Columns
Using the Advanced Editor feature in Power Query and writing M code to remove duplicate entries from your data, considering multiple columns. It’s a more hands-on approach, allowing you to specify exactly how duplicates should be handled, providing a customized and detailed way to clean up your data in Power Query.
Here’s how you can remove duplicates based on the “Name” and “City” columns:
- Open Power Query Editor.

- Go to the “Home” tab in the Power Query Editor.
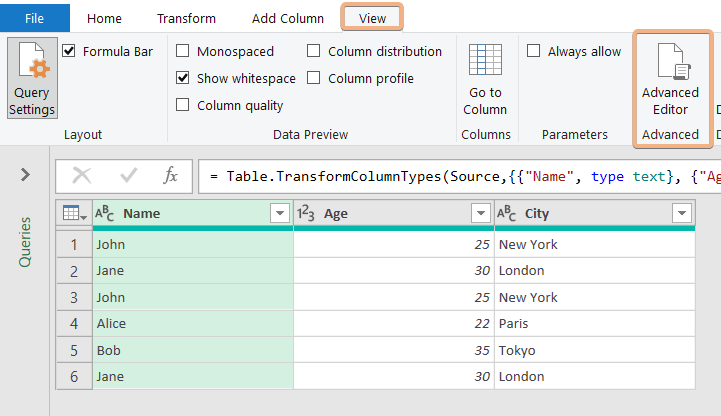
- Click on “Advanced Editor.”
- Use the following M code:
let
Source = Excel.CurrentWorkbook(){[Name="Table1"]}[Content],
#"Changed Type" = Table.TransformColumnTypes(Source,{{"Name", type text}, {"Age ", Int64.Type}, {"City ", type text}}),
#"Removed Duplicates" = Table.Distinct(#"Changed Type", {"Name", "City "})
in
#"Removed Duplicates"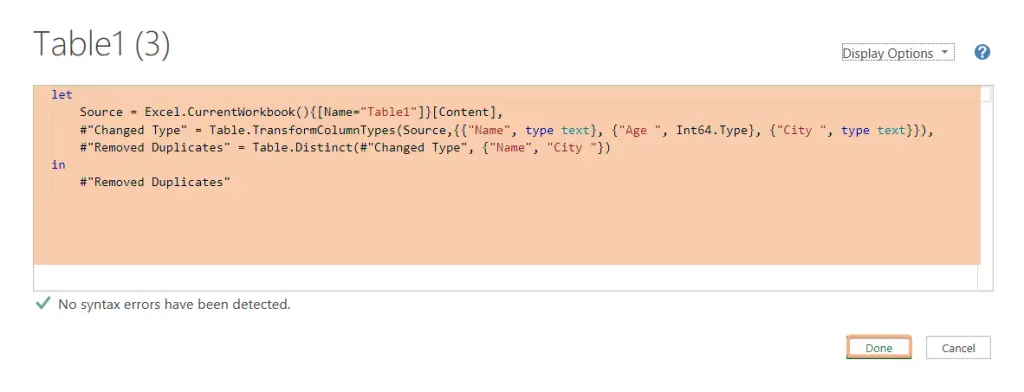
- After making these changes, click on the “Close & Apply” button to apply the transformations.

This code groups the table by the specified columns (“Name” and “City”) and then keeps only the first row of each group, effectively removing duplicates based on those columns. Adjust the column names in the code according to your dataset.
Conclusion
In this article, my goal is to guide you through the process of efficiently removing duplicates based on multiple columns. I’ve outlined three distinct methods, providing you with versatile options for different situations. Although I demonstrated the procedure using two columns, it’s important to note that you can seamlessly apply these methods to datasets with more than two columns, ensuring a flexible and comprehensive approach to eliminating duplicates in your data.
Frequently Asked Questions
How do I remove specific duplicates in Power Query?
In Power Query, you can remove specific duplicates by following these steps:
- Load your data into Power Query Editor.
- Choose the columns where you want to identify and remove duplicates.
- Navigate to the “Home” tab, and click on “Remove duplicates.” This will prompt Power Query to analyze the selected columns.
- A dialog box will appear, showing all columns selected. You can choose specific columns and customize criteria for duplicate removal.
- Once you’ve made your selections, click “OK.” Power Query will then remove the specified duplicates, leaving you with a cleaned dataset.
This process allows you to precisely target and eliminate specific duplicates based on your chosen criteria in Power Query.
What happens if I have duplicate values in one column but different values in another?
Power Query considers the combination of values across all selected columns. If there’s a difference in any of the columns, the entry won’t be treated as a duplicate.
Does Power Query provide any criteria customization for duplicate removal?
In Power Query, you can customize criteria for duplicate removal using the “Remove Duplicates” feature. Here’s how:
- Go to the “Data” tab in Excel and select “Transform Data” to open the Power Query Editor.
- Select your dataset in the Power Query Editor.
- Right-click on the column(s) you want to use for duplicate removal, or go to the “Home” tab and click “Remove Duplicates.”
- In the “Remove Duplicates” dialog, select the columns you want to use as criteria for duplicate removal.
- Click “OK” to apply the removal, then click “Close & Apply” to save the changes.
By customizing criteria, you control which combination of columns identifies duplicates, ensuring flexibility in the duplicate removal process.