5 Ways to Remove Blank Cells from Excel Pivot Table
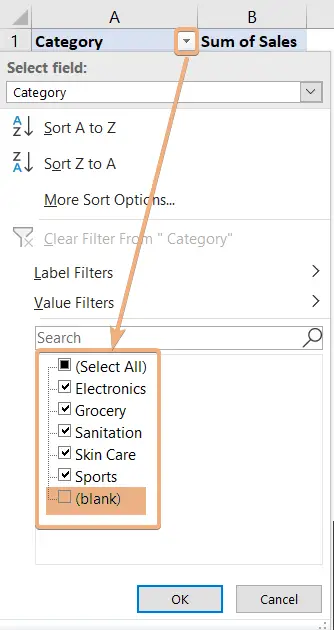
- Click on the Filter icon in the Pivot Table.
- Unselect the (blank) option.
- Click OK.
Here, we have a Pivot Table as the dataset. This is a sales report. So, you can see the product names with their details. Now, we will remove the blanks from the Excel Pivot Table.

Use PivotTable Options to Remove Blank Cells from Excel Pivot Table
In the Pivot Table, there are many places left blank. To remove the blanks with PivotTable Options, follow the steps below:
- Click anywhere within the Pivot Table.
- Go to the Analyze tab.
- Click on Options under the PivotTable group.

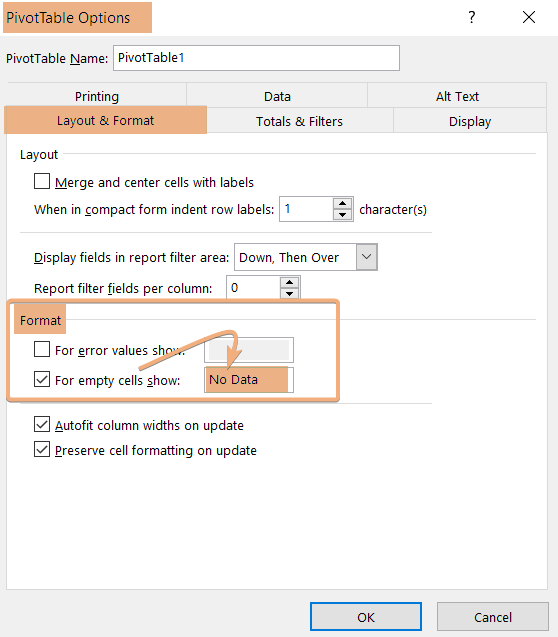
- In the PivotTable Options dialog box, go to the Layout & Format tab.
- In the Format section, “For empty cells show:” add a message or number to show instead of showing blank cells.
Here I added “No Data” to show in place of blank cells. - Click OK.

Afterward, you will see the replaced cells with your message in the Pivot Table.

Remove Blank Rows After Each Item in Excel Pivot Table
Sometimes, you will see blank rows after each item in the Pivot Table. So, you can use Pivot Table features to remove those blank rows in Excel.

To remove the blank lines after each item, go through the steps below:
- Click any cell inside the Pivot Table.
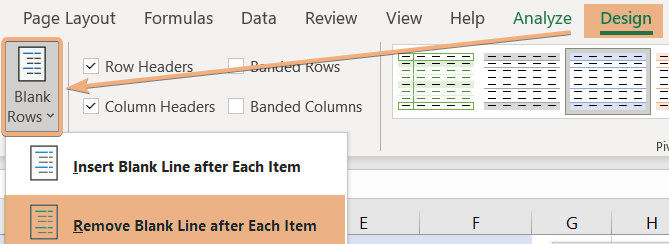
- Go to the Design tab.
- Click on the dropdown of Blank Rows under the Layout group.
- Select “Remove Blank Line after Each Item”.

This will remove the blank lines after each item in the Excel Pivot Table.

Use Conditional Formatting to Remove Blank Cells in Excel Pivot Table
- Go to the Home tab.
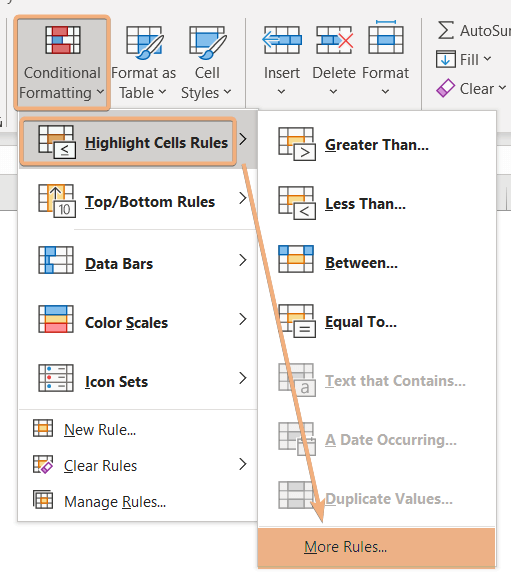
- Navigate to Condition Formatting tool > Highlight Cells Rules > More Rules option.

- In the New Formatting Rule dialog box, choose the third option in the first segment.
- In the “Select a Rule Type:” section, click on “Format only cells that contain” option.
- In the “Format only cells with:” section, choose Blanks option.
- Click on Format button.
- Format cells with Number, Font, Border, and Fill tabs.
- Click OK.

By doing these, you can replace the Pivot Table blanks with a Fill color by using Format.

Remove Blank Cells from the Source Data in Excel
There arise some situations in the Excel Pivot Table where there are some missing values. You can just remove the blanks from the source data in Excel Pivot Table.
 Now, remove the entire data from the source. Next, refresh the Pivot Table. Then, it will update the Pivot Table in Excel.

Filter Out Blank Cells in Excel Pivot Table
Let’s assume a situation in which you have created a Pivot Table. If you remove a data value from the source data, you will see it labeled with (blank) in place of the missing data. Now, we will learn to remove them by filtering them from a Pivot Table.
 To remove blank labeled rows, go through the steps below:
- Click on the Filter button.
- Uncheck the (blank) and click OK.

This will update and exclude the blank labeled rows inside the Pivot Table.
![]()
Conclusion
In conclusion, removing blanks from an Excel Pivot Table is a crucial step toward enhancing data clarity and analysis. By eliminating empty or inconsistent values, users can present more accurate and meaningful insights. The straightforward process of filtering out blanks not only refines the data presentation but also streamlines the decision-making process. In this article, I have discussed 5 methods to remove blanks from Excel Pivot Table. Here, you will able to replace the blank cells with a text or number or fill color within the Pivot Table. Additionally, you will learn Pivot Table features to remove blank lines after each item in the Excel Pivot Tables.
Frequently Asked Questions
Why is blank showing in my Pivot Table?
Blank cells in a Pivot Table may appear due to various reasons, such as empty data fields, null values, or cells containing non-numeric data in a numeric context. To address this issue, ensure your source data doesn’t have empty or inconsistent values. Additionally, check for hidden rows or columns that might impact the Pivot Table. Utilize filters to exclude blanks and consider using the IFERROR function to handle errors. By addressing these factors, you can enhance the accuracy and clarity of your PivotTable results.
How do I replace blank errors in Pivot Table?
To replace blank errors in a Pivot Table, utilize the IFERROR function in Excel. Simply wrap the existing formula or expression with IFERROR, specifying a value or action to take if an error is encountered. For example: =IFERROR(original_formula, “Replace_text_or_value”). This ensures that if a blank or error occurs in the PivotTable, it gets replaced with the specified text or value. Effectively using IFERROR enhances the presentation and accuracy of your Pivot Table results, providing a cleaner and more user-friendly data display.
What is the shortcut to remove blanks in the Pivot Table?
The shortcut to remove blanks in a PivotTable in Excel is to select a cell within the PivotTable, press Alt > H > S to open the dropdown menu, navigate to Sort & Filter, and then select Filter. Subsequently, uncheck the Blanks option in the filter dropdown. This efficient method quickly filters out blank values, providing a cleaner and more focused view of your data in the Pivot Table.


