How to Fix “Cannot group that selection” in Excel Pivot Table
In a Pivot Table, you will need to group selections in Excel. While trying to group a specific selection in a Pivot Table, sometimes you will encounter an error message “Cannot group that selection”. In this article, I have 4 ways to fix this error. Let’s explore how to solve this issue of Pivot Table “Cannot group that selection”.
Inspecting Error Message “Cannot group that selection.” in Pivot Table
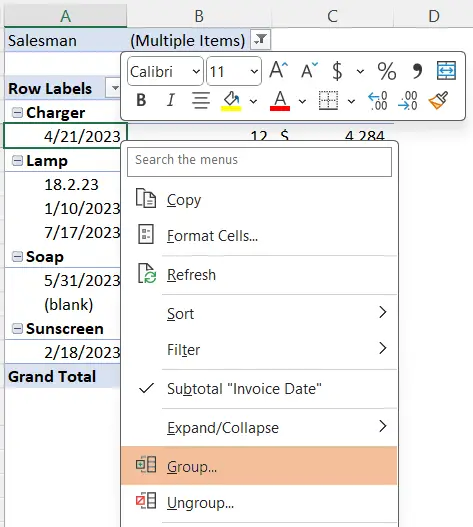
In my dataset, I have a Pivot Table of sales report. Additionally, I have summarized the data with their invoice dates. Now, I want to group a selection.
To check if the Pivot Table contains any grouping problems, follow the process:
- Select any cell inside the Pivot Table.
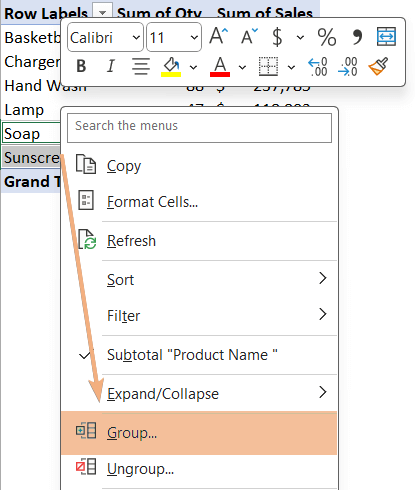
- Right-click on the cell and choose the Group command.

After clicking on Group, I got an error message saying “Cannot group that selection.”. Let’s fix this error.

Solution 1: Highlight the Column That Contains Date to Fix “Cannot group that selection”
To fix the error of grouping that selection, you can highlight the date value in the source data. To do that, follow the steps:
- Go to the source data.
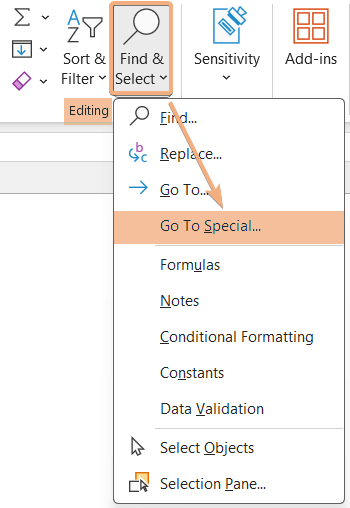
- Navigate to Home tab > Find & Select dropdown under the Editing group.
- Choose Go to Special option.

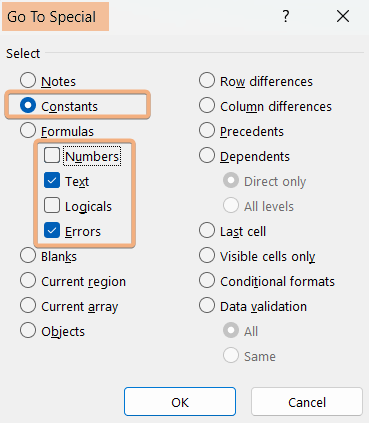
- Select Constants and include Text and Errors in the Go to Special dialog box and click OK.

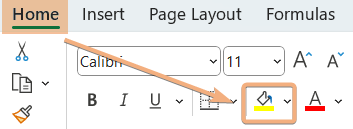
- Now, go to Home tab > Fill Color option and select a color to highlight the invalid cells with color.

Firstly, fix the invalid dates manually. Then, refresh your Pivot Table. Now, you can group the data.

Solution 2: Filter the Cells to Fix “Cannot group that selection” in Excel Pivot Table
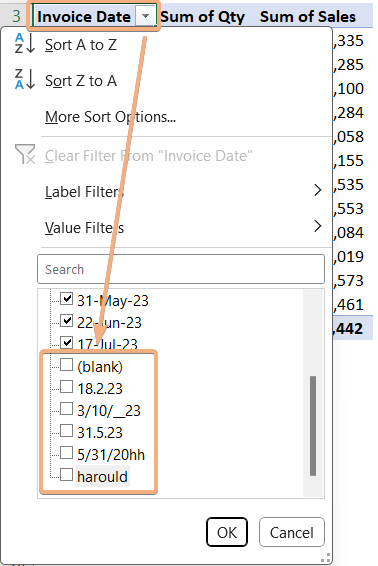
Sometimes, the dataset contains the date with an incorrect format and a blank cell. To fix the group selection, filter the cells in the Pivot Table. Now, go through the instructions below:
- Select a cell outside the Pivot Table.
- Go to Data tab > Filter option.
- Click the Filter icon.
- Unselect the data.
- Click OK.

Even if you want to group the cells, you cannot do that by selecting a cell. So, to group a selection, follow the steps:
- Select the cells you want to group.
- Then, right-click on the selection.
- Choose the Group option.
Now, you can group the cells in the Pivot Table.
Solution 3: Fix “Cannot group that selection” in Column Containing Text
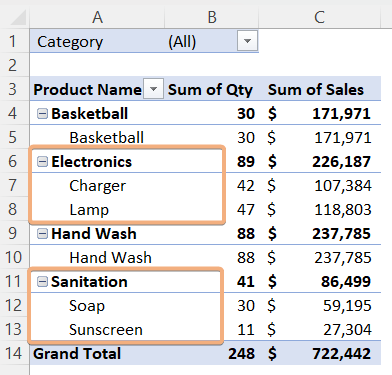
While you want to group cells containing text in the Pivot Table, you have to do only a few steps. Follow the procedure below:
- Select the cells you want to group.
- Right-click on the selection.
- Choose Group from the Context Menu.

Repeat the same steps if you want to group other data. Besides, you can also rename the group name. By following the steps, you can group the column containing text data.
Solution 4: Do not Add Pivot Table to the Data Model to Fix Grouping Error
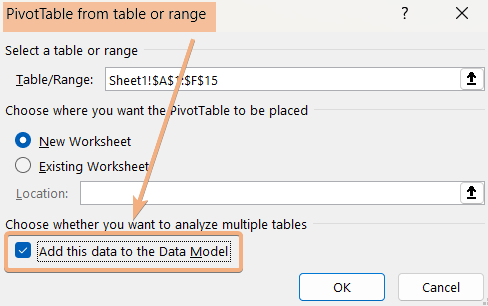
If you want to create a Pivot Table in Excel, select the entire dataset. After going to Insert tab> PivotTable option > From Table/Range, if you check on Add this data to the Data Model, you cannot group a selection in the Pivot Table.
Conclusion
While working on a large dataset, you will need to group some data selections in the Pivot Table. Sometimes, you will get an error message in Pivot Table “Cannot group that selection”. So, to fix that issue, I have explained 4 types of issues with possible solutions in this article. Now, just go through the entire article. Then, decide which problem you are facing. Next, you can solve issues of Excel Pivot Table cannot group that selection. Hopefully, this article will give you a proper guideline.
Frequently Asked Questions
How do you add a selection by filter in a Pivot Table?
To add a selection by filter in a Pivot Table, follow these steps:
- Select any cell within the Pivot Table to activate it.
- Navigate to the Data tab on the Excel ribbon.
- In the Sort & Filter group, click on the Filter button. This adds filter arrows to the header cells in the Pivot Table.
- Click on the filter arrow in the header cell of the field you want to filter and choose the Select Multiple Items option.
- A list of items will appear. Check the items you want to include in the filter and click OK.
This will filter the Pivot Table based on the selected items, showing only the data that meets the specified criteria. Users can easily add or remove items from the filter selection to customize the view of the Pivot Table.
Why is Pivot Table not picking up all data?
When a Pivot Table is not picking up all data, consider the following reasons and solutions:
- Data Range Selection: Ensure that the entire data range is selected when creating the Pivot Table. Review and adjust the data range selection to cover all the intended data.
- Blank Cells or Rows: Blank cells or rows in the data range may interrupt Pivot Table creation. Clean up the data by removing blank cells or rows before creating the Pivot Table.
- Data Formatting Issues: Inconsistent formatting, merged cells, or non-standard structures can cause problems. Standardize the formatting of the data range to ensure uniformity.
- Field List Configuration: Incorrect placement or configuration of fields in the Pivot Table may affect data visibility. Double-check the arrangement of fields in the Pivot Table Field List and adjust as needed.
- Filters or Slicers: Applied filters or slicers may unintentionally limit the data displayed. Review and adjust any filters or slicers to ensure they include the necessary data.
- Refresh the Pivot Table: Outdated or cached data might be causing discrepancies. Refresh the Pivot Table to update it with the latest data. Use the “Refresh” option in the Pivot Table tools.
- Data Source Changes: If the underlying data source has changed, it may not be reflected in the Pivot Table. Update the data source or adjust the connection settings to match the current data.
- Data Integrity: Check for data integrity issues, such as duplicate values or inconsistencies. Cleanse the data to resolve any integrity issues that might be affecting the Pivot Table.
By addressing these potential issues, you can troubleshoot why a Pivot Table is not picking up all data and ensure accurate and comprehensive data representation.
How do I expand data selection in a Pivot Table?
To expand data selection in a PivotTable in Excel, you can use the following steps:
- Click on any cell within the Pivot Table.
- Navigate to the PivotTable Analyze tab in the Excel ribbon.
- Click on Change Data Source.
- In the dialog box that appears, modify the data range to include the additional data you want to include in the Pivot Table.
- Click OK.
Expanding the data selection in a PivotTable is essential when your data set grows, and you need to incorporate new information into your analysis. This process ensures that the PivotTable considers the updated data range for accurate and comprehensive insights.
