How to Delete a Table in Excel Permanently [4 Ways]
If you don’t know the correct way to delete an Excel Table, you might face some problems. For example, you have just removed the table format from a range but not the table. So, next time when you select the range or use the range in a formula or other commands, Excel will treat the range as an Excel Table. This might prompt some sort of frustration in you, as you don’t want it to happen. Thus, here I will show you 4 different ways to delete a table in Excel permanently.
Delete a Table in Excel with Delete Command
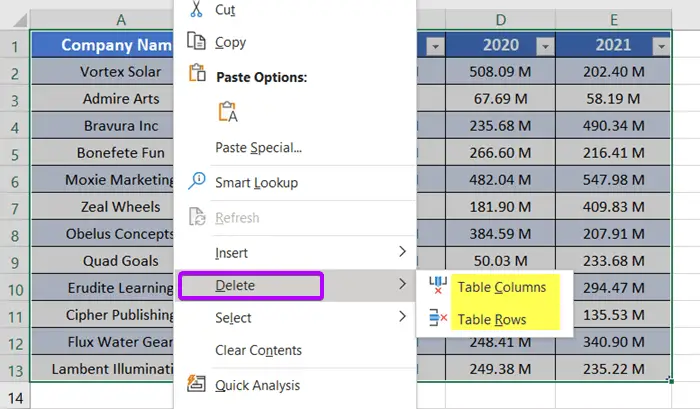
The quickest and easiest way to delete an Excel Table is to use the context menu. Now, follow these steps below:
- For a small table, manually select the whole table first.
Or, just click anywhere on the table and then press CTRL + A. This will select the whole table. It’s convenient to select a larger Excel Table. - Anyways, after selecting the table, right-click on it.
- From the context menu, keep your cursor on the Delete command.
You will get two options to appear. - Select either Table Columns or Table Rows. They both will work just fine to delete an Excel table, as long as you’ve selected the whole table.
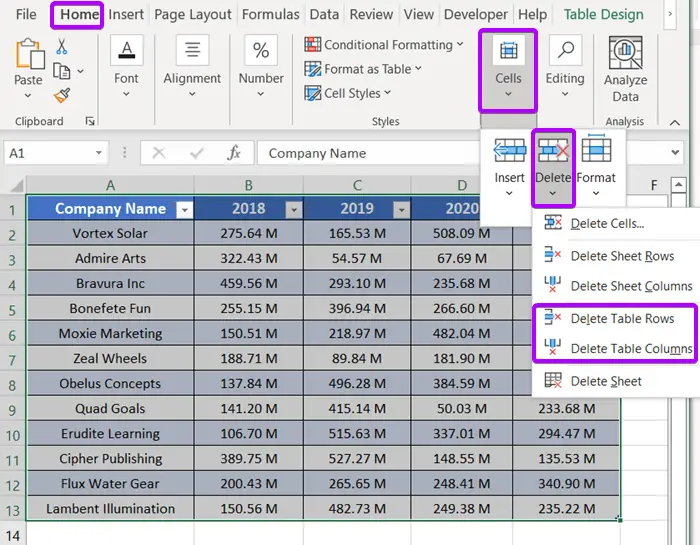
 Alternatively, you can go to the Home tab > Cells group > Delete drop-down. After that, select either Delete Table Rows or Delete Table Columns.
They both can delete an Excel Table permanently. Usually, the Delete Table Rows command deletes table rows based on the selection. Similarly, the Delete Table Columns command deletes table columns based on the cell selection.
But when you select the entire Excel Table and then use any of them, they both delete an Excel Table completely.
How to Delete a Table in Excel but Not the Data
Delete a Table in Excel Using Clear All Command
Clear All command deletes everything relating to an Excel Table. It deletes table formats, table data I mean the whole table.
To use this command, here are the steps below:
- You need to select the entire table first.
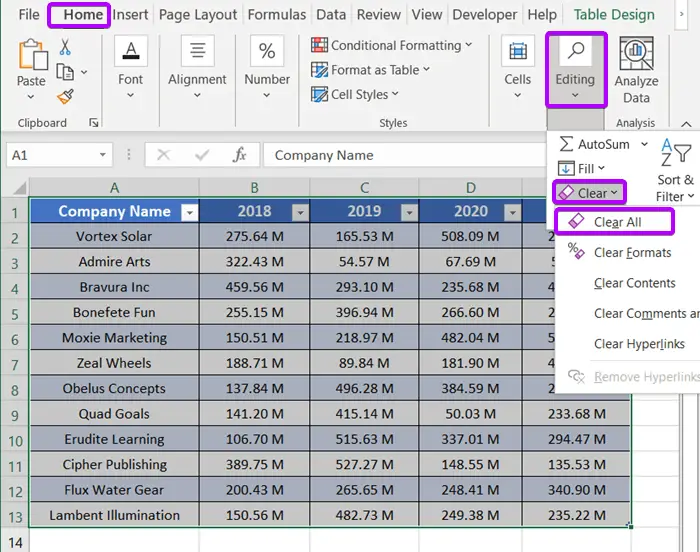
- Then select the Home tab > Editing group > Clear drop-down > Clear All command.
After hitting the Clear All command, it will remove the Excel Table instantly.
You can press CTRL + Z to undo this action and restore your table back.
Delete a Table in Excel by Convert to Range Command
To delete an Excel Table without losing any data the Convert to Range command is used.
When we create an Excel Table by selecting a range, the Name Manager holds this record. You can check this out after creating an Excel Table. You will find the Name Manager in the Formulas tab under the Defined Names group.
Anyways, what the Convert to Range command does is remove the table record from the Name Manager. As a result, the table turns into a mere Excel range. So, you can use this method to delete an Excel Table but you can keep the data of the table in place.
Steps to delete a Table in Excel using the Convert to Range command:
- Select your table first.
When you select the entire table, the Table Design tab automatically appears and gets selected by default. - All you need to do is find the Tools group.
- There you will see the Convert to Range command. Just click on it.

- Then a little dialog box appears. This says whether you want to convert the table or a normal range or not. If you want to do so, then click Yes to proceed.

The Table Format, Table Style, AutoFilter everything will be removed. You will get the data just like they were before applying the Table command.
Delete a Table in Excel Using Keyboard Shortcut
To delete an Excel Table using the shortcut, follow these steps below
- Select the table first.
To the entire table, click on any cell. Then press CTRL + A to select the entire table. - Now, press the DELETE button on your keyboard.
Your table will be deleted instantly. But it will leave only the Table Styles and formats in place. The table record will also be removed from the Name Manager.
Check Whether a Table has been Deleted or Not
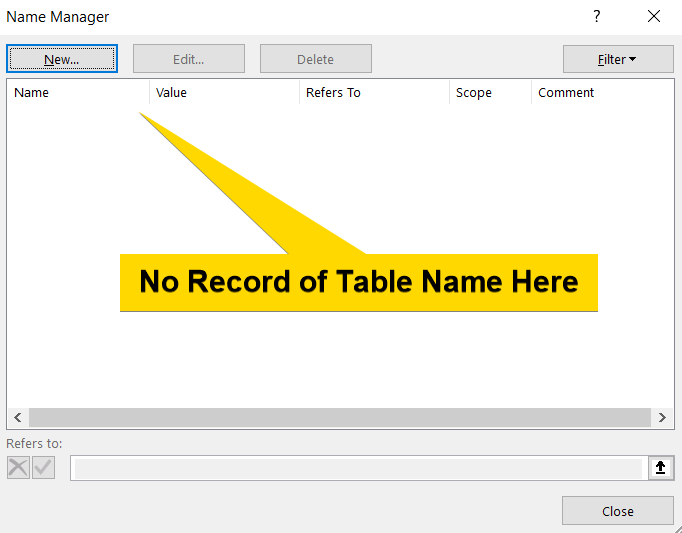
After deleting an Excel Table, if you want to confirm that your table has actually been deleted, check out the Name Manager. To open the Name Manager, go through these steps below:
- Select the Formulas tab ⋙ Defined Names group.
- Under the Defined Names group, you will find the Name Manager. Just click on it to open it.
 The Name Manager dialog box will open.
There check whether your table name is still there. If you found your table range and name in the Name Manager, your table hasn’t been deleted yet. Otherwise, you can be sure that you have successfully deleted your table.
Conclusion
Here, I have discussed 4 different ways to delete an Excel Table permanently. I expect you’ve found this article useful. You can read more articles relating to Excel from the Blog page of our website. Have a fantastic workday!
Frequently Asked Questions
How do you Untable a table in Excel?
To untable a table in Excel and convert it back to a regular range while preserving the data, follow these steps:
- Click anywhere inside the table you want to untable.
- Navigate to the Table Design tab (this tab appears when the table is selected).
- Click on the Convert to Range option.
By doing this, you can successfully untable a table in Excel, converting it to a standard range while retaining the original data.
How do I remove a table from Excel but keep the data?
To remove a table from Excel while keeping the data, follow these steps:
- Click anywhere inside the table you want to remove.
- Go to the Table Design tab that appears when the table is selected.
- Click on the Convert to Range option.
By following these steps, you can convert the table back to a range while preserving the underlying data in Excel.
How do I remove CTRL+T in Excel?
To remove the CTRL+T shortcut in Excel, follow these steps:
- Open Excel and go to the File tab.
- Click on Options at the bottom of the left-hand menu.
- In the Excel Options dialog box, select Customize Ribbon from the left sidebar.
- Under the Keyboard shortcuts section, click on Customize next to Keyboard shortcuts.
- In the Categories list, choose All Commands.
- In the Commands list, scroll down and select Table (or find the CreateTable command).
- In the Current keys box, look for CTRL+T and select it.
- Click on the Remove button to remove the shortcut.
- Click OK to apply the changes and close the Excel Options dialog box.
By following these steps, you can remove the CTRL+T shortcut for creating tables in Excel.
