How to Create a Table in Excel Without Data [Step-by-Step]
Excel is a powerful tool that offers a multitude of functionalities, including data organization, analysis, and visualization. One of its handy features is the ability to create tables, which can streamline data management and enhance readability. In this guide, we’ll walk you through the process of creating a table in Excel, even if you don’t have any data to input just yet. By mastering this skill, you’ll be better equipped how to create a table in Excel without data and handle various tasks efficiently within the Excel environment.
5 Steps to Create a Table in Excel Without Data
Even without pre-existing data, Excel provides a seamless process for crafting structured tables that lay the foundation for future data input and analysis. This step-by-step guide simplifies the procedure, empowering users to create tables in Excel with ease, and facilitating streamlined data management and analysis.
Step 1: Navigate to the Insert Tab
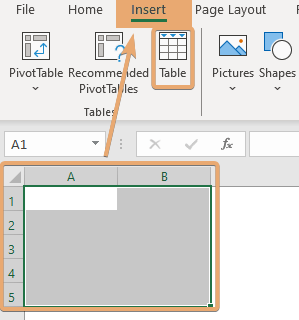
At the top of the Excel window, you’ll see a series of tabs. Click on the “Insert” tab to access the table creation tools.
Step 2: Choose the Table Option
Within the Insert tab, you’ll find various options for inserting different elements into your spreadsheet. Look for the “Table” option and click on it.

Step 3: Define the Table Range
Excel will prompt you to select the range of cells that you want to include in your table. Since we’re creating a table without data, you can simply choose any range of cells by clicking and dragging to highlight them.
Alternatively, you can manually input the cell range.
Step 4: Confirm the Table Range
Follow these steps to confirm the table range in Excel:
- Once you’ve selected the desired range, check the box labeled “My table has headers” if your table will have column headers.
- This option is useful for organizing and categorizing data within the table. Click OK to Create the Table.
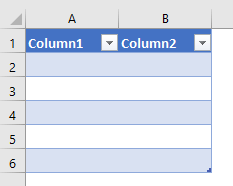
After confirming the table range and headers, click the OK button to create your table. Excel will instantly transform the selected range of cells into a formatted table.

Step 5: Customize the Table (Optional)
With your table created, you can now customize it to suit your needs. You can adjust the column widths, apply formatting styles, and add additional features such as filters and totals.
Conclusion
Congratulations! You’ve successfully learned how to create a table in Excel without any pre-existing data. By following these simple steps, you can efficiently organize your information and prepare your spreadsheet for data entry or analysis. Practice creating tables in Excel to familiarize yourself with this essential feature, and unlock the full potential of this versatile software. Happy Excel-ing!
Frequently Asked Questions
Do I need to have specific data to create the table?
No, you can create a table in Excel without any specific data. Simply select a range of empty cells where you want the table to be located, and Excel will generate the table structure for you to populate later.
What are the benefits of using tables in Excel?
Tables in Excel offer several benefits, including improved data organization, easy sorting and filtering, automatic formatting, and enhanced visual presentation. They provide a structured format for managing and analyzing data efficiently.
Can I add data to the table later?
Absolutely! Once you’ve created the table structure, you can easily add data to it at any time. Simply click on the first empty cell within the table, enter your data, and Excel will automatically expand the table to accommodate the new information.
How do I resize or modify the table after creating it?
You can resize or modify the table by clicking anywhere within the table to activate the “Table Tools” tab on the Excel ribbon. From there, you can access various options to customize the table, including resizing columns, adding or removing rows, and applying formatting.
Can I save the table for future use?
Yes, you can save the entire Excel file, including the table, for future use. Excel files (.xlsx) retain all the formatting and data within them, allowing you to access and modify the table whenever needed.