How to Custom Sort in Excel Pivot Table [2 Methods]
Custom Sort is a feature in Excel that allows users to arrange data in a specific order based on their defined criteria. To perform a Custom Sort, users typically specify sorting criteria, such as a custom list of values, a specific order for text or numbers, or a combination of multiple columns. In Excel, you can have the customized sort list in the Pivot Table. Excel has default customized lists, such as months, days, etc. You can also add a customized sort list with different sequences. In this article, I will show you how to add and apply a customized list to a Pivot Table. Then, you will also learn to use the built-in Custom Sort in Excel Pivot Table. So, let’s explore Custom Sort in the Excel Pivot Table.
Method 1: Custom Sort in Excel Pivot Table Using Customized Sort List
One way to perform a custom sort in a pivot table is by adding customized sort lists. These lists allow users to define the order in which certain values should be sorted. Instead of the standard alphabetical or numerical order, you specify a custom rule or set of rules for how the items in the list should be arranged. In this section, you can enter a specific list in any order. Now, learn to add and apply the customized sort list in the Excel Pivot Table.
Step 1: Add a Customized Sort List in Pivot Table
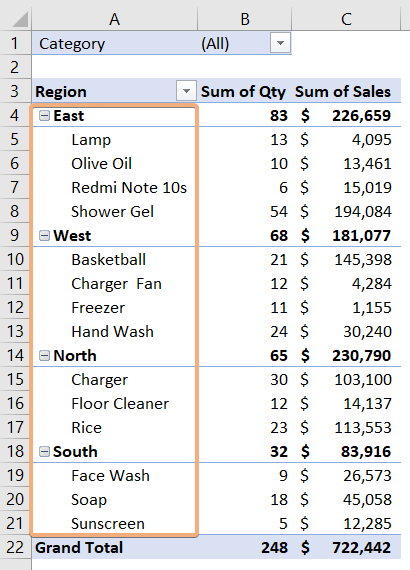
Let’s imagine a situation where we have a sales report displayed in a Pivot Table. This report includes a list of products, their quantities, regions, and sales figures.
Initially, the Region field is set to its default setting. However, I will add a customized sort list of regions. Then, I will show you how to add it to an Excel Pivot Table. Next, you will see the applied customized sort.
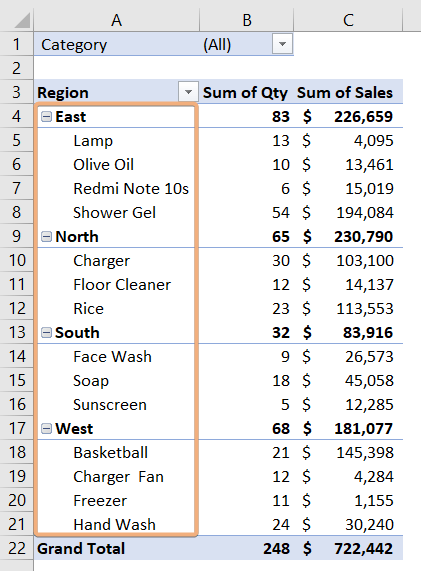 To add a customized sort list in the Excel Pivot Table, follow these steps:
- Go to File tab > Options.
- Select the Advanced tab in the Excel Options dialog box.
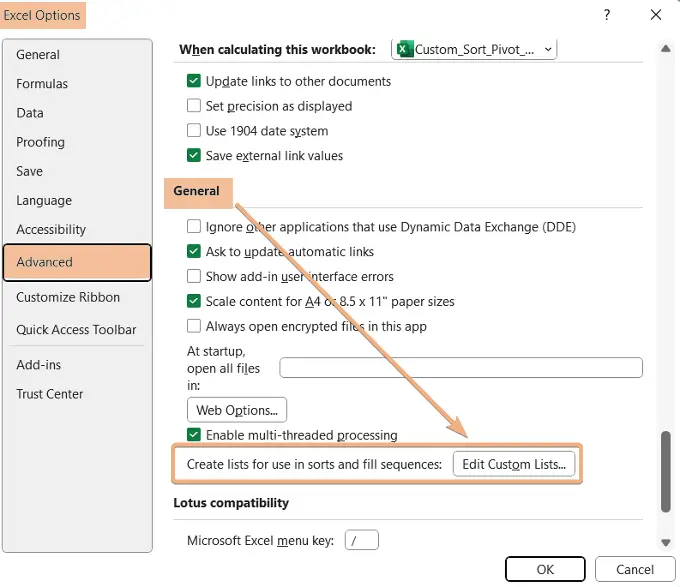
- Click on “Create lists for use in sorts and fill sequences: Edit Custom Lists” under the General section.

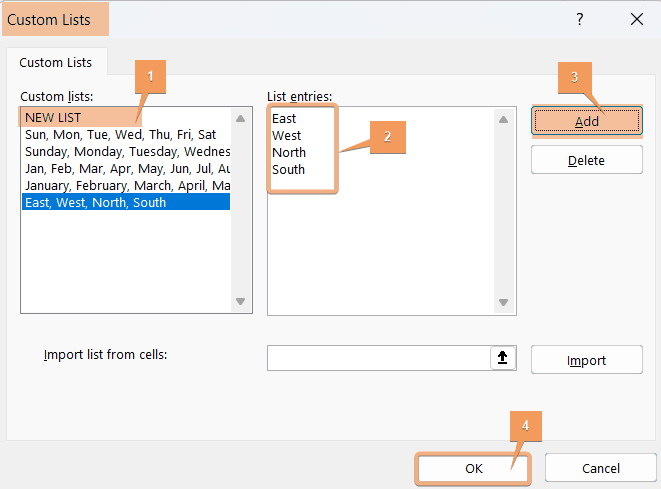
- Now, click on New List in the Custom Lists dialog box.
- Then, insert a new list in the List entries section and click on Add.
- Hit OK.

- Finally, close the Excel Options dialog box.
Following these steps, you can add a customized sort list to your Pivot Table.
Step 2: Apply Customized Sort List to a Pivot Table
Now, I am going to show you how to apply a customized sort list to the Pivot Table. So, follow these steps below:
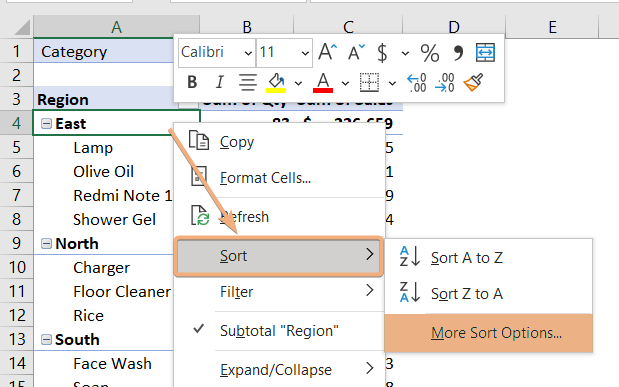
- Select a cell inside the Pivot Table and right-click on that.
- Select Sort > More Sort Options.

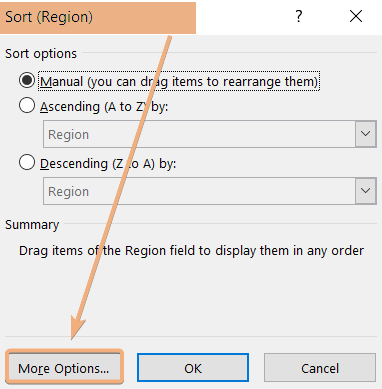
- Click on More Options in the Sort dialog box.

This will open the More Sort Options dialog box. - First, unselect the “Sort automatically every time the report is updated” under the AutoSort section.
- Then, choose the customized sort list from the First key sort order.
- Click OK.

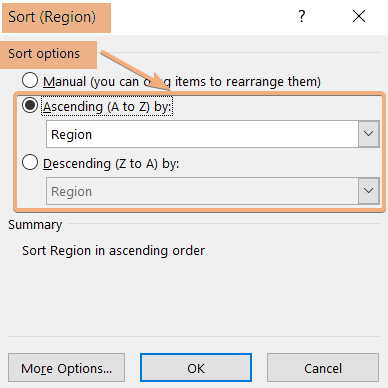
Afterward, you will see the Sort dialog box again. - Now, change the Sort Options from Manual to Ascending or Descending order and click OK.
If you select Ascending order, the result will show in the same way you have put the customized sort list. On the contrary, if you choose Descending order, it will show the reverse way.

Here, you can see the updated Pivot Table with the customized sort list.
Method 2: Built-in Custom Sort in Pivot Table from Excel Ribbon
Let’s explore the built-in Custom Sort option from the Excel Ribbon. Here, I will arrange the Pivot Table first. In this Pivot Table, I have arranged the sales report with its category and salesman. Now, I will sort them in left to right direction.
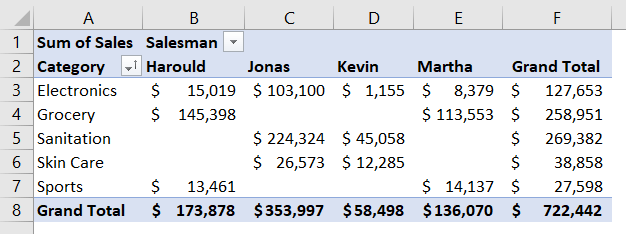 To use the built-in Custom Sort in Pivot Table in Excel, go through the process below:
- Select a cell containing a value to sort.
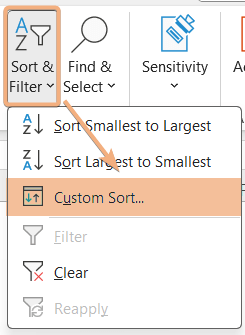
- Navigate to the Home tab > Editing group > Sort & Filter dropdown.
- Now, hit Custom Sort command.

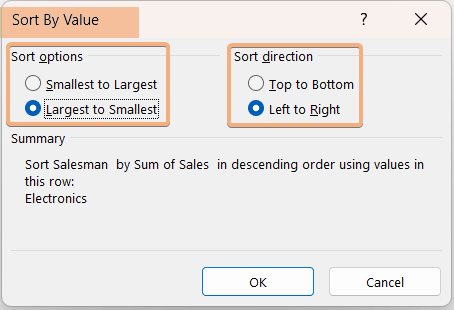
- Choose the Sort option and Sort direction in the Sort By Value and click OK.

Here, I have selected the Largest to Smallest in the Sort options and Left to Right in the Sort direction.

Conclusion
In conclusion, custom sorting in pivot tables is a powerful technique that allows for the optimization of answers. By tailoring the sort order based on specific criteria or user preferences, you can enhance the relevance and clarity of the information presented in the snippet. This not only improves the user experience but also increases the likelihood of your content being selected as a featured snippet by search engines. As you leverage custom sorting techniques in pivot tables, keep in mind the importance of aligning the organization of data with the intent of the user query, ultimately contributing to a more effective and user-friendly presentation of information.
Frequently Asked Questions
Can you add a custom column to a pivot table?
Yes, you can add a custom column to a Pivot Table in Excel by using calculated fields. Follow these steps:
- Click anywhere in your Pivot Table.
- Go to the PivotTable Analyze tab in the ribbon.
- Click on Fields, Items & Sets, and then choose Calculated Field.
- In the Insert Calculated Field dialog box, provide a name for your new column in the Name field.
- In the Formula field, enter the formula for your custom column. For example, if you want to create a column that adds two existing columns, you can use a formula like =Column1 + Column2.
- Click Add to add the calculated field, and then click OK to close the dialog box.
Your custom column will now appear in the Pivot Table. You can customize and add various calculations based on your data.
How do I create a custom Pivot Table style?
To create a custom Pivot Table style in Excel, follow these steps:
- Set up and format your Pivot Table with the desired fields and layout.
- Adjust fonts, colors, and number formats for formatting and customize subtotals and grand totals as needed.
- Click anywhere in the Pivot Table
- Select the Design tab in the ribbon and click on the More button in PivotTable Styles.
- Scroll down, choose New PivotTable Style, and enter a name for your style in the Name field.
- Click on the Format button to modify style elements and click OK.
Your custom style is now available in the PivotTable Styles gallery. You can apply it to any Pivot Table by selecting the style from the gallery.
How to enable custom lists while sorting in Pivot Table?
To enable Custom Sort while working on a Pivot Table in Excel, go through these steps below:
- Select any cell on your Pivot Tabel.
- Then navigate to Analyze tab > PivotTable group > Options command.
- Go to the Totals & Filters tab in the PivotTable Options dialog box.
- Check on the “Use Custom Lists when sorting” and click OK.
By following these steps, Excel will update the Pivot Table while inserting new data into it.
