How to Calculate 90 Days Before/After a Specific Date in Excel
- Select a blank cell.
- Type the formula: =TODAY()-90 to go before 90 days from the current date and write: =TODAY()+90 to go after 90 days from the current date.
- Press ENTER.
This formula will return the present date while using the TODAY function. It will calculate 90 days before and after the present date while subtracting and adding 90.
Case 1: Calculate 90 Days Before/After a Specific Date in Excel Using Simple Formula
You can calculate 90 days before and after a specific date in Excel by using arithmetic operators.
Syntax
=Cell Reference-Days
=Cell Reference+Days
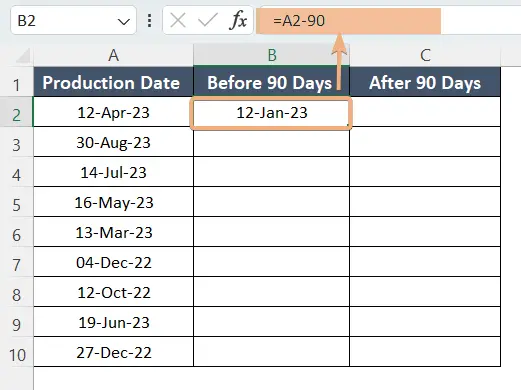
Now follow these steps to calculate 90 days before a specific date in Excel:
- Select cell B2.
- Type the formula into the cell: =A2-90

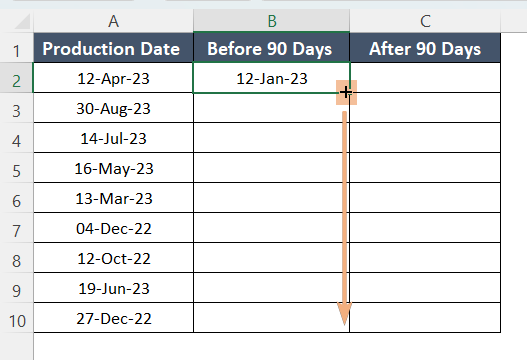
- Copy the formula down using the Fill Handle.

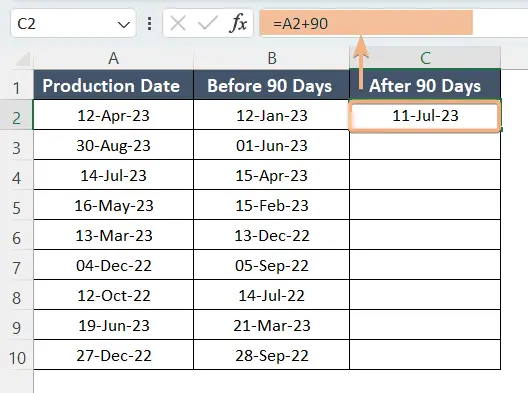
Here are the steps to calculate 90 days after a specific date in Excel:
- Select cell C2.
- Copy the formula and paste it into the cell: =A2+90

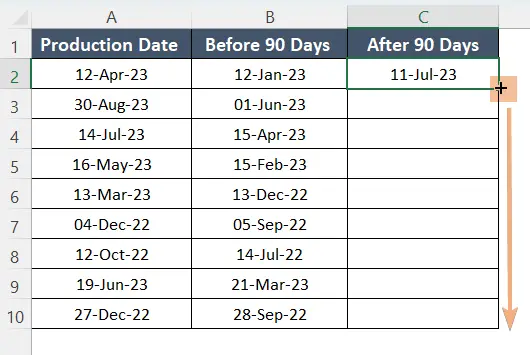
- Copy the formula down using Fill Handle.

Here is the output using arithmetic operations to calculate 90 days from the date.
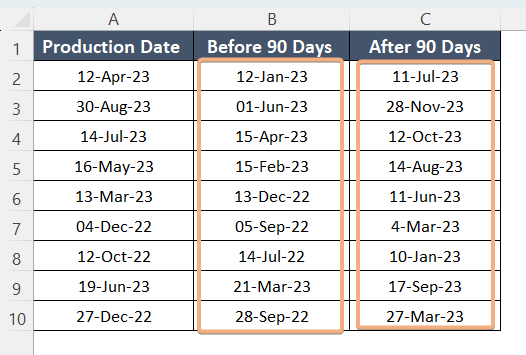
Case 2: Calculate 90 days After a Specific Date in Excel Using the SUM Function
Applying the SUM function is the easiest method to calculate 90 days after a specific date.
Syntax
=SUM(range)Formula
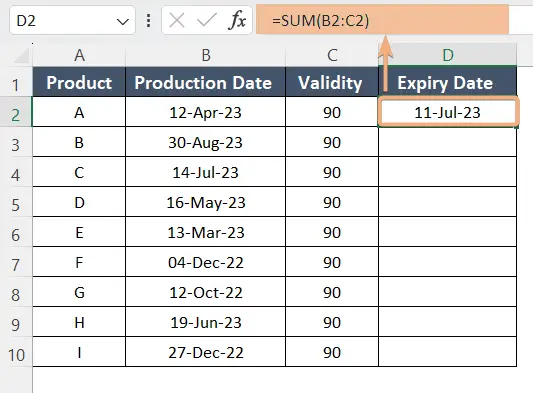
=SUM(B2:C2)To calculate 90 days after a specific date:
- Select cell D2.
- Use the formula: =SUM(B2:C2)
- Press ENTER.

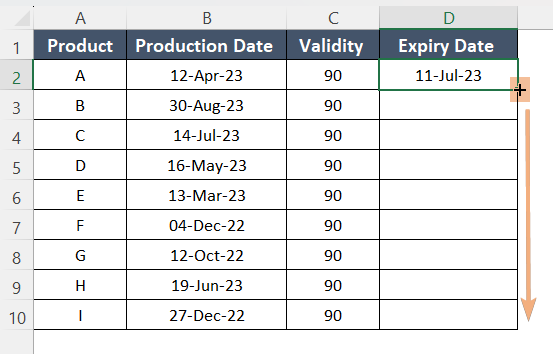
- Use the Fill Handle to drag the formula down.

You can see the 90 days after the production date now.
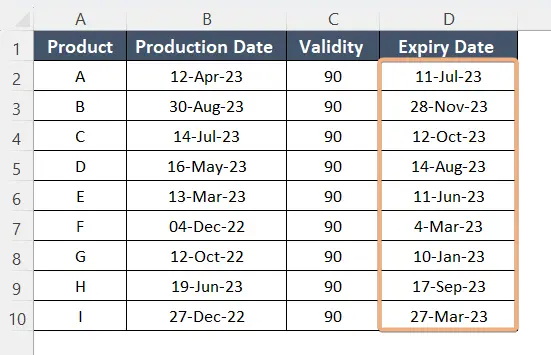
Case 3: Calculate 90 Days Before and After the Current Date in Excel
The TODAY function is used to return the current date in Excel. You can calculate 90 days both before and after the current date by using this function.
Syntax
=TODAY()-Days
=TODAY()+Days
Formula
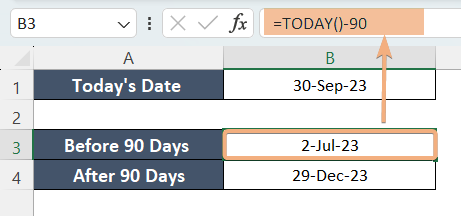
=TODAY()-90To calculate 90 days before the current date in Excel:
- Select cell B3.
- Use the formula in the cell: =TODAY()-90
- Hit ENTER.

To calculate 90 days after the current date in Excel:
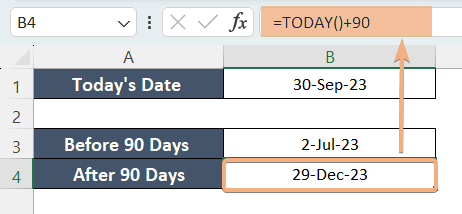
- Select cell B4.
- Paste the formula into the cell: =TODAY()+90
- Hit ENTER.

Here we have got the results for before and after 90 days of 30 September 2023 incorporating the TODAY function.
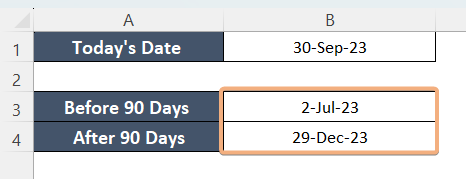
Case 4: Calculate 90 Days Before/After a Certain Date in Excel Using the WORKDAY Function
If you want to get the 90 working days before/after a specific day, you can apply the WORKDAY function.
Syntax
=WORKDAY(start_date, -days)
=WORKDAY(start_date, days)
Formula
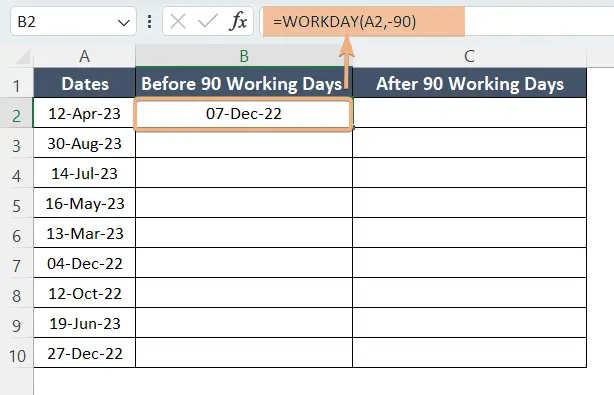
=WORKDAY(A2, -90)If you have a specific date in cell A2 and you want to subtract 90 working days, follow these steps:
- Select cell B2 to insert a formula.
- Now, type the formula into the cell: =WORKDAY(A2, -90)
- Press ENTER.

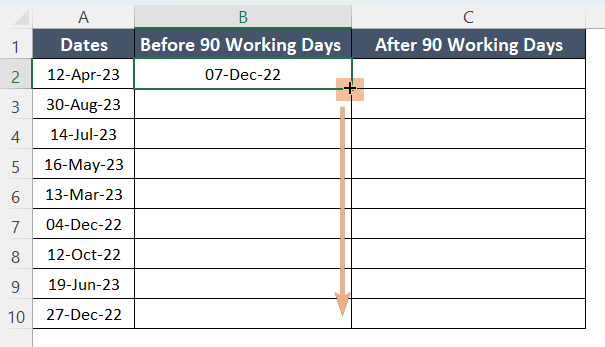
- Use the Fill Handle to drag the formula down.

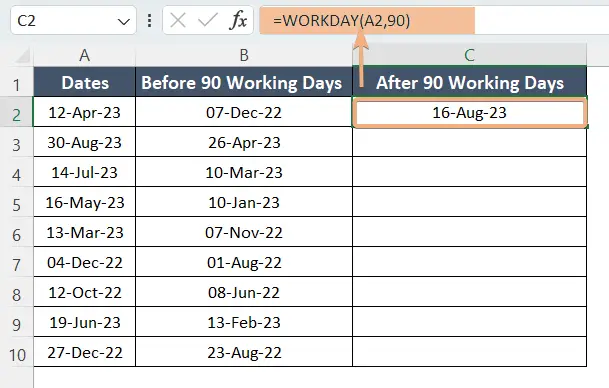
If you have a specific date in cell A2 and you want to add 90 working days, follow these steps:
- Select cell B2.
- Copy and paste the formula into the cell: =WORKDAY(A2, 90)

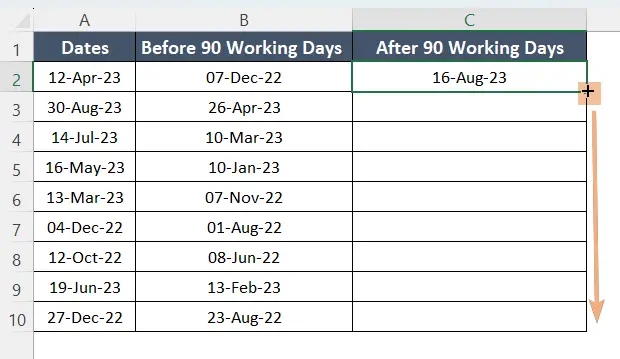
- Use the Fill Handle to drag the formula down.

Now, you will get 90 working days before and after the specific date.
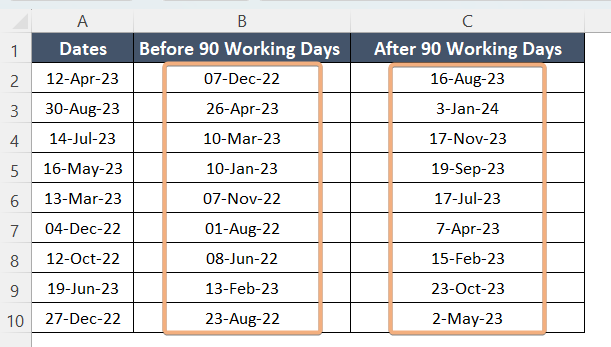
Conclusion
To sum up, you will feel the necessity to calculate 90 days before/after a specific date. Doing the task manually is hectic work. Therefore, in this article, I have gathered the possible ways to calculate 90 days from the date. Additionally, I have added a method to calculate working days. Now, you know the tools, functions, and formulas to calculate 90 days from the date. Hopefully, you can solve all tasks relating to calculating days from any date.
Frequently Asked Questions
How do I conditional format in Excel for 90 days?
To apply conditional formatting in Excel for a 90-day period, follow these steps:
- Highlight the range of cells where you want to apply the conditional formatting.
- Navigate to the Home tab > Conditional Formatting.
- From the drop-down menu, choose New Rule.
- In the Select a Rule Type box, choose Use a formula to determine which cells to format.
- In the Format values where this formula is true field, enter a formula that checks if the date is older than 90 days. For example: =TODAY()-A1>90. This formula assumes that the date is in cell A1.
- Adjust the cell reference based on your data.
- Click on the Format button to choose the formatting style for cells that meet the condition. You can change the font color, fill color, or other formatting options.
- Click OK to apply the rule. The selected cells will now be formatted based on the specified condition.
By following these steps, you can easily implement conditional formatting in Excel to highlight cells that are older than 90 days, providing visual cues for better data analysis.
What is the formula for days in Excel?
The formula to calculate the number of days between two dates in Excel is: =End_Date – Start_Date
Replace End_Date with the cell reference or the actual date of the end date, and Start_Date with the cell reference or the actual date of the start date. This formula will give you the number of days between the two specified dates. You can adjust the cell references or use actual date values based on your specific data.
How do I convert days to months in Excel?
To convert days to months in Excel, use the following steps:
- In a cell, enter the number of days you want to convert.
- In another cell, use the following formula to convert days to months: =INT(A1/30.44)
This formula divides the number of days by the average number of days in a month (30.44) and rounds down to the nearest whole number. - Right-click on the cell, choose Format Cells and select the appropriate format.
Keep in mind that this method provides an approximation, as the number of days in a month can vary. Adjustments may be needed based on specific requirements in converting days to months with this simple formula.
