Automatically Update Pivot Table Range in Excel [3 Methods]
If you insert new data in the worksheet, you have to change your pivot table range in Excel. To update your pivot table manually is such a hectic job. In this article, I will discuss 3 methods to automatically update the pivot table range in Excel when the source data changes. Here, I will include a troubleshooting of using dynamic range. Besides that, I will solve this issue with the VBA code. So, let’s explore it.
Choosing Between Static and Dynamic Pivot Tables for Seamless Data Management
When it comes to pivot tables, there are two main types based on how they handle changes in the data source:
1. Static Pivot Table
- In a static pivot table, the data source range is fixed when the pivot table is initially created.
- If the underlying data changes (e.g., new rows or columns are added), the pivot table does not automatically reflect those changes.
- To update a static pivot table with changes in the data source, you need to manually adjust the data source range or refresh the pivot table.
2. Dynamic (or Automatic) Pivot Table
- In a dynamic pivot table, the data source range is defined in a way that automatically adjusts when the underlying data changes.
- As new data is added or removed, the dynamic pivot table adapts to include the changes without manual intervention.
- Dynamic pivot tables are often created using named ranges, Excel Tables (ListObjects), or formulas that dynamically define the range based on the data’s structure.
Problem with a Static Pivot Table in Excel
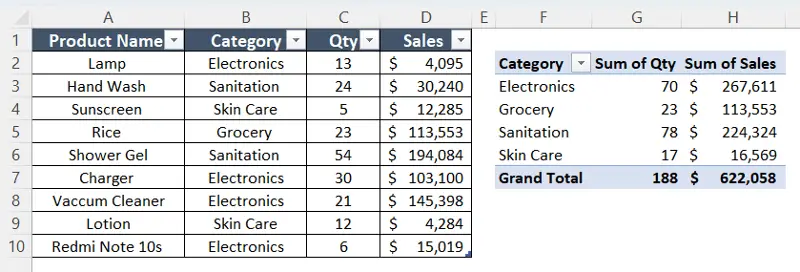
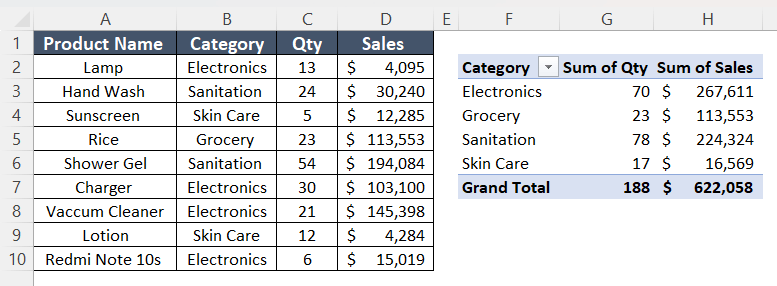
I have a dataset of product details of a company. There are columns for each product’s name, category, quantity, and sales. Here I’ve created a pivot table from it.
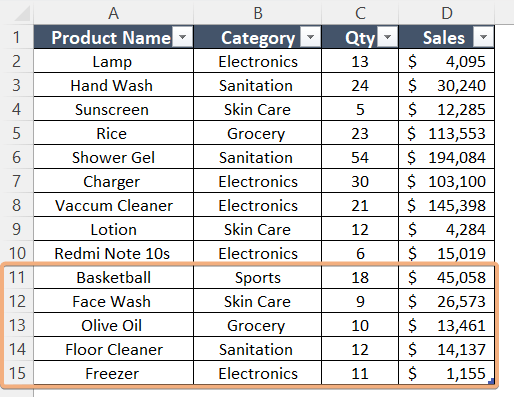
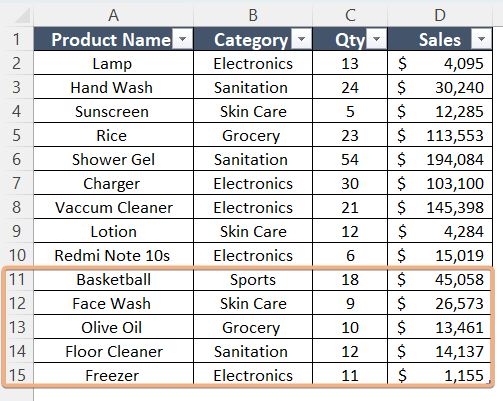
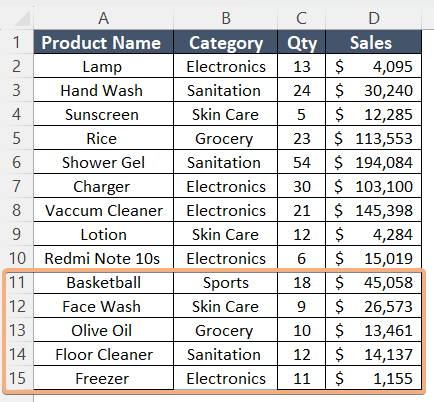
Now I have added 5 additional rows here.
Let’s check whether the pivot table updates or not upon refreshing it:
- Right-click on any cell within the pivot table.
- Select “Refresh” from the context menu.

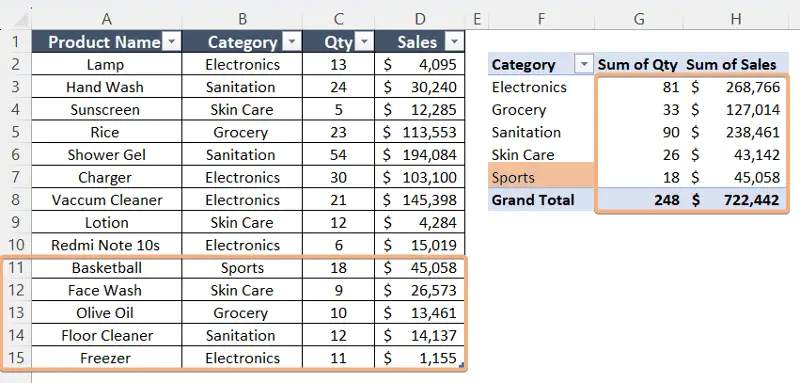
The pivot table has not been updated yet.

This happens as the Pivot Table source range doesn’t include the additional rows that were added later. To solve this problem, you can follow one of the solutions discussed below:
Update Pivot Table Range in Excel By Creating Dynamic Pivot Table Range with OFFSET Function
You can create a dynamic pivot table range using the OFFSET function in Excel. This function allows your pivot table to automatically adjust its range based on changes in the underlying source data. Here’s a step-by-step guide:
Step 1: Create a Dynamic Formula with OFFSET Function
Let’s create a dynamic formula with the OFFSET function.
Syntax
=OFFSET(reference, rows, cols, [height],[width])Formula
=OFFSET(DynamicRange!$A$1,0,0, COUNTA(DynamicRange!$A:$A), COUNTA(DynamicRange!$1:$1))Formula Explanation
The formula creates a dynamic range starting from cell A1 in the sheet DynamicRange. The size of the range is determined dynamically by the number of non-empty cells in column A (height) and the number of non-empty cells in row 1 (width) using the COUNTA function. This dynamic sizing ensures that the range adapts automatically to changes in the data within the DynamicRange sheet. As the data evolves, the OFFSET function effectively adjusts the range boundaries, providing flexibility and responsiveness in capturing the data within the specified sheet.
Step 2: Create a Named Range Using OFFSET Function
To create a named range, you have to input the OFFSET formula.
- Select the data range.
- Go to Formulas tab > Name Manager tool under the Defined Names group.

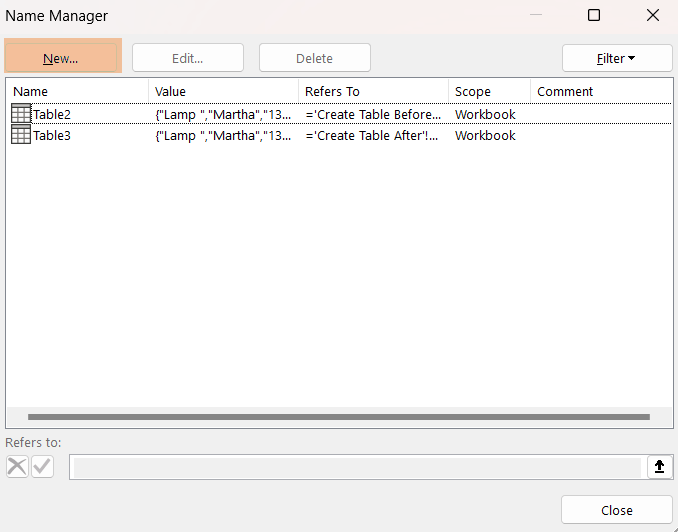
- Click New command in the Name Manager dialog box.

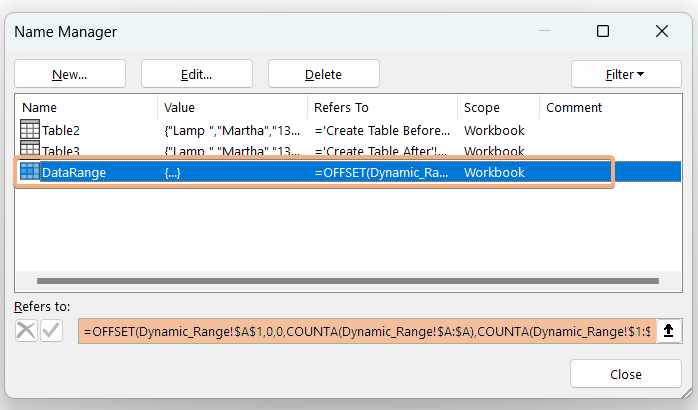
- In the New Name dialog box, enter a name in the Name. Then, in the “Refers to:” section, enter the formula: =OFFSET(DynamicRange!$A$1,0,0, COUNTA(DynamicRange!$A:$A), COUNTA(DynamicRange!$1:$1))
- Click OK.

As you can see, you have created the named range successfully.

Step 3: Inserting a Pivot Table
- Click anywhere within your data.
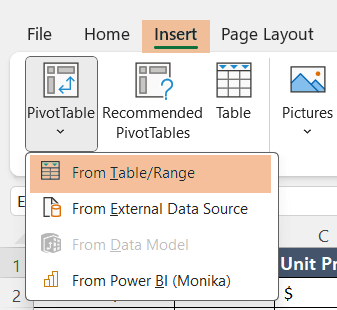
- Go to Insert tab > PivotTable dropdown > From Table/Range option.

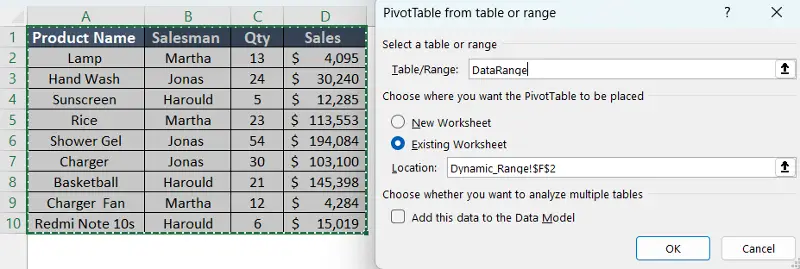
- Insert the dynamic range name you have created.
- Choose a location to place the pivot table and click OK.
Note: Be careful about selecting the location cell. Avoid choosing any cell of row 1 and column A as they are mentioned inside the OFFSET function. Otherwise, you will get an error while refreshing your pivot table.

- Choose the fields that you want in your pivot table.
Here, I have inserted the salesman in the Rows and the sum of Sales in the Values.

Step 4: Test the Dynamic PivotTable Range
Now, I will check whether the dynamic range works or not. Go through the process below to test the dynamic PivotTable range.
- Add new data or remove existing data from your original data range.

- Go back to the worksheet containing the pivot table.
- Right-click on a cell and choose the Refresh option.

Your pivot table should now automatically adjust its range based on changes in the underlying data.
By using the OFFSET function in a named range, you’ve created a dynamic reference for your pivot table that adapts to changes in the data source.
Avoiding “The PivotTable field name is not valid.” Error While Using Dynamic Pivot Table Range with OFFSET Function
Here are the steps to encounter this issue:
- After creating a dynamic range, insert a pivot table based on that dynamic range.
- Assume you have added 5 new rows to update the table, and you want to refresh the pivot table using the dynamic range.
- Upon clicking the Refresh option, you might encounter an error message stating, “The PivotTable field name is not valid. To create a PivotTable report, you must use data that is organized as a list with labeled columns. If you are changing the name of a PivotTable field, you must type a new name for the field.”

Let’s delve into the reasons behind this error.
The formula being used is: =OFFSET(DynamicRange!$A$1, 0, 0, COUNTA(DynamicRange!$A:$A), COUNTA(DynamicRange!$1:$1))
The error occurs because Excel interprets row 1 and column A specified in the OFFSET formula as part of the data range. When you try to use this range as the source for a Pivot Table, Excel assumes that the actual data starts from the first row and column of the specified range, including the headers. As a result, it tries to use these headers as field names, leading to the error if you select any cell of row 1 or column A. That means you can’t select any cell of row 1 and column A as the destination location cell of your Pivot Table.
To resolve this, when choosing the location cell for the Pivot Table, refrain from selecting any cell in row 1 or column A. This is crucial because Excel interprets these cells as part of the data range. Selecting a cell in row 1 or column A as the destination location results in Excel treating them as headers, causing the field name error during the Pivot Table refresh.
Automatically Update Pivot Table Range in Excel by Using Table as Source Data
In Excel, you can automatically update the pivot table range by converting your data range into an Excel Table (ListObject). When you use a Table as the source data for a pivot table, the table automatically expands or contracts as new data is added or existing data is removed. This, in turn, ensures that your pivot table range stays up-to-date without requiring manual adjustments.
In this method, we’ll delve into two scenarios: Case 1, where the table is applied before creating the pivot table, and Case 2, where the table is applied after creating the pivot table.
Case 1: Apply Table Before Creating Pivot Table
To convert the source data into a table before creating the pivot table, follow these steps:
- Select the range.
- Go to Insert tab > Table tool under the Tables Group. Or, use the shortcut CTRL+T.

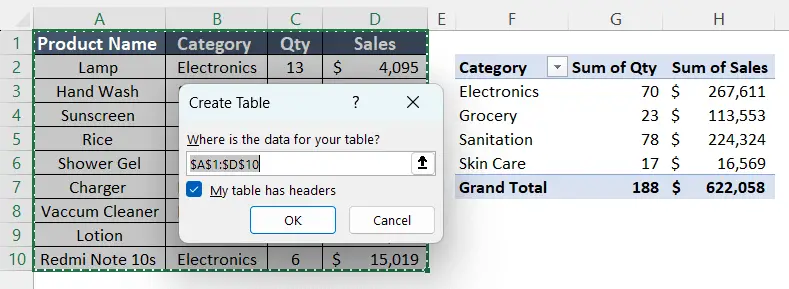
- Insert the range in the Create Table dialog box. Then, click OK.

Here is the table you have created.

- Now, repeat the process of creating a pivot table from the previous section. Select the range. Then, go to Insert tab > PivotTable dropdown > From Table/Range option.
I have selected the category in rows and quantity and sales in Values.

Now, I have added more rows to the dataset.

- Right-click on the first cell of the pivot table and click on Refresh command.

Here you can see the updated pivot table. With only one click on Refresh, you have changed the pivot table range in Excel.

Case 2: Apply Table after Creating Pivot Table
What if you haven’t converted the source data range into a table before creating the pivot table?
Here are some steps to convert the data range into a table after creating a Pivot Table:
- Select the source data range.
- Then, go to Insert tab > Table tool. Or, press CTRL+T.

Now, I will add some more information to the dataset and will change the pivot table range.

- Click on a random cell in the pivot table.
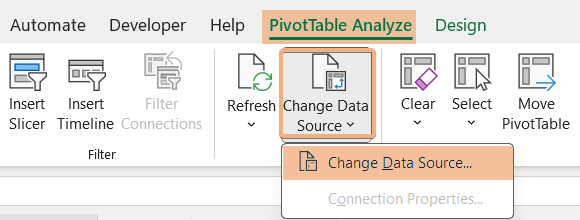
- Go to PivotTable Analyze tab and click on the dropdown of Change Data Source under the Data group.
- Hit on the Change Data Source command.

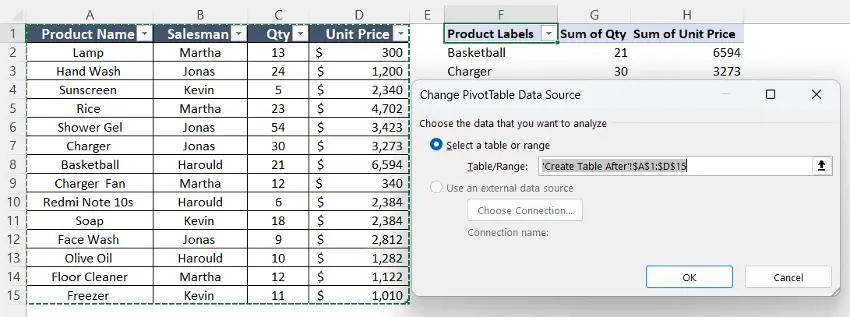
This will open the Change PivotTable Data Source dialog box. - Select the new range manually and click OK.
Or, you can click on the Refresh option like the previous method.
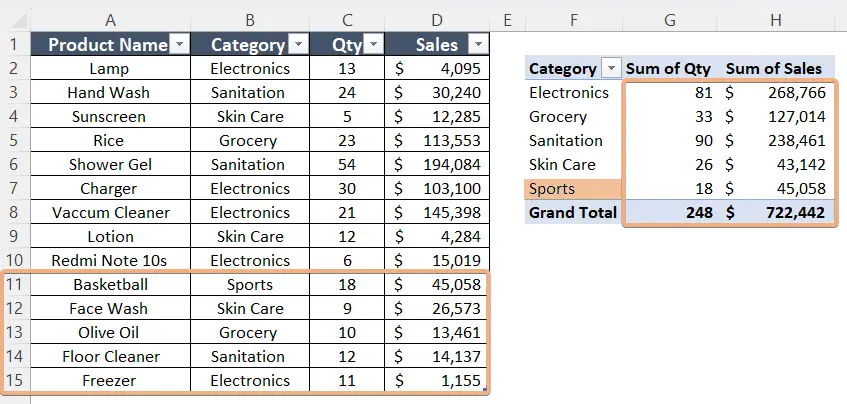
 Here we have updated the pivot table range. I have added two more rows in the pivot table.

Automatically Update Pivot Table Source Data Range in Excel Using VBA
- Right-click on your sheet name.
- Choose View Code command to open Visual Basic Editor window.

- Now, go to Insert tab > Module option.

- Copy the code below and paste it.
Sub ChangePivotTableDataSource()
    Dim ws As Worksheet
    Dim pt As PivotTable
    Dim newRange As String
    ' Set the worksheet containing the Pivot Table
    On Error Resume Next
    Set ws = ThisWorkbook.Worksheets("ChangeRange_with_VBA") ' Change "ChangeRange_with_VBA" to your sheet name
    On Error GoTo 0
    If ws Is Nothing Then
        MsgBox "Worksheet not found!", vbExclamation
        Exit Sub
    End If
    ' Set the Pivot Table
    On Error Resume Next
    Set pt = ws.PivotTables("PivotTable_1") ' Change "PivotTable_1" to your Pivot Table name
    On Error GoTo 0
    If pt Is Nothing Then
        MsgBox "Pivot Table not found!", vbExclamation
        Exit Sub
    End If
    ' Prompt the user for the new data source range
    newRange = InputBox("Enter the new data source range (e.g., A1:B100):")

    If newRange = "" Then
        MsgBox "New range cannot be empty!", vbExclamation
        Exit Sub
    End If
    ' Change the data source range
    pt.ChangePivotCache ThisWorkbook.PivotCaches.Create(SourceType:=xlDatabase, SourceData:=ws.Range(newRange))
End Sub
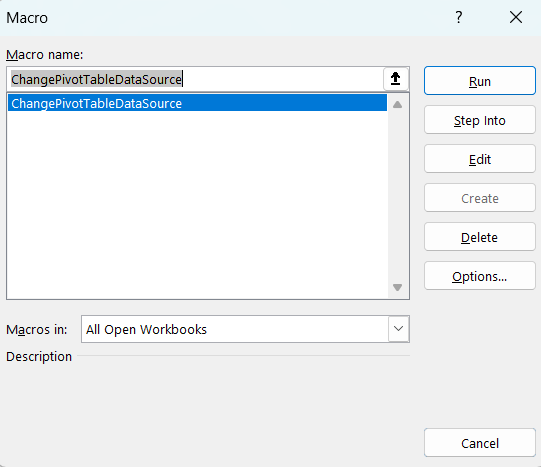
- Go back to the worksheet and press ALT+F8 to open the Macro dialog box. Then, select the code name and click on Run.

A dialog box will appear to enter the new range. - Enter the new range on the Mircosoft Excel dialog box and click OK.

Now add new data to the source data range and refresh your Pivot Table. You will see the change.

Conclusion
In this article, I have included 3 different methods to change the pivot table range in Excel. While you are working on large data, you can’t change your pivot table range manually. So, by following these ways, you can solve it in your own way and also learn to troubleshoot while using dynamic range. I hope this will be enough to change the pivot table range in Excel automatically.
Frequently Asked Questions
What is the shortcut key to open the change PivotTable Data Source?
The shortcut key to open the Change PivotTable Data Source dialog box directly in Excel is Alt+D+P+S. This allows you to quickly modify the data source for your Pivot Table.
How do I change the range of a Pivot Table without losing formatting?
To change the range of a Pivot Table without losing formatting in Excel:
- Select a cell within the Pivot Table.
- Go to the PivotTable Analyze tab.
- Click Change Data Source and adjust the range.
- Click OK to update the range while preserving formatting.
This allows you to expand or modify the data source of your Pivot Table without losing any applied formatting.
How do you find the range of a pivot table in Excel?
To find the range of a Pivot Table in Excel, follow these steps:
- Click anywhere within the Pivot Table to select it.
- Go to the PivotTable Analyze tab on the Excel ribbon.
- In the Data group, click on Change Data Source.
In the Change PivotTable Data Source dialog box, you’ll see the current range formula displayed in the Table/Range field. This field shows the data source range for the Pivot Table. By following these steps, you can easily identify the range of a Pivot Table, which is useful for understanding the data being used in your analysis.


